I was sitting on my couch, scrolling through endless “quick dessert” posts, when my roommate dared me: “Make something that’ll make me forget my name and keep me coming back for seconds.” I laughed, but the challenge lingered like a whisper of cinnamon in the air. The next afternoon I found myself knee‑deep in a mountain of apples, a jar of caramel that had been begging for a makeover, and a pantry full of oats that were practically screaming for a crunchy destiny. The kitchen turned into a battlefield of aromas—sharp green apple tang, buttery caramel sweetness, and that nostalgic, warm spice blend that makes you think of autumn evenings even in the middle of summer.
Picture this: the oven door swings open, a golden‑brown crust bubbling with caramel, the edges just beginning to pull away like a shy lover, and the scent of toasted oats mingling with caramelized apple slices that glisten like jewels. You can practically hear the faint crackle of the crust as it cools, and you can feel the buttery richness melt on the tip of your tongue even before the first bite. The texture is a symphony—soft, tender apple layers that give way to a caramel river, all crowned with a crunchy, buttery crumble that shatters with a satisfying snap. It’s the kind of dessert that turns a simple dinner into a celebration, and trust me, I’ve never been so excited to share a spoonful of something that feels like a hug from the inside.
Most caramel apple crisps out there either drown the apples in sauce, leaving you with a syrupy mess, or they skimp on the crumble, making the whole thing soggy and sad. I’ve been there—waiting for the crust to firm up only to find a mushy disappointment that feels more like a failed experiment than a dessert. That’s why I threw out the rule book and built this version from the ground up, layering flavors, textures, and a secret ingredient that turns the whole thing from “good” to “addicting.” Spoiler alert: the secret is a pinch of sea salt in the caramel, which creates a flavor contrast that makes every bite pop like fireworks on the Fourth of July.
And if you think that’s the only twist, hold onto your whisk. I’m about to reveal a technique that will make your caramel set just right—no grainy clumps, no burnt edges—by tempering it with a splash of heavy cream and a dash of vanilla at the perfect temperature. This method is the game‑changer that most recipes skip, and it’s what gives this crisp its glossy, velvety sauce that coats the apples like silk. Okay, ready for the game‑changer? Let me walk you through every single step — by the end, you’ll wonder how you ever made it any other way.
What Makes This Version Stand Out
- Flavor Explosion: The blend of sweet caramel, tart apples, and a whisper of sea salt creates a balanced taste that dances on the palate. The caramel isn’t just sweet; it’s buttery, slightly buttery, and the salt lifts every nuance.
- Texture Triumph: You get a buttery, crunchy crumble on top, a soft, juicy apple core, and a glossy caramel sauce that holds everything together. The contrast keeps every bite interesting.
- Simplicity Meets Sophistication: Only pantry staples and a few fresh ingredients are needed, yet the final result feels like something you’d order at a high‑end bakery.
- Unique Ingredient: A pinch of flaky sea salt in the caramel turns the sauce from ordinary to extraordinary, adding a depth you won’t find in standard recipes.
- Crowd‑Pleaser: I dare you to taste this and not go back for seconds. Even the most skeptical guests end up begging for the recipe.
- Ingredient Quality: Using firm, tart apples and high‑quality butter ensures the flavor shines without being overrun by sugar.
- Cooking Method Magic: The two‑stage bake—first the apples, then the crumble—prevents sogginess and guarantees a perfect crust every time.
- Make‑Ahead Potential: Assemble the crisp ahead of time, refrigerate, and bake when you’re ready. It’s perfect for busy weekdays or impromptu gatherings.
Inside the Ingredient List
The Flavor Base
Apples are the heart of this dish. I recommend using a mix of Granny Smith for tartness and Honeycrisp for natural sweetness; this combo ensures the fruit stays firm while still offering a juicy burst. If you skip the mix and go with only sweet apples, the caramel can overwhelm, and the crisp may turn soggy. A solid alternative is Pink Lady, which holds its shape well and adds a subtle honey note.
The Texture Crew
The crumble is a balanced trio of flour, oats, and butter. Flour provides structure, oats contribute chewiness, and butter lends richness. The ratio is crucial—too much butter and the crumble spreads like a pancake; too little and it crumbles into dust. If you’re dairy‑free, substitute with a solid coconut oil, but expect a hint of coconut aroma that can be surprisingly pleasant.
The Unexpected Star
Sea salt in the caramel is the secret weapon. It cuts through the sweetness and amplifies the butter flavor, making the sauce taste more complex. You might think a pinch is negligible, but that tiny crystal changes the entire flavor profile. If you’re salt‑sensitive, start with a 1/8 tsp and adjust to taste.
The Final Flourish
Vanilla extract adds a warm backdrop that ties the apple and caramel together. A splash of heavy cream in the caramel ensures a silky texture and prevents graininess. If you don’t have heavy cream, whole milk works, but the sauce will be slightly thinner.
Everything's prepped? Good. Let's get into the real action...
The Method — Step by Step
Preheat your oven to 350°F (175°C). While the oven warms up, line a 9‑inch square baking dish with parchment paper, leaving some overhang for easy removal later. This step ensures an even bake and prevents sticking, which is crucial for that perfect crust that lifts cleanly off the pan.
Kitchen Hack: Place the parchment paper over the dish, then gently press it down with a rolling pin so it adheres to the sides—this creates a snug “wall” that holds the crumble in place.Core and slice the apples into ¼‑inch thick wedges. Toss them in a bowl with 2 tbsp of flour, 1 tsp cinnamon, ¼ tsp nutmeg, and a pinch of salt. The flour helps the caramel cling while the spices infuse the fruit with warmth. If you love extra tartness, add a splash of lemon juice now; it brightens the overall flavor.
Spread the apple mixture evenly in the prepared dish, pressing gently so the slices lie flat but not overlapped. Drizzle the store‑bought caramel sauce (or homemade, see tip below) over the apples, using a spatula to swirl it into a glossy river. This is the moment of truth—if the caramel pools in one spot, you’ll get uneven sweetness.
In a separate bowl, combine 2 cups flour, 1 cup rolled oats, ½ cup brown sugar, ½ cup granulated sugar, 1 tsp cinnamon, ½ tsp salt, and the optional ¼ cup chopped pecans. Toss everything together so the dry ingredients are evenly distributed. The sugars will caramelize during baking, adding depth to the crumble.
Now the butter: Cut 1 cup (2 sticks) cold, unsalted butter into ½‑inch cubes. Using a pastry cutter or your fingertips, work the butter into the dry mixture until it resembles coarse crumbs with some pea‑size pieces. This is where the magic happens—those butter pockets melt during baking, creating a flaky, melt‑in‑your‑mouth texture.
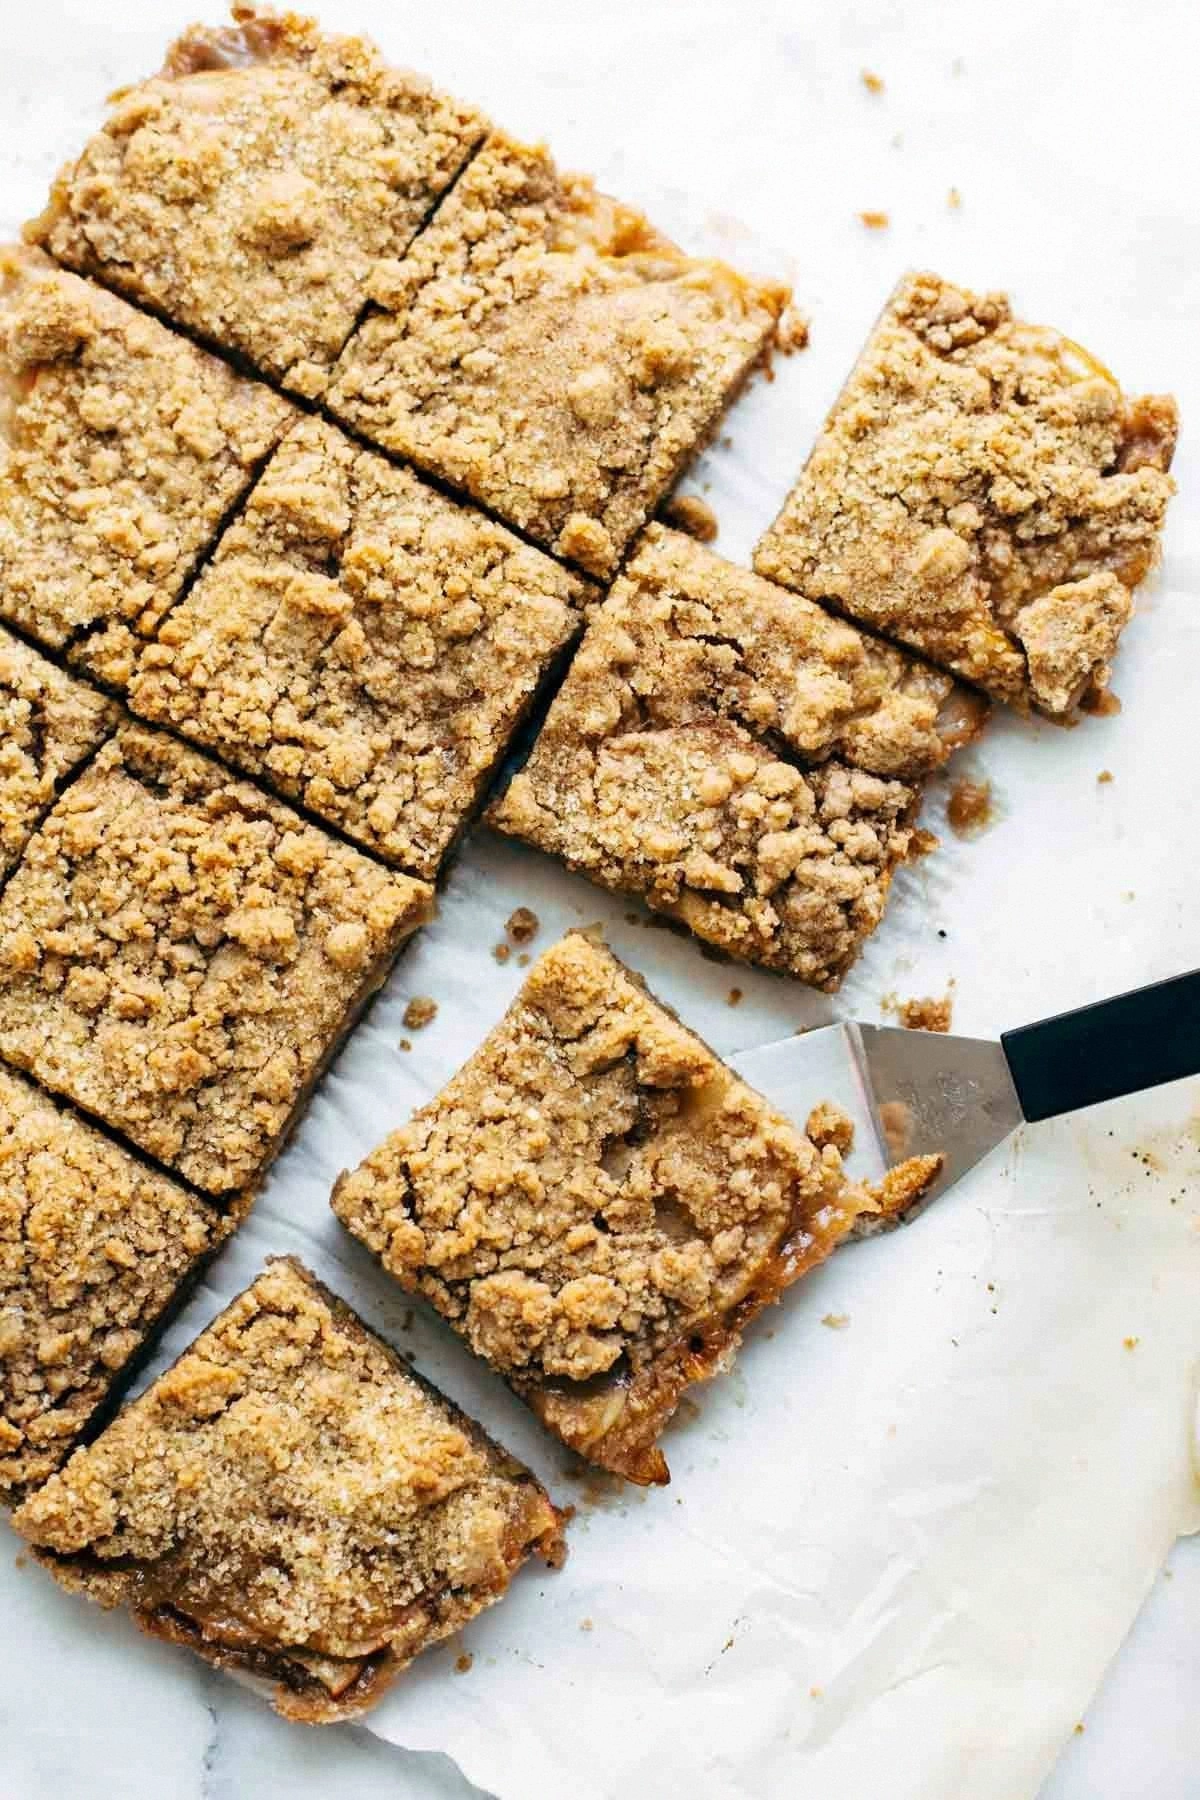
Watch Out: Over‑mixing the butter can turn the crumble into a dough, resulting in a dense, cakey topping rather than a light, crisp one.Evenly sprinkle the crumble over the caramel‑apple layer, making sure to cover the entire surface. The crumble should be about ¼‑inch thick; if it’s too thin, the edges will burn, and if too thick, the center stays soggy. Press lightly with the back of a spoon to embed it just a tad into the caramel.
Slide the dish into the preheated oven and bake for 30 minutes. About halfway through, rotate the pan for even browning. The aroma should start to fill your kitchen, a sweet, buttery perfume that signals the crust is turning golden and the apples are bubbling gently.
After 30 minutes, check the edges—they should be deep amber and beginning to pull away from the sides of the pan. If the top isn’t as brown as you’d like, switch to broil for 1‑2 minutes, watching closely to avoid burning. Let the crisp rest for 10 minutes before cutting; this allows the caramel to set and the crumble to firm up, giving you clean, beautiful slices.
That's it — you did it. But hold on, I've got a few more tricks that'll take this to another level...
Insider Tricks for Flawless Results
The Temperature Rule Nobody Follows
Never bake a crisp at a temperature lower than 350°F. Lower temps cause the apples to release too much moisture, making the crumble soggy. I once tried 325°F for a “gentle bake” and ended up with a mushy mess—lesson learned. Keep the oven hot, and the crust will set quickly, sealing in the juices.
Why Your Nose Knows Best
When the caramel starts to bubble and you catch a faint toasty scent, you’re at the sweet spot. Trust your nose more than the timer. If you hear a faint crackle, that means the sugars are caramelizing nicely. Over‑baking will produce a burnt aroma—stop the bake the moment you hear that gentle pop.
The 5‑Minute Rest That Changes Everything
Allowing the crisp to sit for five minutes after it comes out of the oven lets the caramel thicken just enough to hold its shape. Skipping this rest results in a runny sauce that slides off the plate. I’ve seen newbies cut straight away, only to watch the caramel ooze everywhere—don’t be that person.
Butter Temperature Trick
Cold butter is essential for a flaky crumble, but after cutting it into the dry mix, let the bowl sit for 2 minutes before baking. This brief pause lets the butter chill again, ensuring those little pockets stay solid until they hit the oven heat.
Layering for Maximum Flavor
Instead of just drizzling caramel on top, I swirl it through the apple layer and then add a thin drizzle on the crumble right before baking. This double‑coating creates a caramel glaze that seeps into the crumble, giving every bite a sweet‑salty burst.
Creative Twists and Variations
This recipe is a playground. Here are some of my favorite ways to switch things up:
Maple Bacon Bliss
Swap half the brown sugar for pure maple syrup and fold in ½ cup crisp‑cooked bacon bits. The smoky saltiness pairs beautifully with the caramel, turning the crisp into a sweet‑savory masterpiece.
Apple‑Pear Fusion
Replace two of the four apples with firm Bartlett pears. Pears add a buttery texture and a subtle floral note that elevates the flavor complexity without overpowering the caramel.
Nutty Crunch
Add ¼ cup toasted almond slivers to the crumble for an extra crunch and a nutty aroma. Almonds toast quickly, so keep an eye on them to avoid bitterness.
Spiced Rum Drizzle
Stir 1 tbsp dark spiced rum into the caramel before pouring it over the apples. The rum adds depth, a hint of warmth, and an adult‑only twist that’s perfect for holiday gatherings.
Vegan Velvet
Replace butter with a solid coconut oil and use maple syrup instead of caramel (plus a splash of vanilla). The result is a vegan‑friendly crisp that still boasts that luscious caramel‑like sheen.
Chocolate Chip Surprise
Fold ¼ cup mini dark chocolate chips into the crumble for pockets of molten chocolate that melt into the caramel as it bakes. The bittersweet contrast is an instant crowd‑pleaser.
Storing and Bringing It Back to Life
Fridge Storage
Cover the cooled crisp tightly with plastic wrap or store in an airtight container. It will keep fresh for up to 4 days. Reheat individual slices in the microwave for 30‑45 seconds, or warm the whole dish at 300°F for 10 minutes.
Freezer Friendly
Slice the crisp, then lay the pieces on a parchment‑lined tray and freeze until solid. Transfer the frozen slices to a zip‑top bag; they’ll last for up to 2 months. To serve, bake frozen slices at 350°F for 15‑20 minutes, or microwave for 1 minute, adding a splash of water to revive the caramel.
Best Reheating Method
For the ultimate texture, reheat in a preheated oven at 325°F for 10 minutes, then finish under the broiler for 1 minute to restore that crisp top. Before reheating, drizzle a tiny splash of water over the surface; the steam helps the caramel regain its glossy sheen.