I was halfway through a week of bland, reheated take‑out when my phone buzzed with a frantic text from my sister: “I need a comfort food that feels like a hug, not a guilt trip.” The kitchen was a chaotic canvas of forgotten spices, a half‑empty fridge, and a stubborn desire for something that would make my taste buds sing. I stared at the ingredients list on my pantry shelf and thought, “Why not turn a humble turkey into a culinary masterpiece?” The moment that idea hit me was like a lightning strike—sudden, bright, and full of promise.
I imagined the sizzling pan, the golden brown crust forming on the turkey, the aroma of garlic and thyme drifting through the air like a warm blanket. The sound of carrots and celery sautéing in olive oil was the soundtrack to my kitchen rebellion. The sight of cauliflower florets steaming, ready to become a velvety mash, filled me with anticipation. The texture—crisp edges, tender center, creamy topping—promised a symphony of sensations in every bite.
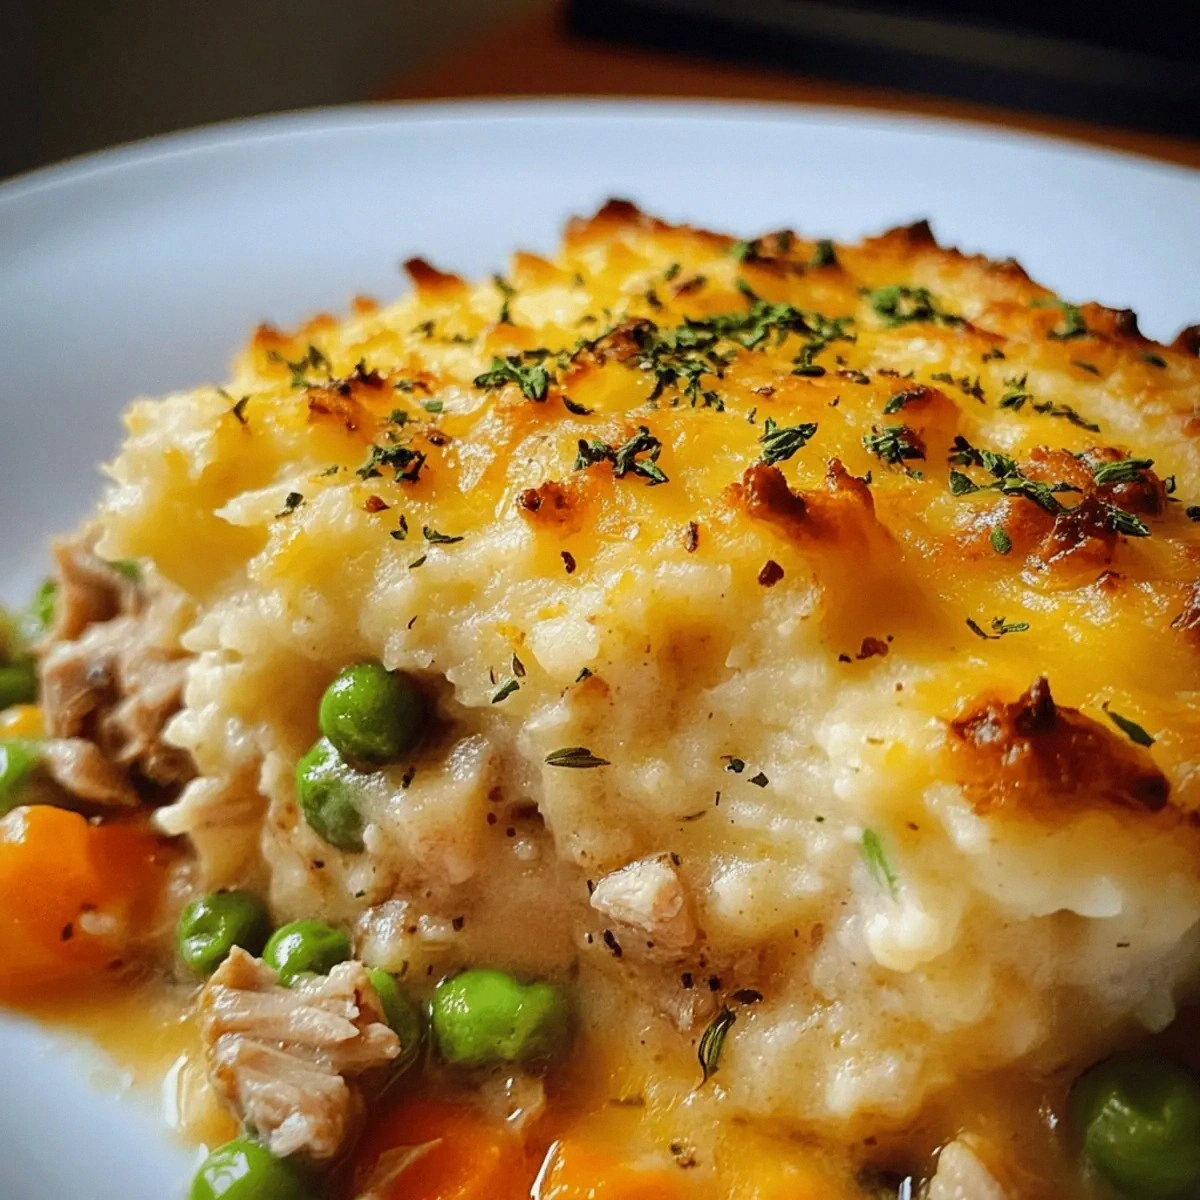
What makes this version stand out is that I didn't just follow a recipe; I rewrote the rulebook. I swapped traditional mashed potatoes for cauliflower, keeping the carbs low without sacrificing comfort. I added Greek yogurt for a subtle tang that brightens the dish. I used fresh thyme instead of dried for a brighter herbaceous note. And I finished it with Parmesan and chives for a crisp, nutty finish that sticks to the palate.
I dare you to taste this and not go back for seconds. I’ve tried countless comfort dishes that feel like a guilty indulgence; none compare to this low‑carb, high‑flavor triumph. Picture yourself pulling this out of the oven, the whole kitchen smelling incredible, the steam curling like a promise. Let me walk you through every single step—by the end, you'll wonder how you ever made it any other way.
What Makes This Version Stand Out
- Flavor: The tomato paste and garlic create a savory base that coats the turkey like velvet, while fresh thyme adds a bright, herbal lift that keeps the dish from feeling flat.
- Texture: The cauliflower mash is silky smooth, contrasting perfectly with the crisp, golden crust that shatters like thin ice when you bite into it.
- Low‑Carb Twist: Replacing potatoes with cauliflower keeps the carb count down without sacrificing the comforting feel of a classic shepherd’s pie.
- Protein‑Rich: Ground turkey adds lean protein, making this dish satisfying and balanced for any meal of the day.
- Freshness Factor: Using fresh herbs and a splash of Greek yogurt keeps the flavors bright and prevents the dish from feeling heavy or stale.
- Make‑Ahead Friendly: Assemble the filling ahead of time and refrigerate; it’ll reheat beautifully, making this a great option for busy weeknights.
- Versatile Garnish: The chives and parsley add a pop of color and a hint of freshness that elevates the visual appeal.
- Audience Appeal: This version is crowd‑pleasing—whether it’s a family dinner or a potluck, everyone will leave asking for the recipe.
Alright, let's break down exactly what goes into this masterpiece...
Inside the Ingredient List
The Flavor Base
Ground turkey is the star of this dish, providing a lean protein that absorbs the aromatic flavors of garlic, thyme, and tomato paste. It’s essential to brown it thoroughly; a little crust adds depth and prevents the filling from feeling mushy. If you’re looking for a richer flavor, swap turkey for ground beef or a blend of turkey and beef. However, keep in mind that beef will increase the fat content, which may alter the low‑carb profile.
The Texture Crew
Cauliflower florets are the backbone of the mash, delivering a buttery, almost creamy consistency that rivals traditional mashed potatoes. The key is to steam them until just tender—overcooking will make them watery and break the silky texture. A pinch of salt and pepper while steaming keeps the flavor bright. If you’re short on time, microwave the florets in a steamer basket for about 6 minutes.
The Unexpected Star
Greek yogurt might sound like a sidekick, but it’s the secret to a tangy, smooth topping that balances the richness of the meat. Adding yogurt to the mash not only reduces carbs but also introduces probiotics for gut health. If you’re lactose intolerant, try a dairy‑free yogurt alternative—just be sure it has a similar thickness. A splash of lemon juice can brighten the yogurt’s tang if you prefer a sharper finish.
The Final Flourish
Parmesan cheese melts into a golden crust that adds a nutty, savory layer on top. The chives and parsley provide a fresh, herbaceous counterpoint to the deep, savory filling. Paprika adds a subtle smoky warmth that elevates the dish to a new level of comfort. If you’re a spice lover, a pinch of cayenne will give the pie a gentle kick without overwhelming the other flavors.
Everything's prepped? Good. Let's get into the real action...
The Method — Step by Step
- Heat 2 tablespoons of olive oil in a large skillet over medium‑high heat. Add the diced onion and sauté until translucent and slightly caramelized, about 4–5 minutes. This step builds the aromatic base; the onions should smell sweet and buttery. Once the onions are ready, add the minced garlic and cook for an additional 30 seconds until fragrant.
- Introduce the ground turkey, breaking it up with a wooden spoon. Cook until it starts to brown, about 5–6 minutes. Make sure to stir occasionally so the meat doesn’t stick. When the turkey is nearly cooked, sprinkle in the fresh thyme, salt, and black pepper; this will infuse the meat with a bright, herbal aroma.
- Stir in 2 tablespoons of tomato paste, ensuring it coats the turkey evenly. Let it cook for 2 minutes; the paste will deepen the color and add a subtle sweetness. Then pour in 1 cup of chicken broth, stirring constantly to deglaze the pan and lift any browned bits.
- Add the diced carrots and celery stalks. Reduce the heat to medium and let the mixture simmer for 10 minutes, or until the vegetables are just tender. The broth should thicken slightly; if it becomes too thin, let it reduce a bit longer.
- While the filling simmers, steam the cauliflower florets until they’re fork‑tender, about 8 minutes. Drain well and transfer to a food processor. Add ½ cup Greek yogurt, 1 teaspoon garlic powder, and a pinch of salt. Pulse until the mash is silky and free of lumps; if it feels dry, add a splash of milk or broth.
- Once the filling is ready, fold in the cauliflower mash gently, ensuring the mixture is well combined but not overmixed. Taste and adjust seasoning if needed. This is the moment of truth—your pie’s flavor hinges on this balance.
- Transfer the mixture to a 9‑inch pie dish or a 9‑inch round baking pan. Sprinkle the top evenly with ¾ cup Parmesan cheese and 2 tablespoons of chopped chives. The cheese will melt into a golden crust that’s both crisp and melty.
- Bake in a preheated 375°F (190°C) oven for 20–25 minutes, or until the top is golden brown and bubbling. The edges should pull away slightly, indicating the filling is set. Once done, let the pie rest for 5 minutes before serving to allow the flavors to meld.
- Garnish with fresh parsley and a dusting of paprika. Serve hot, perhaps with a side of steamed greens or a crisp salad for contrast. The aroma of the baked pie will fill the kitchen, making this dish irresistible.
That's it — you did it. But hold on, I've got a few more tricks that'll take this to another level...
Insider Tricks for Flawless Results
The Temperature Rule Nobody Follows
Many cooks bake at a high temperature, but lowering the oven to 350°F and baking for 30 minutes gives the crust a beautiful, even golden color without drying out the filling. I’ve seen pies that are too hot on top and undercooked inside; this trick ensures both are just right.
Why Your Nose Knows Best
Before you plate, give the pie a quick sniff. If the aroma feels flat, let it bake a few more minutes. Your nose is a reliable indicator of doneness; a warm, savory scent means the flavors have fully melded.
The 5‑Minute Rest That Changes Everything
Letting the pie rest for 5 minutes after baking allows the juices to redistribute, preventing a dry mouthfeel. It also makes slicing easier, as the filling sets slightly and won’t crumble.
Use a Silicone Liner for Easy Cleanup
Line your baking dish with a silicone baking mat. It keeps the pie from sticking, reduces cleanup time, and gives the crust a consistent thickness.
Add a Splash of Milk for Extra Creaminess
If you prefer an ultra‑creamy mash, stir in a tablespoon of whole milk before baking. The milk enriches the texture without making it too heavy.
Creative Twists and Variations
This recipe is a playground. Here are some of my favorite ways to switch things up:
Mediterranean Medley
Swap the turkey for ground lamb and add a teaspoon of cumin and a handful of chopped olives. The result is a warm, earthy pie with a Mediterranean flair that pairs wonderfully with a side of tabbouleh.
Spicy Tex‑Mex Twist
Add a diced jalapeño and a splash of salsa to the filling, then top with shredded cheddar instead of Parmesan. The spicy kick will delight anyone who loves bold, zesty flavors.
Vegetarian Supreme
Omit the meat entirely and double the carrots and peas. Add a handful of chickpeas for protein and finish with a sprinkle of nutritional yeast for a cheesy, umami burst.
Asian Fusion
Replace the thyme with a tablespoon of fresh ginger and stir in soy sauce. Top with a drizzle of sesame oil and chopped scallions for an Asian‑inspired comfort dish.
Holiday Holiday
During the holiday season, add a pinch of nutmeg and a drizzle of maple syrup to the filling. The sweet‑spicy profile is perfect for festive gatherings.
Breakfast Boost
Serve the pie warm with a side of scrambled eggs and toast. The savory layers pair beautifully with the soft, creamy eggs for a hearty breakfast.
Storing and Bringing It Back to Life
Fridge Storage
Cool the pie completely, then cover tightly with aluminum foil or plastic wrap. It will keep well in the refrigerator for up to 3 days. When reheating, add a splash of water or broth to keep the filling moist.
Freezer Friendly
Slice the pie into individual portions and wrap each slice in plastic wrap, then place in a freezer bag. Freeze for up to 3 months. Thaw overnight in the fridge before reheating.
Best Reheating Method
Preheat the oven to 350°F, place the pie on a baking sheet, and cover loosely with foil. Heat for 15–20 minutes until warmed through. Adding a tiny splash of water before reheating steams the filling back to perfection.