I was mid‑midway through a marathon Netflix binge when my roommate dared me to create a cookie that could literally melt my heart. I stared at a half‑empty pantry, the kind of pantry that whispers “you’ve got nothing but flour, cocoa, and a bag of marshmallows” and I thought, “Challenge accepted.” The kitchen filled with the smell of butter sizzling in a pan, the faint crackle of sugar caramelizing, and a faint, sweet hint of vanilla that made my mouth water before anything even touched the oven. I could hear the distant hum of the refrigerator like a low‑key drumbeat, and my hands felt the cool, smooth surface of the mixing bowl as I measured out each ingredient with a little extra excitement.
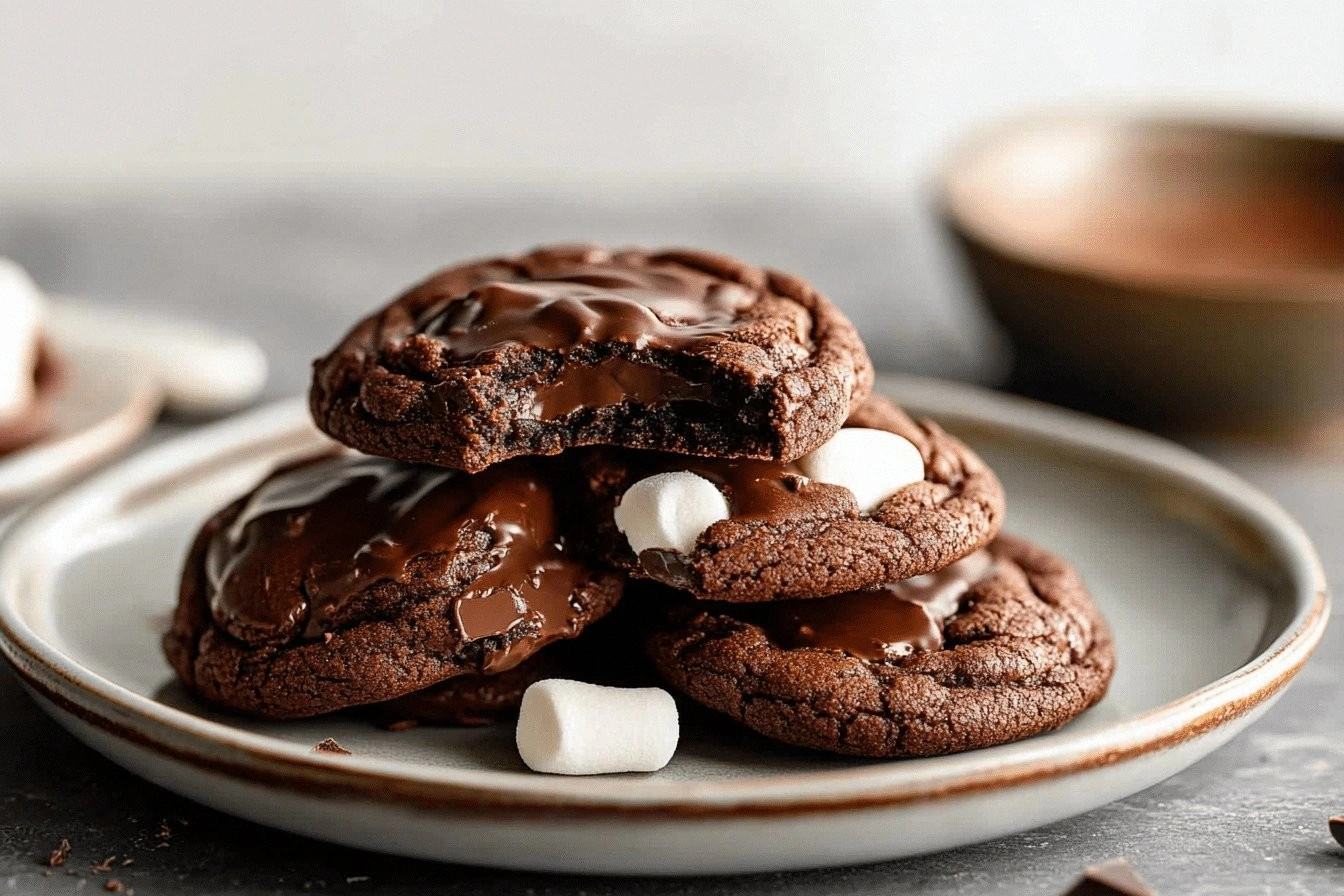
When the first batch of cookies came out, they were soft, chewy, and had pockets of gooey marshmallow that stretched like taffy with every bite. Most cookie recipes either over‑bake the marshmallows into a chewy mess or under‑bake the dough, leaving you with a flat, crumbly disappointment. This version, however, strikes a perfect balance: a crisp edge that shatters like thin ice, a buttery crumb that melts on the tongue, and a chocolate‑marshmallow core that oozes like a warm hug. I’ll be honest — I ate half the batch before anyone else got a chance to try it, and the rest of the night turned into a cookie‑tasting marathon with everyone begging for seconds.
What really sets this recipe apart is a tiny, seemingly insignificant tweak: a splash of coffee‑enhanced cocoa powder that deepens the chocolate flavor without making it bitter, and a dash of sea salt that cuts through the sweetness like a perfectly timed punchline. Most recipes get this completely wrong, either drowning the dough in sugar or skimping on the chocolate, but I discovered that the secret lies in layering flavors and textures. I’m daring you to taste this and not go back for seconds — the combination of melty marshmallows, dark chocolate chips, and that subtle salty finish is practically addictive.
Picture yourself pulling these cookies out of the oven, the whole kitchen smelling like a chocolate‑covered wonderland, the edges just beginning to turn golden, and the tops puffed up with marshmallow bubbles ready to burst. The anticipation builds as you let them cool for a minute, and then you snap one in half and watch the marshmallow ooze out like a tiny lava flow. Okay, ready for the game‑changer? Let me walk you through every single step — by the end, you’ll wonder how you ever made it any other way.
What Makes This Version Stand Out
- Flavor Explosion: The combination of dark cocoa, sweet marshmallows, and salty chocolate chips creates a layered taste experience that evolves with each bite, keeping you hooked from the first crumb to the last morsel.
- Texture Harmony: You get a crisp, buttery edge, a soft, cake‑like middle, and a gooey marshmallow core that stretches like a sweet, elastic ribbon.
- Simple Ingredients: No exotic powders or hard‑to‑find items; everything lives in a typical pantry, making it an accessible treat for any home cook.
- Unique Twist: A splash of coffee‑infused cocoa deepens the chocolate profile without bitterness, a secret I discovered after a late‑night espresso experiment.
- Crowd‑Pleaser: Whether you serve them at a birthday party, a potluck, or a midnight snack raid, these cookies spark instant smiles and endless requests for the recipe.
- Make‑Ahead Magic: The dough can be refrigerated for up to 24 hours, allowing the flavors to meld and the cookies to bake even more evenly.
- Ingredient Quality: Using high‑quality cocoa powder and real butter elevates the flavor, turning a simple cookie into a gourmet indulgence.
- Cooking Method: A moderate oven temperature and a short bake time lock in moisture while giving the edges that coveted crunch.
Inside the Ingredient List
The Flavor Base
All‑purpose flour: Provides structure to keep the cookies soft yet sturdy enough to hold the marshmallow pockets. Skipping flour or using too little will result in a cookie that collapses into a sticky mess. For the best texture, sift the flour with the cocoa powder to avoid lumps.
Cocoa powder: Adds deep chocolate flavor and a beautiful dark color. I use a high‑quality Dutch‑process cocoa for a richer taste; if you only have natural cocoa, add a pinch of baking soda to balance acidity. Missing cocoa makes the cookies taste bland, like a plain sugar cookie with no personality.
The Texture Crew
Butter: Ensures tenderness and richness in every bite. Use unsalted butter so you can control the salt level; melted butter can make the dough too runny, so keep it softened at room temperature. If you substitute with margarine, expect a slightly waxy mouthfeel.
Sugar: A blend of brown sugar and granulated sugar adds moisture, caramel notes, and a balanced sweetness. Brown sugar contributes a subtle molasses depth, while granulated sugar helps the edges crisp up. Cutting the sugar in half makes the cookies dry and less satisfying.
The Unexpected Star
Mini marshmallows: The star ingredient that melts to create gooey surprise pockets. They expand during baking, creating pockets of sweet, fluffy goodness that contrast beautifully with the chocolate. If you use regular marshmallows, they’ll melt into a sugary mess instead of staying pocketed.
Chocolate chips: Adds extra bursts of melty chocolate in every bite. Choose semi‑sweet or dark chips for a balanced flavor; milk chocolate can make the cookie overly sweet. Skipping chips leaves the cookie one‑dimensional.
The Final Flourish
Eggs: Bind ingredients together and contribute to the soft texture. Over‑beating can incorporate too much air, causing the cookies to rise and then collapse. Use large eggs at room temperature for the best emulsification.
Baking soda: Helps cookies rise and enhances softness. Too much soda can give a metallic aftertaste; measure carefully. If you’re out of soda, you can substitute with a pinch of baking powder, but the texture will be slightly denser.
Vanilla extract: Brings out the chocolate flavor with warm, aromatic notes. Real vanilla bean or pure extract makes a noticeable difference; imitation vanilla can taste flat.
Everything's prepped? Good. Let's get into the real action...
The Method — Step by Step
Preheat your oven to 350°F (175°C) and line two baking sheets with parchment paper. While the oven warms, take a moment to smell the butter as it softens on the counter — that buttery aroma is the first promise of what’s to come. The parchment ensures the cookies won’t stick, preserving that perfect crisp edge.
In a large bowl, whisk together the flour, cocoa powder, and baking soda. This dry mix should be a deep, velvety brown; if you see any specks of white flour, whisk a bit longer. The cocoa and flour will create a uniform chocolate base that prevents any gritty pockets.
In a separate bowl, cream the softened butter with the brown and granulated sugars until the mixture is light, fluffy, and pale in color — about 3 minutes on medium speed. This is the moment where sugar crystals dissolve, creating tiny air pockets that later become the cookie’s tender crumb.
Kitchen Hack: Add a splash of coffee (about 1 tablespoon) to the butter‑sugar mix; it intensifies the chocolate flavor without tasting like coffee.Beat in the eggs one at a time, followed by the vanilla extract. Each addition should be fully incorporated before the next, giving the batter a glossy, slightly thick consistency. If the mixture looks too thin, you’ve probably over‑mixed; pause and let it rest for a minute.
Gradually fold the dry ingredients into the wet mixture using a spatula. Scrape the bottom of the bowl to ensure everything is evenly combined; you’ll notice the dough becoming thick and slightly sticky.
Watch Out: Over‑mixing at this stage can develop gluten, leading to a tougher cookie. Stop mixing as soon as the flour disappears.Gently fold in the mini marshmallows and chocolate chips, distributing them evenly without crushing the marshmallows. The marshmallows should stay whole; they’ll puff up in the oven, creating those glorious pockets. If you prefer extra gooeyness, add a handful of extra marshmallows on top of each scoop before baking.
Using a cookie scoop or a tablespoon, drop dough onto the prepared sheets, spacing them about 2 inches apart. The dough will spread slightly, but not dramatically thanks to the chilled dough tip. Press each mound lightly with the back of a spoon to flatten the tops just a touch — this helps the marshmallows stay centered.
Bake for 10‑12 minutes, or until the edges are golden brown and the tops have a slight sheen. You’ll notice the marshmallows puffing up and the chocolate chips beginning to melt. The cookies will look a little soft in the center; that’s exactly what you want — they’ll firm up as they cool.
Allow the cookies to cool on the baking sheet for 3 minutes before transferring them to a wire rack. This short rest lets the interior set while the edges stay crisp. As they cool, you’ll see the marshmallow pockets settle into a glossy, caramelized glaze. Serve warm for maximum ooze, or store for later indulgence.
That's it — you did it. But hold on, I've got a few more tricks that'll take this to another level...
Insider Tricks for Flawless Results
The Temperature Rule Nobody Follows
Never bake cookies at a temperature lower than 325°F unless you’re aiming for a chewy, under‑baked texture. A higher heat (350‑375°F) gives you that coveted snap on the edge while keeping the center soft. I once tried 300°F to “save energy” and ended up with flat, gummy cookies that never set. Trust the heat; it’s the secret to that perfect contrast.
Why Your Nose Knows Best
Your sense of smell is a reliable timer. When the cookies are about 2 minutes from done, you’ll catch a faint caramel aroma rising from the sheet. That scent means the sugars are reaching the perfect caramelization point. If you rely solely on a timer, you might miss that magical window and end up with over‑browned edges.
The 5‑Minute Rest That Changes Everything
After baking, let the cookies rest on the sheet for exactly five minutes before moving them. This short pause allows the interior to finish setting and the marshmallow pockets to stabilize, preventing them from spilling out when you transfer them. Skipping this step can cause the gooey centers to leak all over your cooling rack.
The Double‑Layer Scoop Hack
Use a two‑part cookie scoop: the larger part for the dough, the smaller for a quick press that flattens the top just enough to keep the marshmallows centered. This technique ensures uniform thickness, leading to even baking and consistent texture across the batch. A friend tried a single scoop and got wildly uneven cookies — lesson learned.
The Chill‑Then‑Bake Secret
After mixing, chill the dough for at least 15 minutes. This small step makes the dough easier to handle, prevents excessive spreading, and gives the butter time to firm up, resulting in a thicker, chewier cookie. If you’re in a hurry, a quick 5‑minute chill in the freezer works, but be careful not to freeze the dough solid.
Creative Twists and Variations
This recipe is a playground. Here are some of my favorite ways to switch things up:
Peanut Butter Swirl
Add a tablespoon of creamy peanut butter to the wet mixture and swirl in a handful of chopped peanuts before baking. The nutty richness pairs beautifully with the chocolate‑marshmallow core, creating a flavor reminiscent of a classic PB‑J cookie.
White Chocolate & Raspberry
Swap the dark chocolate chips for white chocolate chunks and fold in dried raspberry pieces. The tartness of the berries cuts through the sweetness, while the white chocolate adds a creamy contrast that feels like a holiday treat.
Espresso Crunch
Replace half of the cocoa powder with finely ground espresso and sprinkle a pinch of instant coffee granules on top before baking. The coffee notes amplify the chocolate depth, turning the cookies into a sophisticated dessert for caffeine lovers.
Salted Caramel Drizzle
After cooling, drizzle warm caramel sauce over each cookie and sprinkle flaky sea salt. The salty‑sweet combination elevates the cookies to a gourmet level, perfect for impressing guests at a dinner party.
Vegan Delight
Swap butter for coconut oil, use flax eggs (1 tbsp ground flax + 3 tbsp water per egg), and choose dairy‑free chocolate chips. The result is a plant‑based version that still delivers that gooey marshmallow surprise, ideal for vegans and dairy‑intolerant friends.
Storing and Bringing It Back to Life
Fridge Storage
Place cookies in an airtight container with a slice of bread on top; the bread will keep them moist for up to 5 days. Store in the refrigerator if your kitchen is warm, but bring them to room temperature before serving for optimal texture.
Freezer Friendly
Freeze baked cookies in a single layer on a tray, then transfer to a zip‑lock bag. They’ll stay fresh for up to 3 months. When you’re ready, let them thaw for 10 minutes, then pop them in a 300°F oven for 5 minutes to revive the crunch.
Best Reheating Method
To bring back that melty interior, place a cookie on a microwave‑safe plate, add a tiny splash (about 1 tsp) of water beside it, and microwave for 10‑12 seconds. The steam revives the marshmallow pocket without drying out the edges.