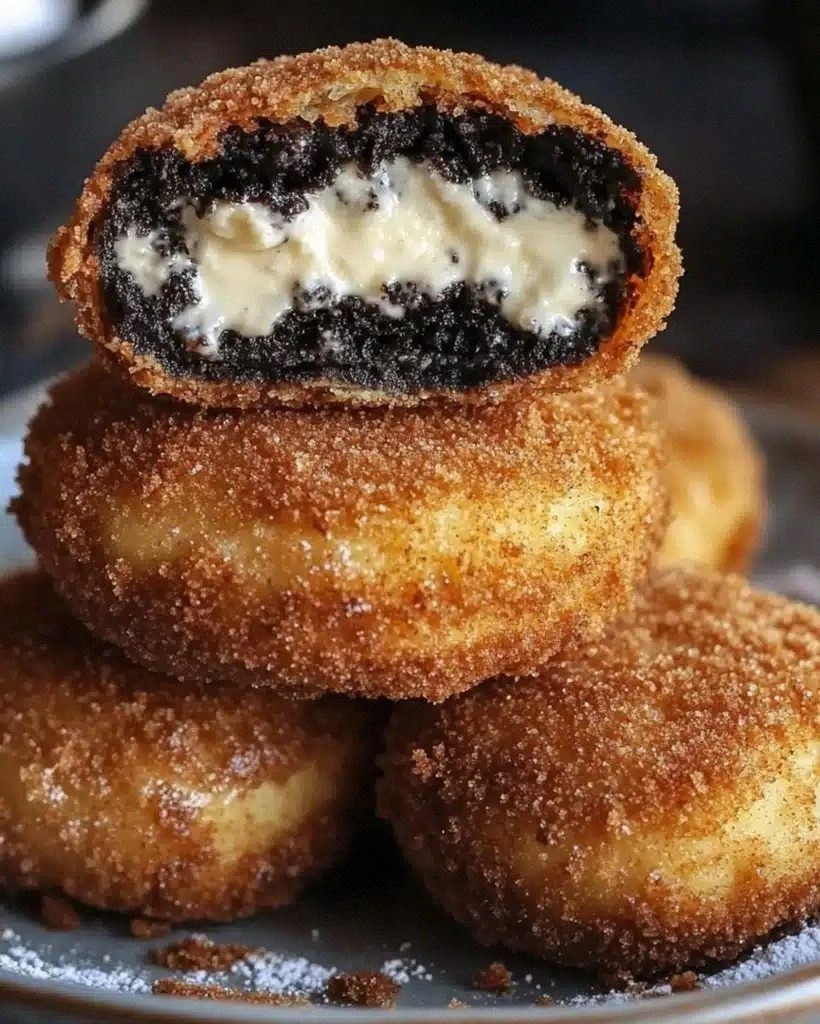
I still remember the night I accidentally created the most ridiculous dessert on the planet. It was 2:47 a.m., I was wearing my roommate's oversized "Taco Tuesday" hoodie, and I had exactly three ingredients on my counter: a half-eaten package of Oreos, some cream cheese that was dangerously close to expiring, and a bottle of vegetable oil I'd bought for a stir-fry I never made. My original plan? Just stuff the Oreos with cream cheese and call it a night. But then I spotted the flour on the top shelf and thought, "What if I could make these taste like cheesecake... then deep-fry them?" The first batch emerged from the oil looking like golden nuggets of pure sin, and when I bit into one, the outside shattered like thin caramelized sugar while the inside revealed this molten cookies-and-cream center that tasted exactly like the best cheesecake I'd ever had, only better because it was wrapped around America's favorite cookie.
That first bite was a religious experience. The hot cream cheese mixture had melded with the Oreo filling, creating this marbled vanilla-chocolate swirl that stayed gooey even after cooling. The cookie itself had softened just enough to feel like cake, while the batter coating provided this incredible textural contrast that made me close my eyes and actually say "oh my god" out loud to an empty kitchen. I ate six of them standing over the counter, burning my tongue because I couldn't wait for them to cool, and then immediately texted my best friend: "I just invented something illegal. You need to come over right now." She showed up in pajamas, took one bite, and her eyes went so wide I thought they might fall out of her head.
Here's what makes this recipe absolutely bonkers: it takes everything you love about cheesecake — the tangy cream cheese, the vanilla notes, the cookie crust — and compresses it into a two-bite explosion that's been deep-fried to golden perfection. Most recipes try to fancy up desserts with weird ingredients or complicated techniques, but this one works because it embraces the chaos. We're not trying to be elegant here; we're trying to create something that makes grown adults make involuntary happy noises. The secret isn't in some molecular gastronomy trick — it's in the way the hot oil transforms familiar ingredients into something completely new and utterly addictive.
I dare you to taste this and not go back for seconds. Actually, I dare you to make it through the first batch without eating at least half of them while they're still too hot to handle. I've made this for backyard barbecues where people lined up like I was selling concert tickets, for game nights where grown men fought over the last one, and for family dinners where my health-conscious aunt asked for the recipe while licking powdered sugar off her fingers. Picture yourself pulling these out of the oil, the whole kitchen smelling like a carnival met a bakery and had beautiful delicious babies, and tell me you wouldn't be the most popular person at any gathering. Let me walk you through every single step — by the end, you'll wonder how you ever made it any other way.
What Makes This Version Stand Out
Taste Explosion: This isn't just deep-fried Oreos with some cream cheese slapped on top. The cheesecake filling actually gets folded into the batter, creating these pockets of tangy vanilla that burst when you bite down. Every mouthful has the perfect balance of chocolate cookie, sweet cream filling, and that distinctive cheesecake tang that makes your taste buds do a happy dance.
Texture Paradise: We're talking about a crispy shell that crackles like the top of a crème brûlée, giving way to a soft cookie that tastes like it's been soaking in milk, all wrapped around a molten center that defies physics by being both creamy and fluffy at the same time. The contrast between the crunchy exterior and the almost-liquid interior is what separates this from every other fried dessert you've ever had.
Stupidly Simple: Most deep-frying projects require candy thermometers and nervous hovering over hot oil. Not this one. The batter comes together in one bowl, the oil temperature is forgiving, and the whole process takes less time than ordering takeout. I've made these at 3 a.m. in a barely-functioning kitchen with one working burner and a pot that probably wasn't meant for frying.
Unexpected Genius: While everyone expects you to just dip Oreos in pancake batter (boring), this recipe creates an actual cheesecake mixture that gets partially frozen before frying. This means when you bite in, you get real cheesecake texture, not just cream cheese flavor. It's the difference between grape-flavored candy and an actual grape.
Crowd Psychology: Bring these to any gathering and watch what happens. People who claim they "don't really like sweets" will eat three. The person who said they were on a diet will ask for the recipe while licking sugar off their fingers. Children will form orderly lines. Adults will fight over the last one like it's the last lifeboat on the Titanic.
Quality Control: This recipe works with any Oreo variety, but it absolutely sings with the classic version. The filling-to-cookie ratio is scientifically perfect for achieving that cheesecake texture. I've tried this with Double Stuf, and while they're good, they get almost too rich. The original Oreo has just enough filling to create magic without going overboard.
Make-Ahead Magic: You can prep these up to the frying step and keep them frozen for a month. Having a stash in your freezer means you're always 90 seconds away from being the most popular person at any impromptu gathering. I've pulled these out at 1 a.m. during study sessions, at beach picnics from a cooler, and at office parties where they disappeared before I could explain what they were.
Alright, let's break down exactly what goes into this masterpiece...
Inside the Ingredient List
The Flavor Base
The cream cheese is obviously the star here, but not all cream cheese is created equal. You want the full-fat block, not the whipped stuff in the tub. The block has less air incorporated, which means it'll melt into that perfect cheesecake texture instead of turning into a sad puddle. Let it come to room temperature before mixing — cold cream cheese will fight you like a stubborn toddler, creating lumps that no amount of mixing will smooth out. If you're in a rush, cut it into small cubes and microwave for 10 seconds at a time, but don't let it melt or you'll lose that tangy bite that makes cheesecake taste like cheesecake.
Powdered sugar isn't just regular sugar that's been ground up — it contains cornstarch that helps thicken the filling and prevent it from weeping in the hot oil. Don't try to substitute granulated sugar here unless you enjoy the taste of grainy disappointment. The powdered sugar dissolves instantly into the cream cheese, creating this smooth sweetness that tastes like the inside of an Oreo, only better because it's fresh and you made it yourself.
The Texture Crew
All-purpose flour creates the structure for our batter, but the real magic happens when we add just a touch of cornstarch. This combination creates a coating that's shatteringly crisp but somehow manages to stay thin and delicate. Too much flour and you'll have doughnuts, too little and the coating will slide off like a bad toupee. The ratio I've landed on after probably fifty test batches creates this gossamer-thin shell that shatters between your teeth while somehow protecting the Oreo inside like a delicious force field.
Baking powder might seem weird in a fried recipe, but it's what gives our coating that light, almost tempura-like quality. Without it, the batter fries up dense and heavy — more like a funnel cake than the delicate coating we're after. The leavening creates tiny air bubbles in the batter as it hits the oil, which translates to extra surface area for crisping. More surface area equals more crunch, and more crunch equals more happiness.
The Unexpected Star
Vanilla extract does more than just add vanilla flavor — it enhances the chocolate in the Oreos and rounds out the tanginess of the cream cheese. Don't use imitation vanilla here unless you want your kitchen to smell like a candle store. The real stuff has hundreds of flavor compounds that work together like a symphony, while imitation vanilla is like someone playing "Chopsticks" on a toy piano. If you want to get really fancy, scrape half a vanilla bean into the cheesecake mixture and watch people's eyes roll back in their heads when they taste it.
Whole milk might seem like an odd choice for a batter, but the fat content is crucial for getting that golden-brown color and rich flavor. Skim milk works in a pinch, but your coating will be pale and sad, like it's seen better days. The milk proteins also help the batter adhere to the Oreos, preventing that tragic moment when your coating slides off in the oil like a bad paint job.
The Final Flourish
Vegetable oil for frying needs to be fresh and clean — old oil will make everything taste like yesterday's fish fry. You want a neutral oil with a high smoke point, so save your expensive olive oil for salads. The oil should come up about two inches in your pot, which is deep enough for the Oreos to float freely but shallow enough that you're not buying oil by the gallon. Keep it at 350°F for the perfect balance of cooking the coating through without burning it before the inside gets melty.
Powdered sugar for dusting isn't just for looks — it creates this sweet cloud that sticks to your fingers and makes you feel like a kid again. Dust them while they're still hot so the sugar partially melts and creates this glaze that crackles when you bite into it. If you're feeling fancy, mix in a little cocoa powder for a cookies-and-cream effect, or add a pinch of cinnamon for warmth that makes people ask "what's that flavor?" in the best possible way.
Everything's prepped? Good. Let's get into the real action...
The Method — Step by Step
- Start by making the cheesecake filling because it needs time to firm up. Beat the cream cheese until it's smoother than a pick-up artist at last call — about two minutes on medium speed. You're not just mixing here; you're incorporating air that will make the filling light instead of dense. Add the powdered sugar gradually, letting each addition fully incorporate before adding more. This prevents lumps that would feel like little pebbles in your final product. Scrape down the bowl at least twice because cream cheese loves to hide in the corners like it's playing hide-and-seek.
- Mix in the vanilla and a tiny pinch of salt — I know salt in dessert sounds weird, but it makes the sweet taste sweeter and the flavors more complex. The mixture should be thick but spreadable, like good frosting. If it's too loose, add a tablespoon more powdered sugar. If it's too stiff, a teaspoon of milk will loosen it up. Taste it now and adjust the sweetness; this is your chance to make it perfect for your palate. I'll be honest — I ate half the batch before anyone else got to try it, and I have zero regrets.
- Carefully twist open each Oreo, trying to keep the filling intact on one side. This is harder than it sounds because Oreos are engineered by geniuses who want to test your patience. Use a butter knife if you need to, working it gently around the seam like you're performing surgery. Lay out the separated cookies on a baking sheet, filling-side up, and prepare yourself for the most ridiculous assembly line of your life. Okay, ready for the game-changer?
- Spread about a teaspoon of cheesecake mixture onto the filling-side of each Oreo cookie. Don't go all the way to the edges — leave a little border so when you press them back together, the filling doesn't squish out like a sandwich with too much mayo. Top with the other cookie half and press gently until you feel it stick together. The cheesecake should bulge slightly but not overflow. If you overfilled them, scrape a little off with your finger and eat it immediately because wasting cheesecake filling should be a crime.
- Place the stuffed Oreos on a parchment-lined baking sheet and freeze for exactly 45 minutes. This next part? Pure magic. The freezer firms up the cheesecake so it won't melt into the oil, but keeps it soft enough to create that molten center. Set a timer because too long and they'll be frozen solid in the middle even after frying. While they're freezing, make your batter by whisking together the flour, cornstarch, baking powder, and salt in a large bowl.
- In a separate bowl, whisk the egg, milk, and vanilla until they're best friends — about 30 seconds. Pour the wet ingredients into the dry and stir just until combined. The batter should be thick enough to coat a spoon but thin enough to drip off slowly. If it's too thick, add milk a teaspoon at a time. Too thin? A tablespoon of flour will fix it. The batter should look like slightly thick pancake batter, not wallpaper paste.
- Heat your oil in a heavy-bottomed pot to 350°F. I use a candy thermometer because I'm not one of those kitchen daredevils who can tell oil temperature by sprinkling water (which is how you get burns and set off smoke detectors). The oil should be about two inches deep — enough for the Oreos to float but not so deep that you're basically deep-frying in a cauldron. When the oil hits temperature, reduce the heat slightly to maintain it. That sizzle when it hits the pan? Absolute perfection.
That's it — you did it. But hold on, I've got a few more tricks that'll take this to another level...
Insider Tricks for Flawless Results
The Temperature Rule Nobody Follows
Here's the thing about frying that most recipes gloss over: temperature is everything, but not in the way you think. Yes, 350°F is the magic number, but what matters more is maintaining that temperature consistently. When you drop in cold Oreos, the oil temperature drops faster than your motivation on a Monday morning. The trick is to fry in small batches and wait between batches for the oil to recover. I actually turn the heat up slightly when I add the Oreos, then reduce it back down. This keeps the coating crispy instead of greasy, and prevents that sad, soggy bottom that makes fried food feel like a disappointment. A friend tried skipping this step once — let's just say it didn't end well, and her kitchen smelled like a carnival for three days.
Why Your Nose Knows Best
Your sense of smell is actually the most reliable indicator of when these are perfectly done. When the batter first hits the oil, it'll smell like raw flour and cold batter — not unpleasant, but not exciting. As they cook, the smell transforms into this nutty, toasty aroma that's basically fried dessert heaven. When you catch that first whiff of something that smells like the best funnel cake you've ever had, start checking for doneness. The color should be golden brown, not pale blonde or dark brown. Pale means raw batter in the middle; dark means the outside will taste burnt before the inside warms through. Trust your nose — it's been evolving for millions of years to detect exactly when food goes from good to incredible.
The 5-Minute Rest That Changes Everything
I know, I know — when something comes out of the fryer looking like a golden gift from the dessert gods, you want to shove it directly into your face. But here's where patience pays off in spades. Let these rest on the wire rack for exactly five minutes before serving. This does two magical things: first, it lets the internal temperature even out so the cheesecake filling becomes uniformly molten instead of having hot edges and a cold center. Second, it allows the exterior to set into that perfect crispy shell that doesn't collapse when you bite into it. During this rest, the powdered sugar melts slightly and creates this thin glaze that crackles when you bite down. It's the difference between good and unforgettable. Plus, you won't burn your tongue, which means you'll actually be able to taste all the flavors instead of just feeling pain.
The Assembly Line Secret
If you've ever struggled with getting the cheesecake filling into the Oreos without making a mess, you're not alone — and I've got the fix. Instead of using a knife or spoon, load your cheesecake mixture into a plastic bag and snip off a corner. Pipe it onto the cookies like you're decorating a cake. This gives you perfect control over the amount and keeps everything neat. Plus, you can make the opening exactly the size you want, so you get consistent filling in every cookie. When you're done, just toss the bag — no messy cleanup, no filling stuck under your fingernails, no wondering if you added enough to each one. It's like having a professional pastry bag but without the price tag or storage hassle.
The Oil Reuse Reality Check
Good frying oil is expensive, and you absolutely can reuse it — but only if you're smart about it. Let the oil cool completely, then strain it through cheesecloth or a coffee filter to remove all the little bits of batter that will burn and taste bitter next time. Store it in a sealed container in a cool, dark place, and it'll last for three more frying sessions. But here's the key: only reuse it for similar foods. Oil that's fried sweet things should only fry sweet things again, or you'll end up with fish-flavored dessert (which is exactly as terrible as it sounds). After four uses total, retire it with honor. Your taste buds — and your guests — will thank you.
Creative Twists and Variations
This recipe is a playground. Here are some of my favorite ways to switch things up:
Peanut Butter Cup Chaos
Replace half the cream cheese with creamy peanut butter and add a tablespoon of honey to balance the saltiness. Stuff the Oreos as usual, but press a mini peanut butter cup into the center of the filling before closing them up. When you fry them, the peanut butter cup melts into this river of chocolate-peanut butter that combines with the cheesecake filling to create something that tastes like the best parts of a peanut butter pie and a chocolate truffle had a baby. Serve these with a drizzle of melted chocolate and a sprinkle of chopped peanuts for a dessert that makes people forget their own names.
Salted Caramel Dream
Mix two tablespoons of caramel sauce into the cheesecake filling along with an extra pinch of salt. The salt enhances all the flavors and keeps the sweetness from becoming overwhelming. After frying, drizzle with more caramel and a sprinkle of flaky sea salt. The hot-cold-sweet-salty combination triggers every pleasure center in your brain simultaneously. These are the ones I make when I want to impress people who think they've tried everything. They always ask "what's that flavor?" in this amazed voice, like I just revealed the secret to eternal youth.
Mint Chocolate Madness
Add a quarter teaspoon of peppermint extract to the cheesecake filling and a few drops of green food coloring if you want to be obvious about it. The mint cuts through the richness and leaves your palate feeling refreshed instead of overwhelmed. These taste exactly like those Girl Scout Thin Mint cookies, only better because they're warm and melty inside. Dip the fried Oreos in melted chocolate mixed with a touch of coconut oil, then let them set for a thin chocolate shell that cracks when you bite into it. They're like dessert Russian nesting dolls.
Spicy Mexican Chocolate
Add a quarter teaspoon each of cinnamon and cayenne to the batter, plus a tablespoon of cocoa powder for extra chocolate intensity. The heat builds slowly, so the first bite tastes like regular chocolate, then you get this warming sensation that spreads across your tongue. It's not enough to make you reach for water — just enough to make things interesting. These are incredible with a dusting of cinnamon-sugar instead of plain powdered sugar. Serve them with Mexican hot chocolate and watch people's faces when they realize dessert can have a kick.
Birthday Cake Explosion
Mix rainbow sprinkles into the cheesecake filling and add a drop of vanilla cake flavoring if you have it. After frying, roll them in a mixture of powdered sugar and more sprinkles. These taste like someone took the best parts of birthday cake and compressed them into a two-bite package. Kids go absolutely bonkers for these, but here's the secret: adults love them even more because they trigger all those childhood birthday party memories. They're like edible nostalgia bombs.
Coffee Lover's Fantasy
Dissolve a teaspoon of instant espresso powder in a tablespoon of hot water, then mix it into the cheesecake filling. The coffee flavor enhances the chocolate in the Oreos while adding this sophisticated bitterness that balances all the sweetness. These are perfect for serving after dinner when you want something indulgent but not cloying. Dip them in chocolate and sprinkle with crushed espresso beans for extra crunch and coffee flavor. They're like the best mocha you've ever had, only crunchy and warm and impossible to stop eating.
Storing and Bringing It Back to Life
Fridge Storage
If you somehow don't eat all of these immediately (I don't understand your willpower), you can store them in an airtight container in the fridge for up to three days. But here's the thing — they won't be crispy anymore. The coating will absorb moisture and become soft, which isn't necessarily bad, just different. They actually taste more like cheesecake this way, with the cookie softening into cake-like texture. Let them come to room temperature before serving, or give them a quick 10-second zap in the microwave to take the chill off. The filling will be softer and more like traditional cheesecake filling.
Freezer Friendly
The uncooked, stuffed Oreos freeze beautifully for up to a month. Lay them in a single layer on a baking sheet to freeze solid, then transfer to a freezer bag. You can fry them straight from frozen — just add an extra 30 seconds to the frying time. This is how I always make them now because having a stash of potential happiness in my freezer feels like having a superpower. Bad day? Fried Oreos. Unexpected guests? Fried Oreos. Midnight craving that won't quit? Fried Oreos. They're like edible insurance against life's disappointments.
Best Reheating Method
Leftover fried Oreos will never be as good as fresh, but you can get them pretty close. Skip the microwave unless you like soggy coating. Instead, pop them in a 350°F oven for about 5 minutes, or until heated through and the coating crisps up again. Add a tiny splash of water to the baking sheet before reheating — it creates steam that helps re-crisp the coating without drying it out. Or, if you're feeling dangerous, give them another quick 30-second fry in hot oil. They won't be quite as perfect as the first time, but they'll be miles better than eating them cold and soggy.