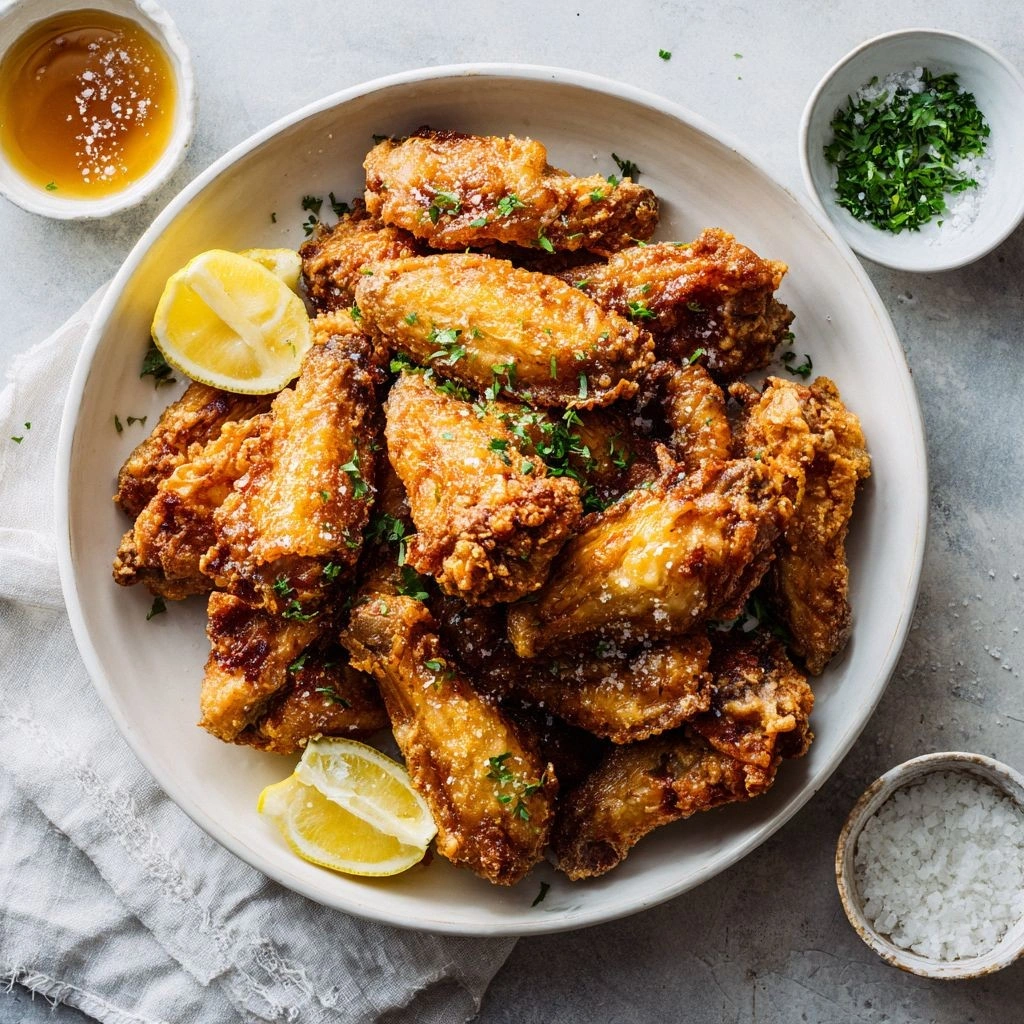
Picture this: the kitchen is a battlefield, the air thick with the scent of fried batter and sharp vinegar, and you’re standing in the middle of the chaos, a spatula in hand, ready to conquer the world of wings. I was staring at a pile of raw chicken wings that had been abandoned in the fridge for weeks, my stomach growling louder than the sizzling pan. My friend dared me to turn them into something that would make the neighbors’ taste buds dance, and I said, “Challenge accepted.” The result? A plate of salt & vinegar fried wings that crackle like fresh popcorn when you bite into them. The first bite is a burst of tang, followed by a buttery, crunchy coating that melts in your mouth while the vinegar leaves a lingering, satisfying sting.
From the moment I cracked the first wing, the kitchen filled with a smoky aroma that felt like a promise of comfort and adventure. The sound of the batter hitting the hot oil was a satisfying hiss that echoed the thrill of a new recipe adventure. I watched the edges of the wings curl and turn golden, their skins blistering just enough to create that coveted crispness that shatters like thin ice under your teeth. The vinegar, a splash of bright acidity, cut through the richness, balancing the flavors with a bright, refreshing punch. By the time the last wing was plated, the room was saturated with a savory scent that made even the most skeptical foodies line up for a taste.
I’ve tried countless versions of salt & vinegar wings over the years, but none of them captured the perfect harmony of crunch, tang, and subtle heat that this recipe offers. The secret lies in a delicate blend of flour and cornstarch that creates a light, airy coating, and a touch of baking soda that lifts the batter into a golden cloud of crispness. The vinegar isn’t just a flavor; it’s a chemical agent that tenderizes the meat, allowing the wings to stay juicy beneath the crunchy shell. And the final flourish? A dash of hot sauce that sneaks in just enough heat to keep your palate on its toes without drowning the delicate balance. Together, these elements form a dish that is hands down the best version you'll ever make at home.
If you’ve ever struggled to get wings crispy enough, you’re not alone—and I’ve got the fix. I remember the first time I tried frying wings in a cast‑iron skillet, only to end up with a greasy, soggy mess that tasted like disappointment. The turning point came when I discovered that a splash of vinegar in the batter not only added flavor but also helped the coating set faster, giving the wings a crispier finish. That single tweak transformed the dish from a flop into a crowd‑pleaser that left everyone begging for the recipe. From that day forward, my kitchen has been filled with the satisfying crunch of wings that are both tangy and addictive.
Picture yourself pulling a basket of hot, golden wings out of the pan, steam swirling around them like a fragrant cloud of promise. The kitchen is alive with the crackle of oil, the clink of a cooling rack, and the inevitable chorus of delighted exclamations. The moment you take that first bite, the vinegar’s sharp bite hits your tongue, followed by a buttery crunch that melts into a juicy, savory interior. The flavor profile is a symphony: salty, acidic, slightly sweet, and a hint of spice that lingers. It’s the kind of dish that turns an ordinary night into a memorable gathering.
I dare you to taste this and not go back for seconds. The texture is a paradox—crispy on the outside, tender on the inside—like a perfectly balanced handshake between crunch and juiciness. The vinegar gives a bright lift that keeps the wings from feeling heavy, while the flour‑cornstarch blend ensures a light, airy coating that doesn’t weigh you down. Even the most seasoned wing connoisseur will find themselves craving this version again and again. If you’ve ever had a batch that fell flat, this recipe will change your perspective forever.
Okay, ready for the game‑changer? This next part? Pure magic. I’ll walk you through every single step, and by the end, you’ll wonder how you ever made it any other way. The secret to a perfect crunch starts with the batter, the right temperature, and a few clever hacks that I’ll share. Trust me, once you master these techniques, your wings will become the talk of every party. Let’s dive in.
What Makes This Version Stand Out
- Crispness: The combination of flour and cornstarch creates a light, airy coating that lifts into a golden cloud. The batter’s structure prevents the wings from becoming soggy, even after several minutes of frying. Each bite delivers a satisfying crackle that echoes a fresh popcorn moment.
- Tang: A generous splash of white vinegar not only adds flavor but also tenderizes the meat. The acidity cuts through the richness, giving the wings a bright, refreshing punch. The result is a balanced bite that doesn’t feel heavy.
- Heat: A dash of hot sauce sneaks in just enough heat to keep the palate engaged without overpowering the other flavors. This subtle spice adds a layer of complexity that keeps people coming back for more. It’s the secret that makes the dish unforgettable.
- Texture: Baking soda in the batter lifts the coating, creating a crispness that’s almost buttery. The batter’s airy structure ensures the wings stay juicy inside. The contrast between crunch and tenderness is a highlight of the dish.
- Convenience: The recipe uses pantry staples, making it a quick go-to for last‑minute gatherings. No fancy sauces or exotic ingredients are required. It’s the perfect solution for busy weeknights or spontaneous parties.
- Make‑Ahead: The wings can be marinated and coated a day ahead, allowing the flavors to develop. They reheat beautifully, maintaining crispness and flavor. This makes the recipe ideal for meal prep or hosting.
- Versatility: The base flavor profile can be tweaked with different spices or sauces. Whether you prefer a smoky, sweet, or spicy version, the core technique remains the same. It’s a culinary playground for experimentation.
- Crowd Reaction: Friends and family consistently rave about the texture and flavor. The dish becomes a conversation starter at gatherings. The combination of familiar and surprising elements keeps everyone hooked.
Inside the Ingredient List
The Flavor Base
The foundation of this dish starts with the wings themselves—fresh, free‑range if possible, because the quality of the meat translates directly into flavor. The wings should be patted dry before marination; moisture is the enemy of crispness. A quick splash of soy sauce adds umami depth that balances the vinegar’s acidity. The vinegar isn’t just a flavor; it’s a tenderizer that breaks down muscle fibers, keeping the meat juicy. The hot sauce, while optional, injects a subtle heat that lingers without overwhelming. Together, these elements create a base that is both bold and nuanced. If you’re short on time, a pre‑made marinade can work, but the fresh combination beats any store‑bought mix. Remember, the ratio of vinegar to other liquids matters; too much can make the batter soggy. A light hand yields the best balance. The flavor base sets the stage for the crisp coating to shine.
The Texture Crew
The batter is a duo of all‑purpose flour and cornstarch, each playing a distinct role. Flour provides structure and a slight heft that holds the coating together. Cornstarch, on the other hand, is the secret to a light, airy crispness; it gelatinizes at high heat, creating a delicate shell. Baking soda is the key to a puffed coating; it reacts with the acidic vinegar, producing carbon dioxide that lifts the batter. Salt and pepper season the batter and the meat, ensuring every bite is flavorful. Garlic and onion powder add depth without overpowering the main flavors. The oil you choose for frying should have a high smoke point; avocado oil is ideal, but canola or peanut oil works well. The temperature of the oil is critical—too hot and the coating will burn before the wings cook through; too cool and the wings will absorb oil. Aim for 350°F to 375°F for the perfect balance. The texture crew works together to produce a coating that is crisp on the outside and tender on the inside.
The Unexpected Star
The unexpected star is the splash of vinegar that sneaks into the batter. While many recipes call for vinegar only as a seasoning, here it acts as a tenderizer, breaking down proteins and making the meat more succulent. The acidity also helps the batter set faster, creating a crispier shell. Some cooks add a pinch of baking soda to the vinegar to create a chemical reaction that lifts the coating. Others use a bit of hot sauce for heat. The combination of vinegar, baking soda, and hot sauce is a flavor bomb that elevates the dish beyond ordinary fried wings. This star also helps balance the richness of the oil, preventing the wings from feeling greasy. It’s a small ingredient that packs a big punch, and that’s why it’s the unexpected star of this recipe. The vinegar’s bright, sharp bite lingers long after the last crunch. It’s the twist that keeps people coming back for more.
The Final Flourish
Once the wings are fried to golden perfection, they’re finished with a quick drizzle of hot sauce or a sprinkle of extra salt for that finishing touch. The sauce should be added just before serving to preserve its heat and flavor. A final squeeze of fresh lemon or lime can brighten the dish even further, but it’s optional. The wings should rest on a cooling rack to keep the coating crisp; a paper towel will absorb excess oil. Serve immediately for the best texture. Pair them with a simple dipping sauce—perhaps a light aioli or a yogurt‑based dip—to balance the acidity. The final flourish is what turns a good dish into a great one. A final sprinkle of fresh herbs adds a pop of color and aroma. This finishing step is essential for achieving the signature crisp and tangy profile.
Everything's prepped? Good. Let's get into the real action.
The Method — Step by Step
- Begin by patting the chicken wings dry with paper towels. Moisture is the enemy of crispness, so removing excess water ensures a golden shell. Toss the wings in a bowl with a pinch of salt and pepper, letting the seasoning penetrate the meat. This simple step builds a flavor foundation that will carry through the batter. Once seasoned, set them aside while you prepare the batter.
- In a separate bowl, whisk together the all‑purpose flour, cornstarch, baking soda, garlic powder, onion powder, and a generous splash of white vinegar. The vinegar’s acidity reacts with the baking soda, creating a light, airy batter that will puff up during frying. Add the hot sauce if you’re using it, and whisk until the mixture is smooth and free of lumps. The batter should be thick enough to coat the wings without dripping off. Let it rest for five minutes; this allows the flavors to meld.
- Heat a deep skillet or Dutch oven to 350°F (175°C) using a thermometer for accuracy. A stable temperature ensures even cooking and prevents the wings from becoming greasy. Add enough oil to cover the wings halfway; this will keep them from drying out. Once the oil reaches the correct temperature, carefully lower the wings into the pan, ensuring they’re not overcrowded. If you’re frying in batches, keep the heat steady by adding a little more oil if needed.
- Let the wings cook for 8–10 minutes, turning every 2–3 minutes to achieve even browning. The batter should puff up and turn a deep golden brown; this indicates a perfect crisp. Keep an eye on the oil temperature—if it drops, add a splash of hot oil to maintain heat. Avoid the temptation to crowd the pan, as it can cause the temperature to plummet and lead to soggy wings. Once the wings are golden and crisp, remove them and place them on a cooling rack to keep the coating crunchy.
- While the wings rest, drizzle a small amount of hot sauce over them if you prefer a spicier kick. The heat will mingle with the vinegar’s tang, creating a balanced flavor profile. This step is optional, but it adds a layer of complexity that many wing lovers crave. If you’re serving a crowd, keep extra hot sauce on the side for those who want more heat. The wings should be served hot to preserve their crispness.
- Transfer the wings to a plate lined with paper towels to absorb any residual oil. This final step ensures the coating remains crisp and not greasy. Let them rest for a minute; the heat will continue to cook the interior. While resting, you can prepare a simple dipping sauce if desired—perhaps a yogurt‑based dip or a light aioli. The rest period also allows the flavors to settle, making each bite even more satisfying.
- Serve immediately with a side of celery sticks, carrot ribbons, or a simple green salad. The crunch of fresh vegetables complements the crispy wings perfectly. If you’re hosting a party, arrange the wings on a platter for easy access. Encourage guests to try different dipping sauces to keep the experience dynamic. The wings are best enjoyed hot, so don’t let them sit for too long before serving.
- Enjoy the moment—watch as the crowd’s faces light up with each bite. The combination of tang, crispness, and subtle heat creates a flavor explosion that is hard to resist. Share the recipe with friends, and watch them fall in love with your version. Remember, practice makes perfect, and each batch will be better than the last. Keep experimenting with spices and sauces to keep the dish fresh and exciting.
That's it — you did it. But hold on, I've got a few more tricks that'll take this to another level.
Insider Tricks for Flawless Results
The Temperature Rule Nobody Follows
Many cooks believe that any high heat will do, but precision is key. A thermometer ensures the oil stays between 350°F and 375°F, preventing the coating from burning before the meat cooks. If the oil is too hot, the batter will char, leaving a bitter taste; too cool, and the wings absorb oil and become soggy. Keep a close eye on the temperature and adjust the flame as needed. A steady temperature guarantees a golden, crispy exterior and a juicy interior.
Why Your Nose Knows Best
The aroma of frying batter is a reliable indicator of doneness. When the oil hisses softly and the batter emits a nutty, toasted scent, it’s almost ready. A faint smell of burnt oil signals that the temperature is too high. Trust your senses; the smell will guide you to the perfect crisp. The right aroma also sets the mood for a delicious meal.
The 5-Minute Rest That Changes Everything
Resting the wings for a few minutes on a rack allows the steam to escape, keeping the coating crunchy. This simple step can make the difference between soggy wings and a crisp masterpiece. While resting, the heat continues to cook the interior, ensuring even doneness. Don’t rush to plate them immediately; let them breathe. A quick rest is a small investment for a big payoff.
The Secret to a Light Batter
Using a combination of flour and cornstarch creates a batter that’s airy and crisp. Cornstarch gelatinizes at high heat, forming a delicate shell, while flour provides structure. Mixing the batter just before frying prevents it from settling and losing its airy quality. A light batter ensures the wings stay juicy inside while the coating remains crisp. The balance is subtle but essential.
The Power of Pre‑Marination
Marinating the wings for at least 30 minutes before coating allows the flavors to penetrate the meat. The vinegar tenderizes, while the salt draws out moisture, preventing a greasy result. If you’re short on time, a quick 10‑minute marination still helps. The longer the marination, the deeper the flavor. This step is a game‑changer for those who want maximum taste.
The Final Touch of Heat
Adding a splash of hot sauce after frying introduces a subtle heat that lingers without overpowering. It also adds a glossy finish that makes the wings visually appealing. If you’re not a fan of heat, use a mild sauce or omit it entirely. The choice is yours, but the extra kick can elevate the dish to a new level. Experiment with different sauces to find your favorite.
Creative Twists and Variations
Smoky Chipotle Version
Swap the hot sauce for chipotle powder and a dash of smoked paprika. The smoky undertones pair beautifully with the vinegar’s brightness. This variation is perfect for a barbecue theme. The wings will have a deeper, richer flavor that still remains crisp. Guests will love the subtle heat and smoky aroma.
Sweet & Tangy Honey Glaze
After frying, drizzle a honey‑vinegar glaze over the wings. The sweetness balances the tang, creating a harmonious flavor profile. Add a pinch of cayenne pepper for a mild kick. This version is great for a brunch or a casual get‑together. The glaze adds a glossy finish that makes the wings look irresistible.
Herb‑Infused Mediterranean
Replace the garlic and onion powder with dried oregano and thyme. Finish with a squeeze of lemon for brightness. Pair the wings with a tzatziki dip for a Mediterranean twist. The herbs complement the vinegar’s sharpness, creating a fresh, aromatic experience. This version works well for a light summer meal.
Spicy Korean Kimbap Style
Add gochujang to the batter for a Korean flair. Serve the wings with pickled vegetables and a side of rice. The spicy, umami flavor pairs well with the crispy coating. This variation is ideal for a themed dinner or a Korean food night. The wings will become a crowd‑pleaser for adventurous eaters.
Citrus‑Herb Explosion
Incorporate zest of orange and lemon into the batter. Finish with fresh parsley or cilantro for a burst of color. This bright, citrusy version is refreshing and light. It’s a great option for a summer party or a backyard BBQ. The citrus notes add a lively contrast to the tang.
Cheesy Bacon Delight
After frying, sprinkle shredded cheddar and crumbled bacon over the wings. Drizzle with a light barbecue sauce for extra flavor. The cheese melts slightly, creating a gooey, savory coating. This indulgent twist is perfect for a movie night or a casual gathering. The combination of crispy, cheesy, and smoky is unbeatable.
Storing and Bringing It Back to Life
Fridge Storage
Place the cooled wings in an airtight container, ensuring they’re not stacked too tightly. The container should be sealed tightly to prevent moisture from seeping in. Store them in the fridge for up to 3 days. When ready to eat, reheat them in the oven at 375°F for 10 minutes to restore crispness. This method keeps the wings fresh and tasty.
Freezer Friendly
For longer storage, freeze the wings in a single layer on a baking sheet before transferring them to a freezer bag. This prevents them from sticking together. Freeze for up to 2 months for best quality. When you’re ready, thaw in the fridge overnight. Reheat in the oven or a skillet to regain crispness. This approach is perfect for meal prep or a quick snack.
Best Reheating Method
The oven is the best way to reheat without losing crunch. Preheat to 400°F and bake the wings for 8–10 minutes, flipping halfway through. If you’re short on time, a skillet over medium heat works well; add a splash of water to create steam and keep the coating crisp. Avoid microwaving, as it will make the wings soggy. For a quick fix, use a toaster oven for a few minutes. Reheating this way preserves the flavor and texture.
Remember to add a tiny splash of water before reheating; it steams back to perfection, giving the wings a fresh, crisp finish that’s almost as good as when they were first fried.