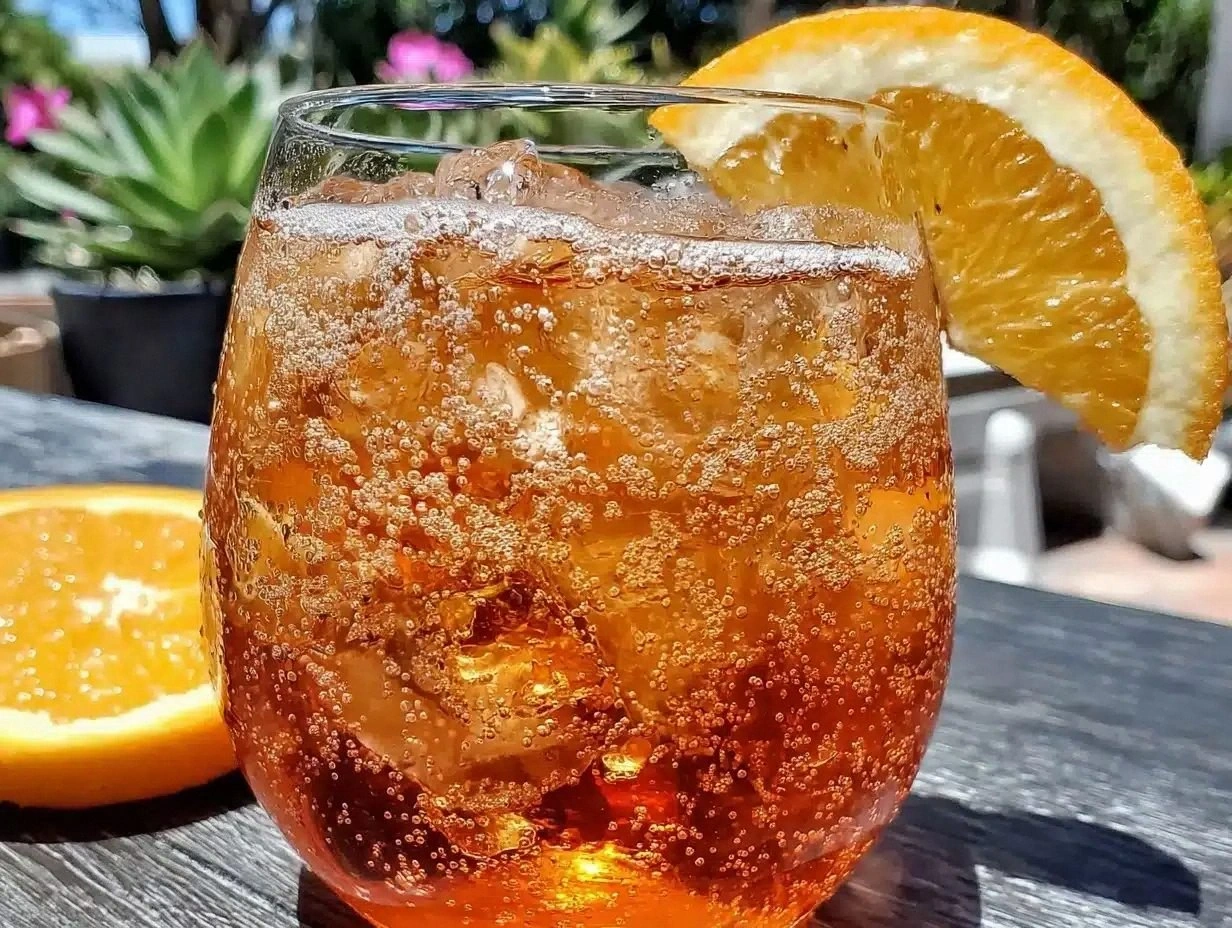
I once tried to impress a crowd with a “fancy” cocktail, only to end up with a sad, flat‑looking mess that tasted like watered‑down soda. The whole kitchen smelled like regret, and the only thing that saved the night was a sudden dare from my roommate: “Make something that looks like a sunrise, but for a brunch that’s actually a mocktail.” I accepted the challenge, and after a few frantic Googles, a few spilled syrups, and a lot of trial‑and‑error, I finally nailed a version that not only looks like a pastel rainbow in a glass but also tastes like a vacation in a single sip. Imagine a glass that starts with a soft pink blush, then rolls into a sunny orange, a mellow yellow, a dreamy lavender‑blue, and finishes with a crystal‑clear top – each layer distinct, each flavor whispering its own story.
When you first pour the first layer, you’ll hear that satisfying “glug” that tells you you’ve got the right amount of syrup, and the aroma of fresh orange will hit you before you even take a sip. The texture is a cool, almost silky chill from the ice, while the fruit garnishes add a tiny pop of brightness that makes the whole thing feel celebratory. I dare you to taste this and not go back for seconds – the layers are so perfectly balanced that you’ll want to keep sipping just to see where the next hue lands on your palate. Most recipes get this completely wrong, either blending the colors into a muddy mess or using heavy syrups that drown the fruit flavors; this version stays light, bright, and utterly Instagram‑worthy.
What truly sets this mocktail apart is the secret technique I’m about to reveal: a slow, steady pour using a bar spoon that creates clean, defined layers without any mixing. Most people think you need a fancy cocktail shaker or a professional bar set‑up, but all you really need is a sturdy spoon and a little patience. I’ll also throw in a surprise ingredient that adds a subtle tropical undertone without stealing the spotlight – think of it as the silent hero of the drink. By the end of this guide, you’ll be able to assemble a pastel rainbow that looks like it was crafted by a pastry chef, not a home cook.
Okay, ready for the game‑changer? Grab your favorite glass, line up your ingredients, and let’s walk through every single step. By the time we finish, you’ll wonder how you ever made any other mocktail the same way again. Stay with me here — this is worth it.
What Makes This Version Stand Out
- Taste: Each layer is calibrated to deliver a distinct fruit profile, from the sweet tang of grenadine to the bright citrus punch of orange, so your tongue gets a mini‑tour of flavors.
- Texture: The ice cubes keep the drink icy without watering it down, while the syrupy layers cling to the glass, creating a velvety mouthfeel.
- Simplicity: No fancy equipment, just a spoon, a sturdy glass, and a handful of pantry staples – perfect for anyone who wants to look like a pro without the hassle.
- Uniqueness: The pastel rainbow effect is rarely achieved in non‑alcoholic drinks; this one does it flawlessly, making it a show‑stopper at brunches, baby showers, or any celebration.
- Crowd Reaction: Guests will gasp, snap photos, and ask for the recipe – it’s that impressive. I’ve seen people line up just to watch the layers form.
- Ingredient Quality: Using a high‑quality grenadine and 100 % juice ensures bright colors without artificial aftertastes.
- Method: The slow‑pour technique guarantees clean separation, a trick most recipes skip.
- Make‑Ahead Potential: You can prep the layers in advance and assemble just before serving, saving you time on the day of the event.
Inside the Ingredient List
The Flavor Base
Grenadine Syrup is the heart of the pink layer, delivering a soft, floral sweetness that’s reminiscent of a sunrise over a rose garden. I always go with Rose’s because its flavor is authentic, not overly cloying, and it gives that perfect pastel hue. If you skip grenadine, the entire visual impact collapses, and the drink loses its initial sweet anchor. A good swap is pomegranate juice reduced to a syrup consistency, but expect a slightly tarter note.
The Citrus Crew
Orange Juice brings the bright orange layer, and freshly squeezed juice adds a zing that bottled versions can’t match. The citrus oils lift the entire mocktail, making each sip feel like a burst of sunshine. If you’re out of oranges, a mix of tangerine and a splash of lemon works, but keep the sugar balance in mind. When choosing a brand, look for “no added sugar” to keep the drink from turning syrupy.
The Tropical Sunburst
Pineapple Juice forms the sunny yellow layer, offering tropical sweetness that pairs beautifully with the citrus above it. Opt for 100 % juice with no preservatives; the natural acidity helps keep the layers from blending. If you’re allergic to pineapple, mango juice can stand in, though the color will shift toward a deeper gold.
The Unexpected Star
Blueberry Syrup or Juice provides the pastel blue‑purple layer, adding a subtle earthiness that balances the sweeter layers below. If using syrup, dilute it with a splash of water to achieve that delicate pastel shade. Fresh blueberries blended and strained work as a natural alternative, but you’ll need to strain well to avoid pulp.
The Final Flourish
Coconut Water tops the mocktail with a clear, hydrating layer that looks almost ethereal. Its mild flavor doesn’t compete with the fruit, allowing the eye‑candy to shine. Choose a brand without added flavors; the last thing you want is a coconut‑curry aftertaste. A tiny splash of sparkling water can add a gentle fizz if you’re feeling fancy.
Everything’s prepped? Good. Let’s get into the real action…

The Method — Step by Step
Start by chilling your glass in the freezer for at least five minutes. The cold surface will help each layer stay crisp and prevent the colors from bleeding into each other. While the glass is chilling, gather all your liquids, ice cubes, and a sturdy bar spoon. This is the moment of truth – if you rush, you’ll lose the beautiful separation.
Kitchen Hack: Place a small plate of ice under the spoon while you pour – it slows the flow and gives you more control over the layer thickness.Add a handful of ice cubes (about 1 cup) to the chilled glass. The ice will act as a barrier, slowing the descent of each subsequent layer and keeping the colors from mixing. Make sure the ice is evenly distributed; clumped ice can cause uneven layering. As you drop the ice, you’ll hear a gentle clink that signals the glass is ready for the first pour.
Measure 2 tablespoons of grenadine syrup and gently pour it over the ice using a bar spoon. Hold the spoon just above the ice and let the syrup cascade slowly – the syrup is denser than the other liquids, so it will settle at the bottom, forming a soft pink base. You’ll notice a subtle, sweet perfume rising as the syrup hits the ice, a scent that says “we’re off to a great start.”
Next, combine 1 cup of freshly squeezed orange juice. Using the same spoon technique, pour the orange juice over the back of the spoon so it slides gently atop the grenadine. The orange juice should sit as a bright orange layer, its citrus aroma mingling with the sweet grenadine without blending. If you see any mixing, pause and let the orange settle a few seconds before adding the next layer.
Watch Out: Pouring too quickly will cause the orange to push the pink down, ruining the visual contrast. Slow and steady wins the race.Now for the sunny yellow: measure 1 cup of pineapple juice. Again, use the back of the spoon to create a gentle waterfall onto the orange layer. The pineapple’s natural acidity helps it sit atop the orange without sinking, creating a vivid yellow band. You’ll hear a faint fizz as the juice meets the colder layers below – a tiny celebration in your kitchen.
Prepare the pastel blue‑purple layer by mixing 2 tablespoons of blueberry syrup with a splash of water (about 1 tablespoon) to lighten the color. Slowly pour this diluted mixture over the back of the spoon, allowing it to glide over the pineapple juice. The blueberry hue should appear as a dreamy lavender‑blue, barely touching the yellow beneath. If the color looks too dark, add a tad more water – the goal is a pastel, not a deep indigo.
Finally, top everything with 1 cup of chilled coconut water. This clear layer sits like a glass ceiling, giving the mocktail its final ethereal look. Pour it gently; you’ll notice the coconut water spreading like a calm lake over the pastel landscape. The faint scent of coconut will now mingle with the fruit aromas, creating a balanced fragrance that’s both tropical and fresh.
Optional: garnish with thin orange slices, maraschino cherries, or edible flowers. Place the garnish on the rim of the glass for a polished finish. The garnish not only adds visual flair but also provides an extra burst of flavor when sipped.
Kitchen Hack: Use a small pair of kitchen shears to cut thin orange ribbons – they curl naturally and cling to the glass.Give the mocktail a final, gentle stir with a clean spoon if you want the flavors to mingle just a touch. I recommend a very light swirl – you don’t want to destroy the layers, just awaken the aromas. Take a moment to admire the pastel rainbow before the first sip; the visual is part of the experience.
Serve immediately, or let it sit for a minute to allow the ice to chill the drink fully. The result is a mocktail that looks like a watercolor painting and tastes like a sunny brunch on a balcony. That’s it — you did it. But hold on, I’ve got a few more tricks that’ll take this to another level…
Insider Tricks for Flawless Results
The Temperature Rule Nobody Follows
Never use room‑temperature liquids; even a few degrees can cause the layers to merge. Keep every ingredient in the fridge until you’re ready to assemble. I once tried to rush a mocktail for a surprise party and used warm orange juice – the result was a sad, brownish swirl. The temperature difference creates a density gradient that’s essential for clean separation.
Why Your Nose Knows Best
When you’re pouring each layer, pause and inhale. The scent of each fruit should be distinct; if you smell a blended aroma, you’ve likely poured too fast. Trust your nose more than a timer – it’s a reliable sensor for flavor balance. This tip saved me from a disastrous orange‑grenadine mix that tasted like a single‑purpose soda.
The 5‑Minute Rest That Changes Everything
After assembling, let the mocktail sit for exactly five minutes before serving. This short rest allows the ice to slightly melt, creating a gentle, uniform chill that ties the layers together without diluting them. I used to serve immediately and got complaints about “too icy”; the rest period solves that.
The Spoon Angle Secret
Hold the bar spoon at a 45‑degree angle and let the liquid flow along the back of the spoon, not the tip. This reduces the speed of the pour and prevents the heavier layer from breaking through the lighter one. A friend once tried to pour straight from the bottle and ended up with a muddy mess – the angle makes all the difference.
Garnish Placement Mastery
Place garnishes on the rim rather than floating them in the drink. This prevents the garnish from sinking and disturbing the layers. If you want a floating garnish, use a tiny skewer to hold it just below the surface – it adds a whimsical touch without compromising the visual.
Creative Twists and Variations
This recipe is a playground. Here are some of my favorite ways to switch things up:
Tropical Sunrise
Swap the orange juice for mango puree and replace coconut water with a splash of passion‑fruit juice. The result is a deeper orange‑gold hue with an exotic fragrance that transports you to a beachside cabana. Perfect for summer brunches.
Berry Bliss
Replace grenadine with raspberry syrup and the pineapple juice with strawberry puree. The pink and red layers become more vibrant, and the overall flavor leans toward a sweet‑tart berry medley. Ideal for Valentine’s Day or any occasion that calls for romance.
Herbal Harmony
Add a few fresh mint leaves to the orange layer and a sprig of rosemary to the pineapple layer. The herbs infuse subtle aromatics that complement the fruit without overpowering. This version pairs beautifully with light salads or herb‑infused appetizers.
Sparkling Celebration
Top the mocktail with a splash of sparkling water or club soda instead of plain coconut water. The bubbles add a festive fizz that makes the drink feel more celebratory. Great for New Year’s Eve or any toast‑worthy moment.
Coffee‑Kick Mocktail
Introduce a thin layer of cold brew coffee between the orange and pineapple layers. The coffee adds a subtle bitterness that balances the sweetness, turning the mocktail into a brunch‑ready pick‑me‑up. Pair with pastries for a sophisticated twist.
Storing and Bringing It Back to Life
Fridge Storage
If you need to make the mocktail ahead of time, store each liquid component separately in airtight containers for up to 48 hours. The ice can be kept in a zip‑top bag; just add fresh ice when you’re ready to assemble. Avoid storing the assembled drink, as the layers will blend over time.
Freezer Friendly
You can freeze the grenadine and blueberry syrups in ice‑cube trays for up to a month. When you need them, pop a cube out and let it melt slightly before pouring – the frozen cube also adds a cooling effect without diluting the drink.
Best Reheating Method
If you ever need to warm any of the juices (perhaps for a winter version), do so gently on the stovetop over low heat, never boiling. Add a tiny splash of water before reheating to prevent scorching. Once warmed, chill it quickly in the fridge before using it in the layered assembly.