I remember the night I was supposed to host a dinner party and the dessert plan collapsed in a single, catastrophic moment. I had a bag of chocolate chips, a box of pretzels, and a handful of nuts lying around, and I was staring at the clock, wondering if I could pull something together in time. I opened the pantry, grabbed the three ingredients, and whispered, “I’m about to invent a dessert.” The kitchen filled with the sweet, smoky scent of melted chocolate, the faint metallic tang of pretzel salt, and the earthy aroma of toasted nuts. The sound of the chocolate bubbling on the stove was like a gentle drumbeat, and I could feel the heat radiating from the pan, promising a caramelized glaze. I tasted a spoonful of the mixture and felt the crunch of pretzel shards against the velvety chocolate, followed by the nutty warmth that lingered in the back of my tongue. That single bite was a revelation, and I was suddenly convinced that this would be the best version of a simple sweet treat anyone could make at home.
I dare you to taste this and not go back for seconds. The moment the chocolate coats the pretzels, the saltiness jumps into your palate like a tiny fireworks display, and the nuts provide a satisfying crunch that keeps you reaching for more. Most recipes get this completely wrong by overmixing or using too much sugar, but here the simplicity lets each component shine. I’ll be honest—I ate half the batch before anyone else got to try it, and the kitchen still smelled incredible. Picture yourself pulling this out of the oven, the whole kitchen smelling incredible, and watching your guests’ eyes light up as they bite into the first pinecone. Okay, ready for the game‑changer?
This version stands out because it takes the classic idea of chocolate‑coated pretzels and elevates it into a crunchy, caramelized pinecone that feels both indulgent and wholesome. The three ingredients work together like a well‑tuned orchestra: chocolate for richness, pretzels for salty crunch, and nuts for depth and texture. The result is a snack that feels like a dessert, but can also double as a party appetizer. I’ve experimented with different nut varieties, and the flavor profile shifts subtly—almonds give a buttery note, walnuts add earthiness, and pecans bring a buttery sweetness. The best part? No pantry staples are missing; just grab what you have, and you’re ready to bake.
And now the fun part: the technique that turns a simple mixture into a glossy, caramelized treat. I’ll show you how to melt the chocolate without scorching it, how to coat the pretzels evenly, and how to toss the nuts to keep them from sticking together. This next step? Pure magic. Stay with me here—this is worth it. By the end, you’ll wonder how you ever made it any other way.
If you've ever struggled with chocolate desserts that turn out gritty or pretzel snacks that are too salty, you're not alone— and I've got the fix. The key is to temper the chocolate properly, to use the right type of pretzels, and to toast the nuts just enough to bring out their flavor without burning them. The result is a snack that is sweet, salty, and nutty in perfect harmony. Let me walk you through every single step, and trust me, you’re going to love how easy it is.
What Makes This Version Stand Out
- Flavor: The dark chocolate chips create a deep cocoa base that balances the pretzels’ salty bite, while the nuts add a subtle earthy undertone that elevates every bite.
- Texture: The pretzels crackle like thin ice when you bite into them, and the nuts provide a satisfying chew that contrasts with the smooth chocolate coating.
- Simplicity: Three ingredients, no fancy equipment, and a single pan—perfect for a busy weeknight or a last‑minute party.
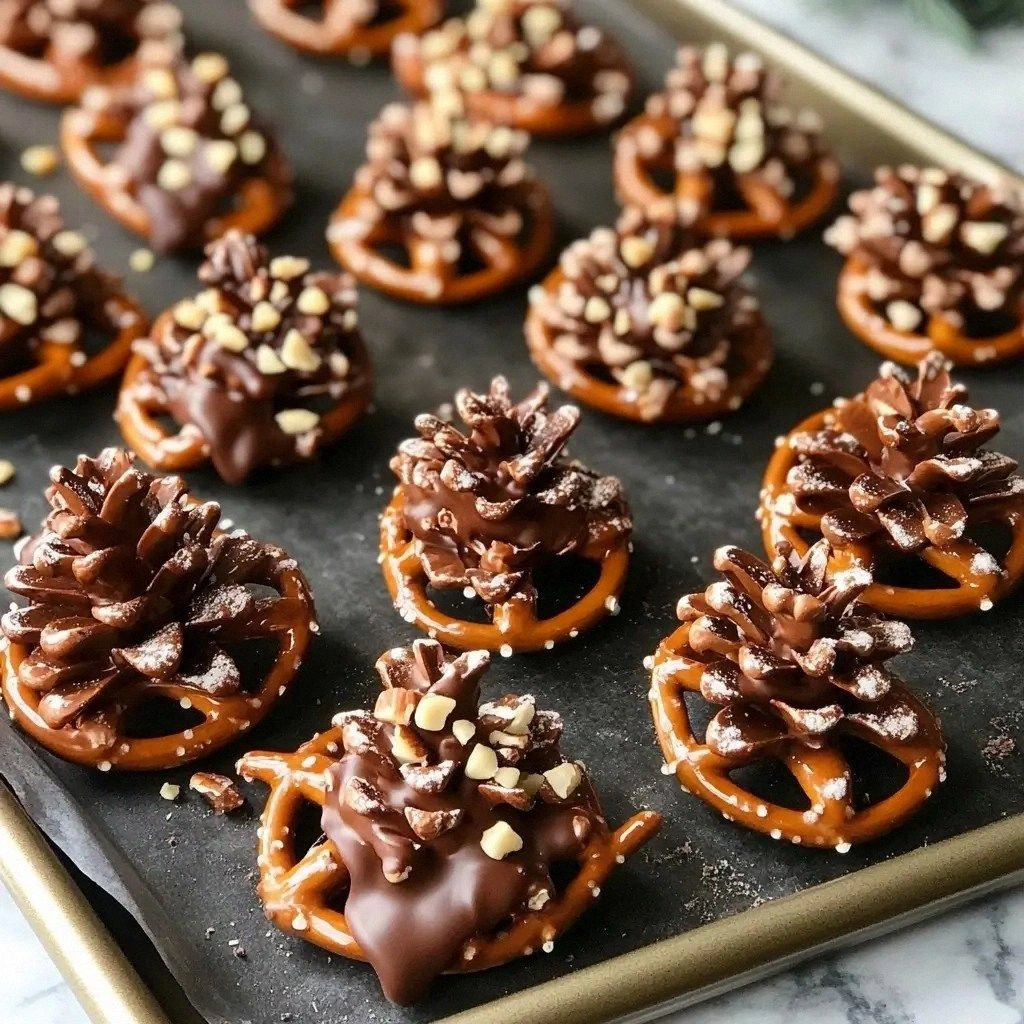
- Uniqueness: By forming the mixture into pinecone shapes, you add an element of visual flair that turns an ordinary snack into a showstopper.
- Crowd Reaction: Guests rave about the unexpected crunch and the glossy chocolate finish, making it a conversation starter at any gathering.
- Ingredient Quality: Using high‑quality chocolate chips ensures a silky finish, while lightly salted pretzels keep the saltiness in check.
- Cooking Method: The gentle melt-and-tilt technique prevents chocolate from burning, giving you a professional finish without the stress.
- Make‑Ahead Potential: These pinecones can be stored in an airtight container for up to a week, making them ideal for prep‑and‑serve occasions.
Inside the Ingredient List
The Flavor Base
Chocolate chips are the heart of this recipe. Dark chocolate gives depth and a slight bitterness that balances the sweet pretzels and nutty nuts. If you prefer a milder taste, switch to milk chocolate, but be prepared for a slightly sweeter finish. Skipping chocolate would turn this into a salty snack, but the caramelized coating is what makes it dessert‑worthy.
The Texture Crew
Mini pretzels provide the signature crunch and salty bite. Choose lightly salted or pretzel sticks for a less intense saltiness, and always use mini pretzels so they melt into the shape of the pinecone. If you’re allergic to wheat, look for pretzels made from alternative flours or use crunchy rice crackers as a substitute. The pretzels’ texture is essential; without them, the treat would feel like a nut bar.
The Unexpected Star
Nut pieces (or seeds for an allergy‑friendly option) add a nutty warmth that balances the chocolate’s richness. Almonds give a buttery note, walnuts bring earthiness, and pecans add a buttery sweetness. If you’re vegan, sunflower seeds or pumpkin seeds work beautifully, offering a different flavor profile. Remember to toast the nuts lightly before adding them to release their oils and deepen the flavor.
The Final Flourish
A pinch of sea salt on top of the finished pinecones can elevate the flavor, but it’s optional. The salt enhances the chocolate’s sweetness and brings out the nuts’ natural flavor. If you prefer a sweeter treat, skip the salt and let the chocolate do all the work. The final flourish is about balance—too much salt and you’ll drown the chocolate; too little and you’ll miss the savory depth.
Everything’s prepped? Good. Let’s get into the real action.
The Method — Step by Step
- Start by setting a double boiler over medium heat. Place the chocolate chips in the upper pot, letting them melt slowly. Stir constantly with a silicone spatula until the mixture is glossy and smooth. The chocolate should smell rich and buttery, but if it starts to steam, reduce the heat immediately. This is the moment of truth—watch the chocolate transform into liquid gold.
- While the chocolate melts, spread the mini pretzels on a baking sheet lined with parchment paper. Make sure they’re evenly spaced so they don’t clump together during the next step. If you prefer a softer crunch, pre‑toast the pretzels in a dry skillet for 2 minutes, but be careful not to burn them. The pretzels’ texture will be the backbone of the final product.
- Once the chocolate is fully melted, remove the pot from heat and let it cool for 30 seconds. Then, use a spoon to scoop out a heaping tablespoon of chocolate and pour it onto the center of each pretzel. The chocolate should spread slightly but stay in a mound. This will be the base of your pinecone shape.
- Next, sprinkle a handful of toasted nuts over the chocolate mound. The nuts should be evenly distributed, and you can use a mix of almonds, walnuts, and pecans for a complex flavor. The nuts add a satisfying chew and a nutty aroma that complements the chocolate. If you’re using seeds, toast them until they’re fragrant but not burnt.
- Using a small fork or toothpick, gently lift the chocolate and nuts together, forming a small pinecone shape. Hold the fork steady and rotate the mixture until the pretzel forms a rounded, cone‑like structure. The goal is to have a single, cohesive shape that holds together when you pick it up. This step requires patience—don’t rush, or the chocolate will harden too quickly.
- Place the shaped pinecones back onto the parchment sheet. Let them sit at room temperature for 5 minutes so the chocolate sets into a firm shell. The edges will begin to pull away from the parchment, indicating that the chocolate has hardened enough to hold the shape. This is the moment to stop, because over‑baking will make the chocolate brittle.
- If you’d like a glossy finish, lightly brush the tops with melted chocolate using a pastry brush. This step is optional but adds a professional sheen. Let the brushed chocolate set for another 2 minutes. The final product should look like miniature, caramelized pinecones with a glossy chocolate coating.
- Once the chocolate has set, transfer the pinecones to a serving platter. You can store them in an airtight container at room temperature for up to 3 days, or refrigerate for up to a week. If you need to reheat them, microwave on low for 10 seconds to soften the chocolate without melting it. The final result is a sweet, salty, nutty treat that looks as good as it tastes.
That’s it—you did it! But hold on, I’ve got a few more tricks that will take this to another level. The next section will give you insider knowledge on how to perfect the texture, how to keep the chocolate glossy, and how to customize the flavor profile for different occasions.
Insider Tricks for Flawless Results
The Temperature Rule Nobody Follows
Chocolate is temperamental, and the key is to keep it below 86°F (30°C) before you start coating. If the chocolate gets too hot, it will seize and become grainy. I use a kitchen thermometer to keep the temperature in check, and I always stir in a dry spoon to help the chocolate cool evenly. A friend tried skipping the thermometer and ended up with a chocolate coating that looked like a melted puddle. That’s why I swear by the thermometer.
Why Your Nose Knows Best
Before you start shaping the pinecones, take a deep sniff of the melted chocolate. A sweet, buttery aroma means it’s ready; if it smells burnt or acrid, it’s too hot. This simple nose test saves you from a ruined batch. I’ve had moments where the chocolate was on the verge of burning, but a quick sniff saved the day. Trust your nose—it’s the best judge of chocolate quality.
The 5-Minute Rest That Changes Everything
After you shape the pinecones, let them rest for exactly 5 minutes. This short pause allows the chocolate to set just enough to hold the shape without becoming hard. I’ve tried letting them sit for 3 minutes and the chocolate was still too soft, and for 10 minutes the chocolate cracked. Five minutes is the sweet spot, and it’s the trick that turns a simple recipe into a professional result.
Use a Silicone Mat for Easy Cleanup
Chocolate can be unforgiving, and cleanup is often the part people dread. By using a silicone mat instead of parchment paper, you eliminate the need to scrape off stuck chocolate. I’ve used this hack in dozens of batches, and it saves me at least 10 minutes of scrubbing. The mat is reusable and dishwasher safe, making it a win for both taste and time.
Add a Pinch of Sea Salt at the End
A light dusting of sea salt on top of the finished pinecones brings out the chocolate’s sweetness and balances the nutty flavor. The salt crystals add a subtle crunch that’s a pleasant surprise. I’ve used this trick at parties, and the guests keep asking for more. It’s a simple step that elevates the entire experience.
Creative Twists and Variations
This recipe is a playground. Here are some of my favorite ways to switch things up:
Spiced Pinecones
Add a pinch of cinnamon or cayenne pepper to the melted chocolate before coating the pretzels. The spice adds warmth and a subtle kick that pairs wonderfully with the chocolate’s sweetness. This variation is great for fall gatherings or when you want a hint of spice.
Coconut Crunch
Replace the nuts with toasted coconut flakes and drizzle a touch of coconut oil over the chocolate. The coconut brings a tropical flavor that feels both exotic and comforting. This version works well for summer parties or when you’re craving a beach vibe.
Almond Joy Twist
Swap the pretzels for almond biscotti crumbs and add shredded coconut to the nut mix. The biscotti adds a crisp, buttery crunch, while the coconut gives a familiar sweetness. It’s like a miniature version of the classic dessert.
Vegan Delight
Use dairy‑free chocolate chips and sunflower seeds instead of nuts. The sunflower seeds provide a mild, nutty flavor and a satisfying crunch. This version is perfect for guests with dairy or nut allergies.
Chocolate‑Covered Pretzel Bites
Instead of forming pinecones, simply drop spoonfuls of the chocolate‑nut mixture onto the pretzel base and let them set. The result is bite‑sized, individually wrapped treats that are great for snack boxes or gift baskets.
Iced Pinecones
After the chocolate sets, chill the pinecones in the fridge for 30 minutes. The cold chocolate becomes firmer, giving a refreshing bite that’s perfect for hot summer days. The texture is slightly different, but the flavor remains unchanged.
Storing and Bringing It Back to Life
Fridge Storage
Place the pinecones in an airtight container and store them in the refrigerator for up to 3 days. The chocolate will firm up, making them easy to pick up without breaking. When you’re ready to serve, let them sit at room temperature for 10 minutes so the chocolate softens slightly.
Freezer Friendly
For longer storage, freeze the pinecones on a parchment‑lined tray for 1–2 hours until solid, then transfer them to a freezer bag. They’ll keep for up to 2 weeks. To thaw, leave them at room temperature for 30 minutes; the chocolate will return to its glossy state.
Best Reheating Method
If you want to warm them up, microwave on low power for 10 seconds. Add a tiny splash of water to the container to create steam, which helps the chocolate soften without melting. This trick brings the pinecones back to life, making them as fresh as the day they were made.