Picture this: I’m standing in my kitchen, the oven humming like a lazy cat, and a half‑finished batch of brownies sits on the counter looking more like a sad, flat pancake than the fudgy masterpiece I was promised. I’d just tried a “quick fix” recipe from a glossy magazine, and the result was as disappointing as a movie with a great trailer but a terrible ending. My taste buds were pleading for something richer, something that could turn a bland afternoon into a celebration. That moment of culinary defeat sparked a daring challenge – I would create the ultimate brownie, one that could silence every critic and satisfy even the most stubborn sweet tooth.
The first time I attempted my new formula, the kitchen was a symphony of smells: melted butter sizzling softly, cocoa powder blooming into a deep mahogany cloud, and a hint of vanilla that seemed to whisper promises of decadence. The batter was glossy, thick, and practically begged to be spread into the pan. As it baked, the air filled with an aroma so intoxicating that even the neighbor’s cat paused at the window, ears perked, as if to say “finally, something worth waiting for.” When the timer dinged, the brownies emerged with a glossy crust that cracked just enough to reveal a gooey, fudgy interior that glistened like a chocolate lava flow.
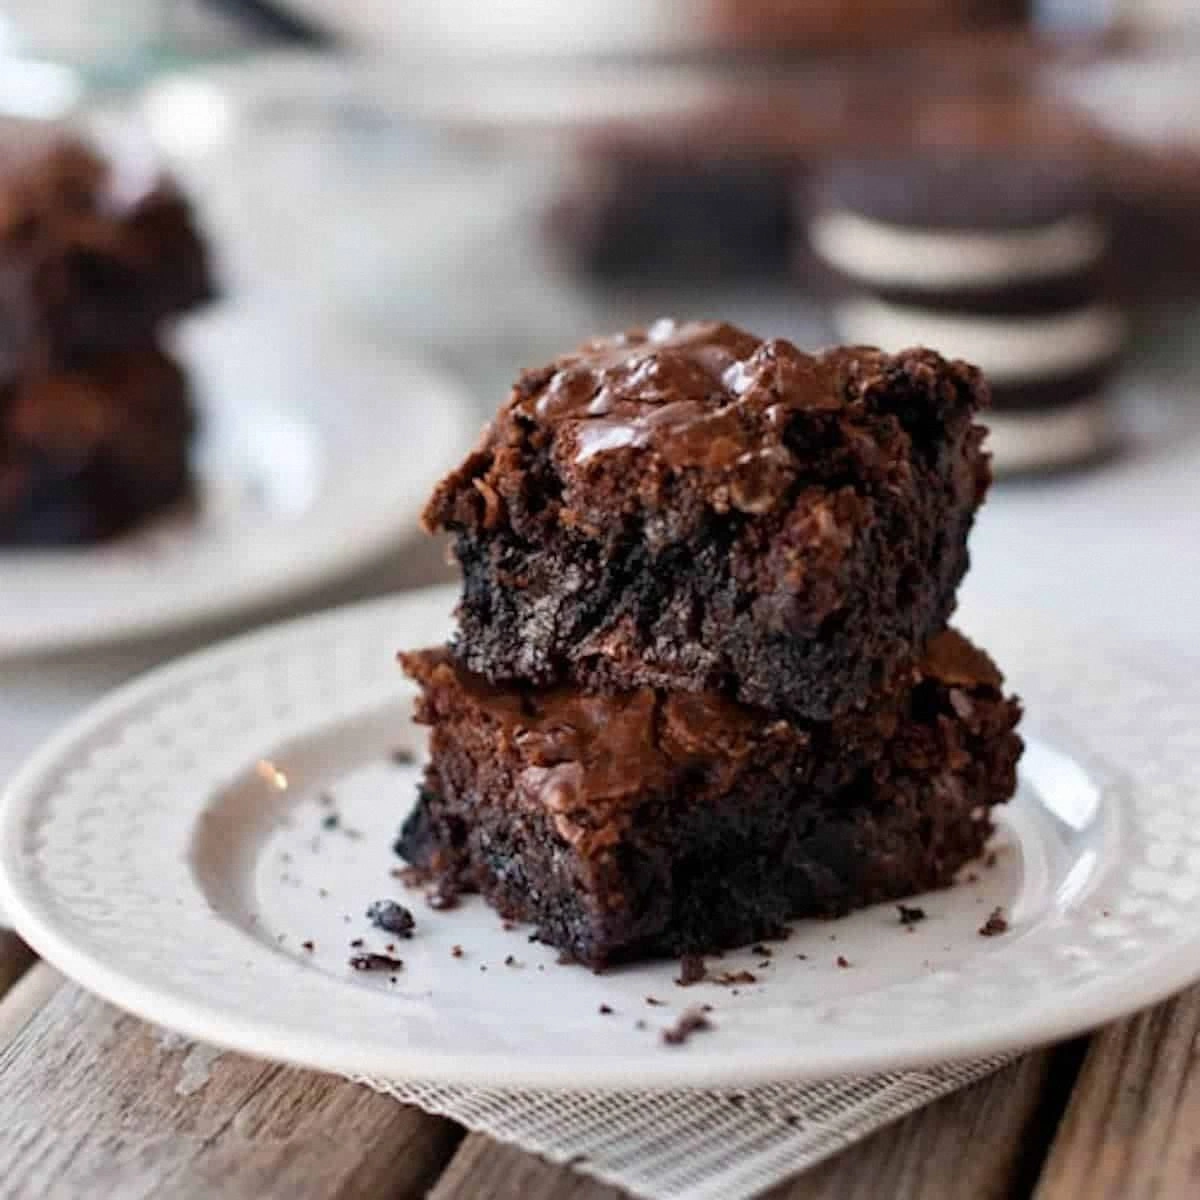
What makes this version stand out? It’s not just the ingredients; it’s the chemistry, the timing, the little secrets that turn a good brownie into the best ever brownies you’ll ever make at home. I dare you to taste this and not go back for seconds – the combination of a crisp edge, a chewy middle, and a melt‑in‑your‑mouth center is pure, unapologetic indulgence. Most recipes get the texture wrong, either too cakey or too dry, but this one hits the sweet spot every single time. I’ll be honest — I ate half the batch before anyone else got a chance to try it, and that’s because the flavor is so intense it practically melts in your mouth.
Now, let me walk you through every single step — by the end, you’ll wonder how you ever made brownies any other way. Okay, ready for the game‑changer? This next part? Pure magic. We’ll dive into the why’s and how’s, sprinkle in some hacks, and I’ll even share a few wild variations that will keep you coming back for more. Stay with me here — this is worth it.
What Makes This Version Stand Out
- Flavor Depth: A blend of high‑quality cocoa powder and melted dark chocolate creates a rich, layered chocolate experience that’s deeper than any store‑bought mix.
- Texture Balance: The ratio of butter to flour yields a crust that’s crisp at the edges while the center stays chewy and fudgy, like a chocolate lava flow.
- Simplicity: Only nine pantry staples are needed, and each step is straightforward enough for a beginner yet refined enough for a seasoned baker.
- Ingredient Quality: Using real butter instead of oil, and opting for unsweetened cocoa, ensures a pure chocolate taste without any greasy aftertaste.
- Crowd Reaction: These brownies have a habit of disappearing within minutes at parties, prompting endless requests for the recipe.
- Make‑Ahead Potential: They keep perfectly for up to a week, and freeze beautifully, so you can have a ready‑to‑serve treat anytime.
- Cooking Method: The “low‑and‑slow” bake at 325°F prevents over‑drying and encourages that coveted crackly top.
- Unexpected Twist: A pinch of sea salt sprinkled just before baking amplifies the chocolate’s sweetness, creating a sophisticated flavor contrast.
Inside the Ingredient List
The Flavor Base
First up, the cocoa powder. I use a Dutch‑process, unsweetened cocoa that gives the brownies a deep, earthy chocolate flavor without any bitterness. If you skip the cocoa, you lose that intense chocolate backbone, and the brownies become one‑dimensional. A good swap is a mix of cocoa and melted dark chocolate – just make sure the total chocolate content stays around 8 ounces for balance.
The Texture Crew
Butter is the star of the show when it comes to texture. Melted butter coats every flour particle, creating that coveted glossy crust while keeping the interior moist. If you replace butter with oil, you’ll notice a lighter crumb and a slightly greasy mouthfeel – not the fudgy dream we’re after. For the best butter, choose a European‑style variety with higher butterfat; it adds richness without needing extra fat.
The Unexpected Star
Salt might seem like a background player, but a pinch of flaky sea salt just before baking can elevate the chocolate flavor dramatically. It’s the culinary equivalent of a spotlight on a lead actor – it makes the sweet notes pop. If you’re watching your sodium, you can use a reduced‑sodium sea salt or simply omit it, though you’ll miss that subtle contrast.
The Final Flourish
Flour provides structure, but the key is to use just enough to hold the brownies together without turning them cake‑like. I stick with all‑purpose flour because it balances gluten development perfectly. For a gluten‑free version, swap in an equal weight of almond flour mixed with a tablespoon of cornstarch; the texture will be slightly denser but still delicious.
Everything’s prepped? Good. Let’s get into the real action…
The Method — Step by Step
Preheat your oven to 325°F (163°C) and line a 9×13‑inch baking pan with parchment paper, letting the paper hang over the sides for easy lift‑out later. The lower temperature is the secret to that crackly top; a hotter oven would bake the edges too fast and leave the center undercooked. While the oven warms, melt the butter in a medium saucepan over low heat, stirring until it’s completely liquid and fragrant – you’ll hear a soft sizzle that signals it’s ready.
In a large mixing bowl, whisk together the flour, cocoa powder, baking powder, and salt until the dry ingredients are uniformly combined. This step is crucial because it prevents pockets of cocoa from creating bitter streaks. If you notice any lumps, give the mixture a quick sift; the result will be a smoother batter.
In another bowl, beat the sugar and melted butter together until the mixture is glossy and slightly thickened – think of a caramel that’s just about to set. Then add the eggs one at a time, whisking vigorously after each addition. Finally, stir in the vanilla extract; that aromatic note will round out the chocolate flavor beautifully.
Now comes the “magic” moment: pour the wet mixture into the dry ingredients and fold gently with a rubber spatula. The goal is to combine until you see just a few streaks of flour; over‑mixing would develop gluten and make the brownies cakey. This is where the texture crew really shines, creating that perfect balance of fudgy and chewy.
Transfer the batter into the prepared pan, spreading it evenly with the spatula. For that extra glossy finish, brush the very top with a thin veil of melted butter – this is the “glossy crust” trick that makes the brownies look bakery‑level. Sprinkle a pinch of flaky sea salt over the surface; the tiny crystals will catch the light and add a subtle crunch.
Slide the pan into the preheated oven and bake for 30‑35 minutes. You’ll know it’s done when the edges start pulling away from the parchment and the top has a faint crackle. Insert a toothpick into the center; it should come out with a few moist crumbs but no wet batter. If you’re unsure, trust your nose – the aroma will turn rich and slightly nutty, signaling it’s ready.
Once baked, remove the pan and let the brownies cool in the pan for at least 15 minutes. This resting period lets the crumb set, making it easier to lift the whole slab out using the parchment overhang. After cooling, cut into squares – I like 2‑inch pieces for a perfect bite‑size that still feels indulgent.
Now the fun part: serve warm with a scoop of vanilla ice cream, or let them cool completely for a firmer texture that’s perfect for packing in lunchboxes. I dare you to taste one plain and then try it with a drizzle of salted caramel – the contrast will blow your mind. And remember, these brownies keep well, so you can enjoy them over several days without losing that fresh‑baked magic.
That’s it — you did it. But hold on, I’ve got a few more tricks that’ll take this to another level…
Insider Tricks for Flawless Results
The Temperature Rule Nobody Follows
Most home bakers set the oven to 350°F, assuming hotter is better. In reality, a lower temperature of 325°F allows the batter to bake evenly, preventing the dreaded dry edges while still developing that coveted crackly top. I once tried the 350°F shortcut and ended up with a crust that was too hard and a middle that was under‑done. Trust the slower bake; the extra 25 degrees makes a world of difference in texture.
Why Your Nose Knows Best
Don’t rely solely on a toothpick; your sense of smell is a far more reliable indicator. When the brownies are ready, the kitchen fills with a deep, almost earthy chocolate scent that’s slightly sweet and a touch buttery. If you catch that aroma before the timer, you can pull them out a minute early for an extra gooey center. I’ve saved many batches by listening to my nose.
The 5‑Minute Rest That Changes Everything
Resist the urge to dig in immediately. Letting the brownies rest for five minutes after cutting allows the interior to finish setting, making each piece hold its shape when you lift it. Skipping this step often results in crumbly squares that fall apart on the plate. A short patience pause yields a cleaner bite and a more satisfying mouthfeel.
Chocolate Chip Distribution Tip
If you love chocolate pockets, toss the chips with a teaspoon of flour before folding them into the batter. The flour coating prevents the chips from sinking to the bottom, ensuring they’re evenly dispersed. I tried adding chips directly once and ended up with a chocolate‑free border – not ideal for the brownie lover.
Freezing for Future Cravings
Once cooled, cut the brownies into portions and wrap each tightly in plastic wrap before placing them in a freezer bag. When you’re ready for a treat, microwave for 15‑20 seconds with a splash of milk to revive that fresh‑baked softness. Freezing locks in flavor, and the reheated brownies taste almost as good as the day they were baked.
Creative Twists and Variations
This recipe is a playground. Here are some of my favorite ways to switch things up:
Espresso Explosion
Replace 1 tablespoon of cocoa powder with 1 tablespoon of instant espresso powder. The coffee amplifies the chocolate depth, turning each bite into a sophisticated mocha experience. Perfect for brunch or an after‑dinner pick‑me‑up.
Nutty Crunch
Stir in a half‑cup of toasted chopped walnuts or pecans before baking. The nuts add a buttery crunch that contrasts beautifully with the fudgy interior. If you’re allergic, try toasted pumpkin seeds for a similar texture without the nut flavor.
White Chocolate Swirl
Drop dollops of melted white chocolate on top of the batter before baking and use a skewer to swirl it through. This creates ribbons of sweet cream that melt into the brownie, offering a delightful surprise in every bite.
Spicy Chili
Add a pinch (about ¼ teaspoon) of cayenne pepper or a drizzle of chili‑infused chocolate. The subtle heat dances with the chocolate, creating a complex flavor profile that’s surprisingly addictive.
Berry Burst
Fold in a half‑cup of fresh raspberries or dried cranberries after the batter is mixed. The fruit adds a tart pop that cuts through the richness, making the brownies feel lighter while still indulgent.
Storing and Bringing It Back to Life
Fridge Storage
Place the brownies in an airtight container and store them in the refrigerator for up to five days. The cool environment keeps the crumb firm and prevents them from becoming overly soft. When you’re ready to eat, let them sit at room temperature for 10 minutes or microwave a single piece for 10‑15 seconds.
Freezer Friendly
Wrap individual squares tightly in plastic wrap, then place them in a freezer‑safe zip‑lock bag. They’ll stay fresh for up to three months. To reheat, unwrap and microwave for 20 seconds, adding a tiny splash of water to the plate – the steam revives that melt‑in‑your‑mouth texture.
Best Reheating Method
For the ultimate reheated brownie, preheat your oven to 300°F (149°C), place the brownies on a foil‑lined baking sheet, and warm for 5‑7 minutes. This method restores the crisp edge while keeping the center gooey, mimicking the original bake.