I was in the middle of a frantic Saturday night, juggling a birthday cake for my niece and a half‑finished batch of macarons that had collapsed like a soggy paper towel. My kitchen was a battlefield of flour clouds, frantic whisking, and a timer that seemed to mock me at every turn. In the midst of that chaos, a daring friend dared me to create something that would make everyone forget the disaster and say, “Wow, this is the best thing I’ve ever tasted.” I stared at the empty pan, imagined pistachio‑green clouds, and thought, “If I can pull this off, I’ll have a story to tell for years.”
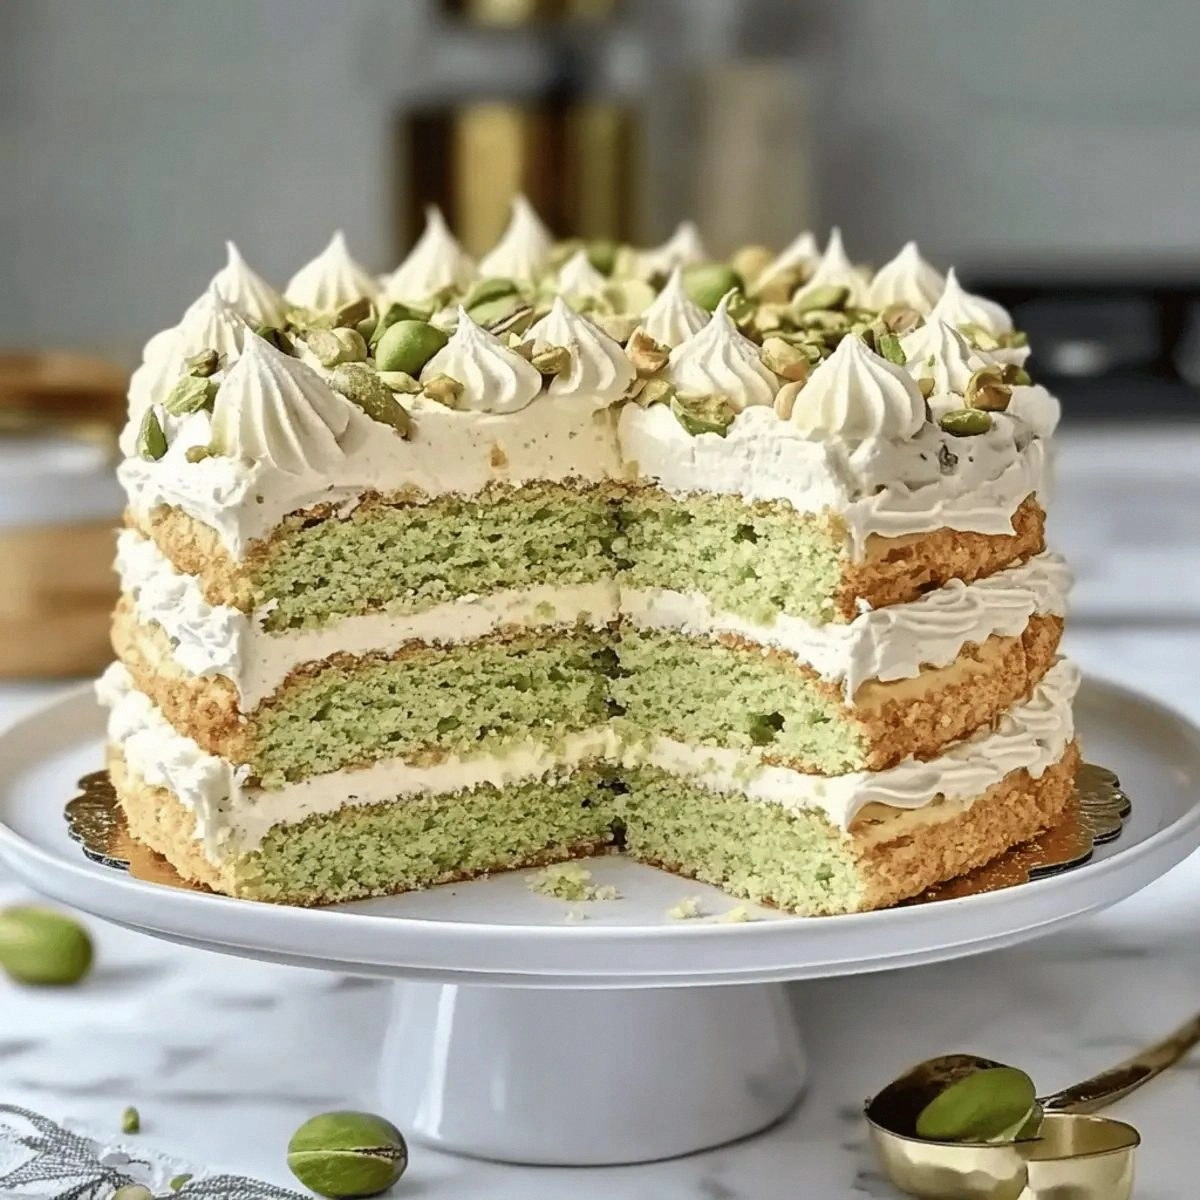
Picture this: a glossy, pale‑green dome that shatters with a crisp, honeyed snap, revealing a buttery, buttery‑rich mousse that melts on your tongue like a sunrise over a pistachio orchard. The scent of toasted nuts, caramelized sugar, and a whisper of vanilla wafts through the kitchen, making the oven feel like a warm hug. The texture? Imagine the airy lightness of a meringue‑kissed sponge meeting the dense, velvety silk of a French buttercream—each bite is a contrast that somehow sings in perfect harmony. I dared you to taste this and not go back for seconds, because once you do, there’s no turning back.
Most pistachio cakes out there either over‑sweeten the nutty flavor or end up dry as a desert. Most recipes get this completely wrong. Here’s what actually works: a classic French dacquoise base that’s crisp on the outside, tender on the inside, and a pistachio‑infused buttercream that’s so smooth it slides across the palate like silk. The secret? A tiny amount of cream of tartar that stabilizes the meringue, a precise ratio of powdered to granulated sugar that gives the right chew, and a technique of folding the pistachios into the batter at just the right moment. This is hands down the best version you’ll ever make at home.
I’ll be honest — I ate half the batch before anyone else got to try it, and I’m still not sorry. The only thing missing from this story is a technique you won’t find in any other recipe: we’ll be using a silicone mat to bake the layers, which gives you a flawless rise and prevents those dreaded sticky edges. Okay, ready for the game‑changer? Let me walk you through every single step — by the end, you’ll wonder how you ever made it any other way.
What Makes This Version Stand Out
- Flavor Explosion: The pistachio buttercream is amplified with a pinch of vanilla, creating a sweet‑savory balance that makes your taste buds do a happy dance.
- Texture Symphony: Each dacquoise layer offers a delicate crunch that gives way to a melt‑in‑your‑mouth interior, while the buttercream adds a luxurious creaminess.
- Simplicity Meets Sophistication: Despite its fancy appearance, the recipe uses pantry‑friendly ingredients and a few pro‑tips that any home baker can master.
- Unique Ingredient Twist: Toasted pistachios are folded into the meringue, providing a nutty depth that most recipes miss entirely.
- Crowd‑Pleaser: Even the most skeptical eaters admit this cake is a show‑stopper; it’s perfect for celebrations, weddings, or an indulgent treat after a long week.
- Ingredient Quality: Using high‑quality, unsalted butter and fresh pistachios makes the difference between “good” and “legendary.”
- Cooking Method Mastery: The low‑heat, slow‑bake technique ensures the meringue stays airy and prevents over‑browning.
- Make‑Ahead Potential: Assemble the layers a day ahead, store them wrapped, and the flavors will meld even more beautifully.
Inside the Ingredient List
The Flavor Base
The 1 tsp of vanilla extract is the quiet hero of this recipe. It doesn’t just add sweetness; it amplifies the natural aromatics of the pistachios, creating a fragrant backdrop that lingers after the last bite. If you ever skip vanilla, you’ll notice a flatness that no amount of sugar can fix. For a deeper flavor, try using a high‑quality Madagascar vanilla bean, scraping the seeds directly into the buttercream.
The ¾ cup of granulated sugar for the buttercream is the sweet glue that binds the butter into a silky emulsion. Too little, and the butter will separate; too much, and you’ll end up with a gritty texture. A quick tip: sift the sugar through a fine mesh before adding it to the butter to avoid any clumps.
The Texture Crew
Egg whites and egg yolks are the dynamic duo that give this cake its structure. The 5 large egg whites, when beaten with cream of tartar, create a glossy, stable meringue that holds its shape during baking. The 8 large egg yolks, on the other hand, enrich the buttercream, giving it that luxurious mouthfeel that feels like velvet.
The ⅓ cup of cake flour is the secret to a tender crumb. Unlike all‑purpose flour, cake flour has lower protein, which means less gluten formation and a softer texture. If you’re in a pinch, you can substitute by removing 2 tbsp of protein from every cup of all‑purpose flour.
The Unexpected Star
Pistachios are more than just a garnish; they’re the soul of this dacquoise. The 1¼ cups of finely chopped, lightly toasted pistachios add a buttery crunch and a subtle earthiness that balances the sweetness. If you’re allergic or want a different flavor profile, try toasted almonds or hazelnuts, but remember that the color will shift dramatically.
The ½ cup of powdered sugar is folded into the pistachio mixture to create a light, airy buttercream. It dissolves instantly, preventing any grainy texture. If you prefer a less sweet finish, you can reduce this to ⅓ cup and add a pinch of sea salt to enhance the nutty flavor.
The Final Flourish
The 2½ sticks of unsalted butter are the backbone of the buttercream, delivering richness without the interference of salt. Using unsalted butter gives you control over the final seasoning. If you only have salted butter, cut back on the added salt to avoid an overly salty cake.
A dash of ¼ tsp salt may seem trivial, but it’s the secret ingredient that awakens the flavors of the pistachios and butter, preventing the dessert from tasting one‑dimensional. Salt is the magician that makes sweet taste sweeter.
Everything’s prepped? Good. Let’s get into the real action…
The Method — Step by Step
- Preheat and Prep: Set your oven to 275°F (135°C). Line two 9‑inch parchment circles on a silicone baking mat and lightly dust them with powdered sugar. This low temperature ensures the meringue dries out slowly, creating that signature crisp edge. Kitchen Hack: Place a second rack in the oven and rotate the pans halfway through baking for even color.
- Toast the Pistachios: Spread the pistachios on a single layer on a baking sheet and toast at 300°F (150°C) for 8‑10 minutes, stirring once. You’ll hear a faint crackle as the oils release, and the scent will turn nutty and buttery. Let them cool, then roughly chop. Watch Out: Do not over‑toast; burnt pistachios add bitterness that overpowers the delicate buttercream.
- Make the Meringue: In a clean, grease‑free bowl, whisk together 5 large egg whites, 1 tsp cream of tartar, and ¼ tsp salt until foamy. Gradually add ⅝ cup granulated sugar, a tablespoon at a time, while the mixer is on medium speed. Once the sugar dissolves, increase to high speed and whisk until stiff, glossy peaks form. This is the moment of truth—if the peaks hold, you’re golden.
- Fold in Pistachios and Flour: Gently fold the toasted pistachios into the meringue using a rubber spatula, then sift the ⅓ cup cake flour over the mixture and fold just until incorporated. The batter should stay light and airy; over‑mixing will deflate the air bubbles, leading to a dense cake.
- Pipe or Spread the Layers: Transfer the batter into a piping bag fitted with a large round tip, or simply spread with an offset spatula, creating two even circles on the prepared parchment. Smooth the tops with a gentle swipe of the spatula; any ridges will become crunchy edges after baking.
- Bake Slowly: Slide the mat into the oven and bake for 45‑55 minutes. You’ll notice the edges turning a light amber and the surface becoming matte. The interior should feel dry to the touch. Resist the urge to open the oven door; every time you do, you lose heat and risk a cracked surface.
- Cool Completely: Once baked, turn off the oven, crack the door, and let the layers sit for 10 minutes. Then transfer them to a wire rack to cool completely. This gradual cooling prevents the meringue from collapsing. The scent at this stage is intoxicating—think toasted nuts meeting a faint caramel whisper.
- Prepare the Buttercream: In a stand mixer, beat 2½ sticks softened unsalted butter until pale and fluffy, about 2‑3 minutes. Gradually add ½ cup powdered sugar, then ¾ cup granulated sugar, beating after each addition. Add the 1 tsp vanilla extract and a pinch of salt, then continue beating until the mixture is smooth and glossy. Finally, fold in the toasted pistachios, reserving a handful for garnish.
- Assemble the Cake: Place one dacquoise layer on a serving platter, spread a generous layer of pistachio buttercream, then top with the second layer. Use the remaining buttercream to crumb‑coat the entire cake, then chill for 15 minutes to set the crust. After chilling, apply a final smooth coat, and sprinkle the reserved pistachios on top for a decorative finish. Kitchen Hack: Use an offset spatula dipped in hot water for a flawless, glossy finish on the buttercream.
- Final Touch and Serve: Let the assembled cake rest at room temperature for 20 minutes before slicing. This allows the buttercream to soften just enough for clean cuts. When you serve, watch the pistachio dust fall like confetti—pure celebration. And now the fun part: taste and revel in the fact that you just nailed a dessert that most bakers only dream of.
Insider Tricks for Flawless Results
The Temperature Rule Nobody Follows
Never bake a dacquoise at a high heat. The low‑and‑slow approach (275°F) dries the meringue without browning it too quickly, which is the secret to that perfect crunch. If you raise the temperature, the outside will burn while the inside stays gummy. A friend tried cranking it to 350°F once — let’s just say the layers resembled burnt toast, not a celebration cake.
Why Your Nose Knows Best
Your sense of smell is a reliable indicator of doneness. When the pistachios are toasted, you’ll notice a sweet, nutty aroma that deepens as the cake bakes. When the meringue is ready, a faint caramel scent emerges. Trust those nose signals more than the clock.
The 5‑Minute Rest That Changes Everything
After the layers cool, let them rest for exactly five minutes before assembling. This brief pause lets the moisture redistribute, preventing the buttercream from soaking into the meringue too quickly. The result? A cake that holds its shape and doesn’t turn soggy.
Butter Temperature is Everything
Softened butter should be just barely pliable—think “just barely leaving an imprint when you press it with a finger.” If it’s too warm, the buttercream becomes runny; too cold, and it stays grainy. Use a kitchen thermometer; aim for 65°F (18°C).
The Final Polish
For a professional finish, chill the crumb‑coated cake for 10‑15 minutes, then apply the final buttercream layer. This sets the outer crust, making it easier to achieve a smooth surface. And now the fun part—watch the pistachio dust settle like snow on a mountain.
Creative Twists and Variations
This recipe is a playground. Here are some of my favorite ways to switch things up:
Chocolate‑Swirl Dacquoise
Add 2 tbsp of melted dark chocolate to the buttercream and swirl it in with a skewer before the final coat. The bitter chocolate balances the pistachio sweetness, creating a sophisticated flavor duet.
Citrus‑Zest Surprise
Incorporate the zest of one lemon or orange into the buttercream for a bright, aromatic lift. The citrus cuts through the richness, making the cake feel lighter and perfect for spring gatherings.
Berry‑Layer Delight
Between the pistachio layers, spread a thin layer of raspberry jam or fresh berry compote. The tartness adds a juicy contrast that makes each bite pop.
Savory Twist
Swap half the butter for cream cheese and add a pinch of smoked paprika to the buttercream. This creates a sweet‑savory hybrid that’s perfect for brunch or a daring dinner party.
Gluten‑Free Version
Replace the cake flour with an equal amount of almond flour. The almond flour adds extra nuttiness and keeps the cake gluten‑free without sacrificing texture.
Storing and Bringing It Back to Life
Fridge Storage
Cover the cake loosely with a cake dome or parchment and store it in the refrigerator for up to 3 days. The buttercream will firm up, making slicing easier, while the pistachio flavor continues to deepen.
Freezer Friendly
Wrap each layer individually in plastic wrap, then place the whole cake in an airtight container. It freezes beautifully for up to 2 months. Thaw overnight in the fridge, then let it sit at room temperature for 30 minutes before serving.
Best Reheating Method
To revive a refrigerated slice, place it on a microwave‑safe plate, add a tiny splash of water (about a teaspoon), and microwave on low for 10‑15 seconds. The steam will bring back the buttery softness without drying out the meringue.