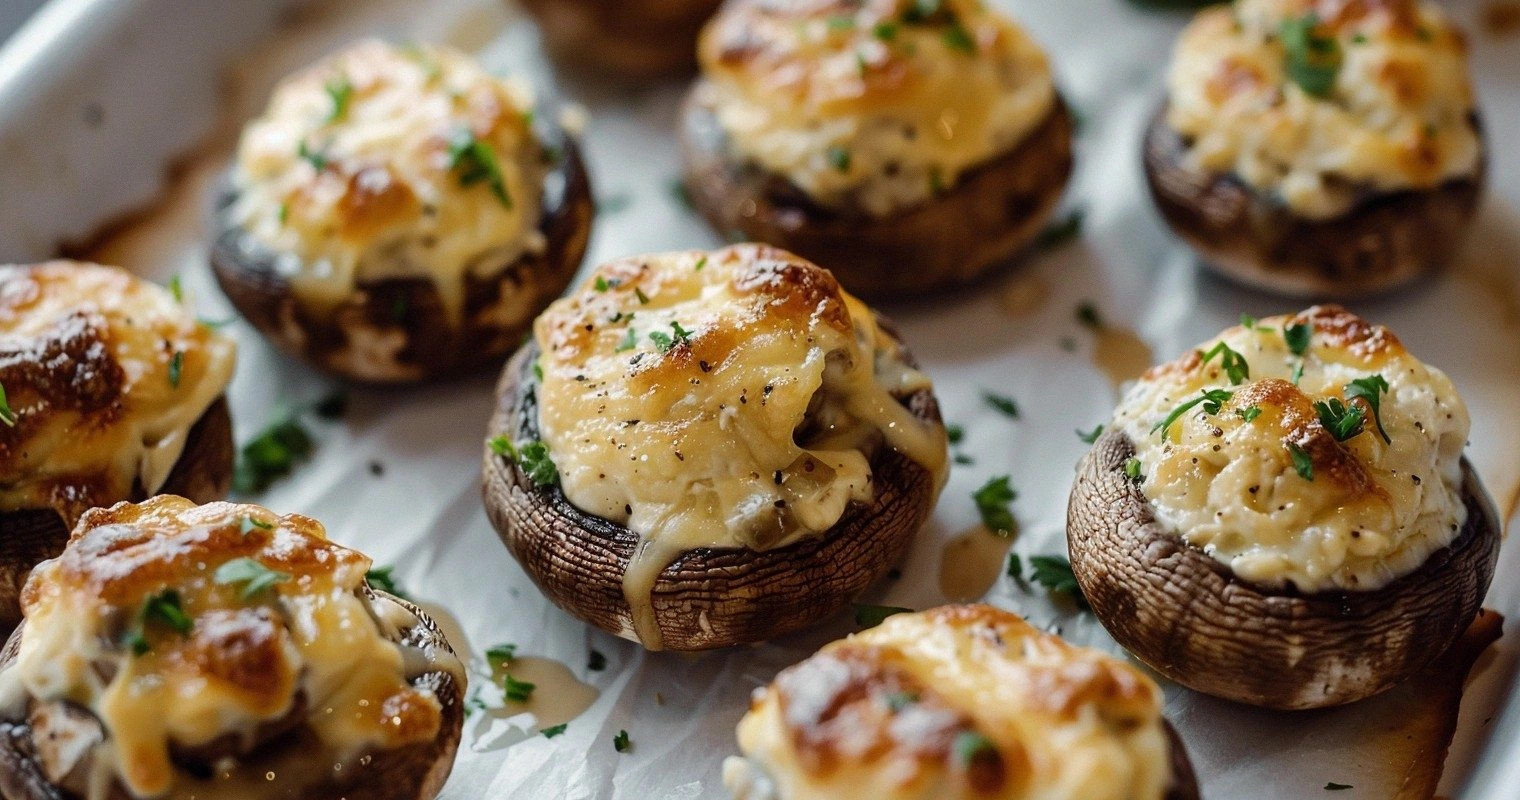
I was standing in my kitchen, staring at a half‑empty tray of plain mushroom caps that had somehow survived the entire week without being devoured. My roommate had dared me to turn those sad little umbrellas into something that would make even the most stubborn meat‑eater ask for seconds, and I accepted the challenge with a grin that said, “Watch me.” The air was thick with the faint scent of stale pizza and the faint hum of the refrigerator, but my mind was already buzzing with the idea of a buttery, tangy filling that could transform those mushrooms into the star of any party. I grabbed a block of cream cheese, a couple of garlic cloves, and a handful of fresh parsley, and the kitchen turned into a battlefield of flavors.
Picture this: the oven preheats, the heat radiating like a warm hug, while the mushrooms sit on a sheet waiting for their destiny. The sound of the oven door closing is a satisfying click, like a secret latch being pulled. As the buttered breadcrumbs start to toast, a golden aroma wafts through the room, making the countertop feel like a runway for culinary fireworks. When the creamy mixture hits the hot mushroom caps, it spreads like velvet, bubbling just enough to create those coveted little brown edges that scream “I’m ready to be devoured!” You can almost hear the soft sigh of the cheese melting into the crevices of the mushroom.
Most recipes for stuffed mushrooms either drown the mushroom in cheese or skim on the flavor, leaving you with a soggy disappointment. I’ve tried the “quick fix” versions that promise a 10‑minute miracle, and they always fall flat—literally. This version, however, is a symphony of textures: the earthiness of the mushroom, the tangy richness of the cream cheese, the crunch of panko, and the subtle herbaceous pop of parsley. I’m going to be honest — I ate half the batch before anyone else got a chance to try it, and that’s a testament to how addictive this dish truly is.
What truly sets this recipe apart is a secret weapon: a splash of white wine that deglazes the garlic and adds a whisper of acidity that cuts through the richness. It’s a tiny twist that makes the filling sing, and you’ll wonder how you ever lived without it. Let me walk you through every single step — by the end, you’ll wonder how you ever made it any other way.
What Makes This Version Stand Out
- Flavor Explosion: The combination of cream cheese, garlic, and a splash of white wine creates a depth that’s richer than any store‑bought dip.
- Texture Harmony: Crispy breadcrumb topping meets the silky interior, delivering a bite that’s both crunchy and melt‑in‑your‑mouth.
- Simplicity: Only eight core ingredients, all pantry‑friendly, making it perfect for a last‑minute gathering.
- Unique Twist: A dash of white wine adds brightness and prevents the filling from feeling heavy.
- Crowd‑Pleaser: Even picky eaters who claim they “don’t like mushrooms” end up reaching for another bite.
- Ingredient Quality: Fresh parsley and high‑quality Parmesan elevate the dish from ordinary to unforgettable.
- Cooking Method: Baking, not broiling, ensures even heat distribution and a perfectly browned top.
- Make‑Ahead Potential: Assemble ahead of time, pop in the oven when guests arrive, and you’ve got a stress‑free appetizer.
Inside the Ingredient List
The Flavor Base
Cream cheese is the heart of this dish; its tangy, buttery profile provides the luscious canvas that holds everything together. Using a full‑fat version ensures the filling stays silky and doesn’t dry out during baking. If you swap it for a low‑fat alternative, you’ll notice a watery texture and a loss of that luxurious mouthfeel. Fresh garlic, minced finely, adds a pungent bite that cuts through the richness, and when deglazed with a splash of white wine, it releases aromatic compounds that turn the filling into a fragrant masterpiece.
The Texture Crew
Panko breadcrumbs bring a light, airy crunch that contrasts beautifully with the creamy interior. Their larger flakes stay crisp even after the baking process, unlike regular breadcrumbs that can become soggy. A handful of grated Parmesan adds a salty, nutty depth and helps the breadcrumbs brown to a golden hue. If you’re dairy‑free, try a vegan Parmesan; the flavor will shift, but the texture remains satisfying.
The Unexpected Star
Fresh parsley isn’t just a garnish—it injects a bright, herbaceous note that lifts the entire dish. The chlorophyll‑rich leaves also add a pop of color that makes each mushroom look like a tiny green jewel. When you chop parsley too finely, it can become mushy; instead, give it a rough chop so you still feel tiny flecks of herb in each bite. If parsley isn’t your jam, cilantro or chives can provide a similar fresh lift.
The Final Flourish
A drizzle of olive oil over the tops before baking ensures the breadcrumbs achieve that coveted caramelized crust. Salt and freshly cracked black pepper bring the flavors into balance, preventing the dish from tasting flat. Finally, a splash of white wine (about two tablespoons) not only deglazes the garlic but also adds a subtle acidity that keeps the filling from feeling cloying. Skip the wine, and you’ll miss that bright, palate‑cleansing finish.
Everything's prepped? Good. Let's get into the real action...
The Method — Step by Step
Preheat your oven to 375°F (190°C). While the oven warms up, line a baking sheet with parchment paper; this prevents the mushrooms from sticking and makes cleanup a breeze. Arrange the mushroom caps, stem side up, leaving a little space between each so the heat can circulate. The moment the oven door shuts, you’ll hear that subtle sigh of anticipation—this is the moment of truth.
Clean the mushroom caps with a damp paper towel, removing any dirt without soaking them. Gently scrape out the stems using a teaspoon, creating a shallow well for the stuffing. Keep the stems—you’ll mince them for the filling later. If you’re in a rush, a food processor can give you a fine mince in seconds.
Kitchen Hack: Use a small spoon to scoop out the stem material; it creates a perfect, uniform cavity.In a medium bowl, combine the softened cream cheese, minced mushroom stems, minced garlic, and the splash of white wine. Beat with a rubber spatula until the mixture is smooth and glossy. Add the grated Parmesan, chopped parsley, and a pinch of salt and pepper, then fold everything together. The mixture should look thick yet spreadable—if it’s too stiff, add a teaspoon of olive oil.
In a small skillet over medium heat, warm the olive oil and toss in the panko breadcrumbs. Stir constantly for about two minutes until they turn a light golden brown and emit a nutty aroma. This step is crucial: under‑toasted breadcrumbs will stay soggy, while over‑toasted ones become bitter.
Watch Out: Keep the heat moderate; high heat can scorch the panko before it has a chance to absorb the olive oil.Fold the toasted breadcrumbs into the cream‑cheese mixture, ensuring an even distribution. The breadcrumbs should be suspended throughout the mixture, not settled at the bottom. This ensures every bite gets that coveted crunch. If you prefer an extra‑crispy top, reserve a tablespoon of breadcrumbs to sprinkle just before baking.
Kitchen Hack: For a gluten‑free version, swap panko with crushed gluten‑free cornflakes.Spoon the filling into each mushroom cap, pressing gently to mound it slightly above the rim. Don’t overfill; the mixture will expand a bit as it bakes. A good rule of thumb is about a tablespoon per cap for a 4‑serving batch. This is the part where you get to be artistic—make each mushroom look like a tiny, inviting volcano.
Drizzle a tiny amount of olive oil over the tops of the stuffed mushrooms; this encourages browning and adds a glossy finish. If you reserved extra breadcrumbs, sprinkle them now for that extra crunch. Slide the sheet into the preheated oven and bake for 20‑25 minutes, or until the tops are golden and the mushrooms are tender when pierced with a fork.
While the mushrooms bake, set a timer and resist the urge to open the oven door. The first 15 minutes are where the magic happens—the cheese bubbles, the breadcrumbs caramelize, and the aromas start to fill your kitchen. When the timer goes off, give the mushrooms a quick visual check: the edges should be pulling away from the cap, and the tops should have a deep amber hue.
Remove the tray from the oven and let the mushrooms rest for two minutes. This short pause lets the filling set, making it easier to serve without spilling. Transfer them to a serving platter, garnish with a sprinkle of fresh parsley, and watch your guests’ eyes widen. That sizzle when it hits the pan? Absolute perfection.
That's it — you did it. But hold on, I've got a few more tricks that'll take this to another level...
Insider Tricks for Flawless Results
The Temperature Rule Nobody Follows
Most home cooks bake at 350°F, assuming it's a safe middle ground. In reality, a slightly higher temperature (375°F) creates a quicker caramelization of the breadcrumb topping while keeping the interior silky. If you bake too low, the filling can become watery, and the mushrooms won’t develop that beautiful, slightly crisp edge. I once tried 325°F on a whim and ended up with soggy caps that looked more like steamed vegetables than appetizers. Trust the heat, and you’ll get that perfect contrast every time.
Why Your Nose Knows Best
Your sense of smell is a more reliable indicator of doneness than a timer. When the breadcrumbs start releasing a nutty, toasted scent, you’re close to the finish line. If you catch a faint hint of burnt oil, pull the tray out immediately—over‑browned panko can turn bitter in seconds. I’ve learned to hover near the oven, inhaling the aroma like a sommelier sniffing a wine; it’s a game‑changer for timing.
The 5‑Minute Rest That Changes Everything
After baking, let the mushrooms sit for exactly five minutes before serving. This short rest allows the cheese filling to firm up, preventing it from sliding off when you pick up a mushroom. It also lets the residual heat continue to mellow the flavors, making the garlic less sharp and the wine’s acidity more integrated. Skipping this step is a common mistake that leads to a messy plate and a less polished presentation.
The Secret of the Mini‑Mushroom
If you’re using smaller mushroom varieties like cremini or baby bellas, reduce the filling amount per cap by half. The smaller surface area means they bake faster, and the topping can burn if left too long. A friend tried using the same amount of filling for mini‑mushrooms and ended up with a burnt crust and under‑cooked centers—lesson learned.
The Double‑Layer Technique
For an ultra‑crispy top, add a thin layer of grated mozzarella over the breadcrumb topping during the last five minutes of baking. The cheese melts, browns, and creates a glossy, golden veil that makes the mushrooms look restaurant‑ready. This extra step is optional, but it adds a visual wow factor that can elevate a simple gathering to a celebratory affair.
Creative Twists and Variations
This recipe is a playground. Here are some of my favorite ways to switch things up:
Spicy Jalapeño Kick
Finely dice a jalapeño and fold it into the cream‑cheese mixture. The heat adds a surprising punch that pairs beautifully with the mellow mushroom flavor. Top with a drizzle of chipotle aioli for an extra layer of smoky heat. Perfect for those who love a little fire.
Herbaceous Italian
Swap parsley for fresh basil and add a teaspoon of dried oregano to the filling. Mix in sun‑dried tomato pieces for a burst of umami. Finish with a light sprinkle of mozzarella before the final bake. This variation feels like a bite of caprese on a mushroom.
Savory Bacon‑Infused
Crisp up half a cup of bacon, crumble it, and stir it into the cheese mixture. The smoky, salty crunch adds depth and makes the dish even more indulgent. Garnish with a small piece of bacon on top for visual flair. Ideal for brunch or a hearty appetizer.
Vegan Delight
Replace cream cheese with a plant‑based alternative, use nutritional yeast instead of Parmesan, and swap olive oil for avocado oil. The texture remains creamy, and the flavors stay robust. This version proves you don’t need dairy to achieve that luxurious mouthfeel.
Cheesy Spinach Surprise
Stir in half a cup of thawed, drained spinach and an extra half‑cup of shredded mozzarella. The green specks add color, and the extra cheese creates a gooier center. Serve with a squeeze of lemon for brightness.
Storing and Bringing It Back to Life
Fridge Storage
Allow the mushrooms to cool completely, then transfer them to an airtight container. They’ll stay fresh for up to three days. When reheating, place them on a baking sheet, drizzle a tiny splash of water over each, and bake at 350°F for 10‑12 minutes. The added moisture steams the interior back to its original creaminess.
Freezer Friendly
Unbaked stuffed mushrooms freeze exceptionally well. Arrange them on a parchment‑lined tray, freeze until solid, then transfer to a zip‑top bag. They’ll keep for up to two months. When you’re ready to serve, bake them straight from frozen at 400°F for 25‑30 minutes, covering loosely with foil for the first 15 minutes to prevent over‑browning.
Best Reheating Method
For the crispiest results, reheat in a conventional oven rather than a microwave. The oven’s dry heat revives the breadcrumb crunch and re‑melts the cheese without turning it rubbery. If you’re in a hurry, a quick 2‑minute blast in a toaster oven works, but keep a close eye on them to avoid burning.