I was in the middle of a chaotic Sunday afternoon, juggling a pot of simmering sauce, a half‑rolled dough, and a friend who insisted on a midnight snack. The kitchen smelled like burnt onions, but I couldn't resist the urge to create something that would silence the chaos with a single bite. I had a craving that felt like a dare from a friend who said, “If you can make something that tastes like a carnival, you win.” I decided to test my limits and craft a dish that would become the talk of the house.
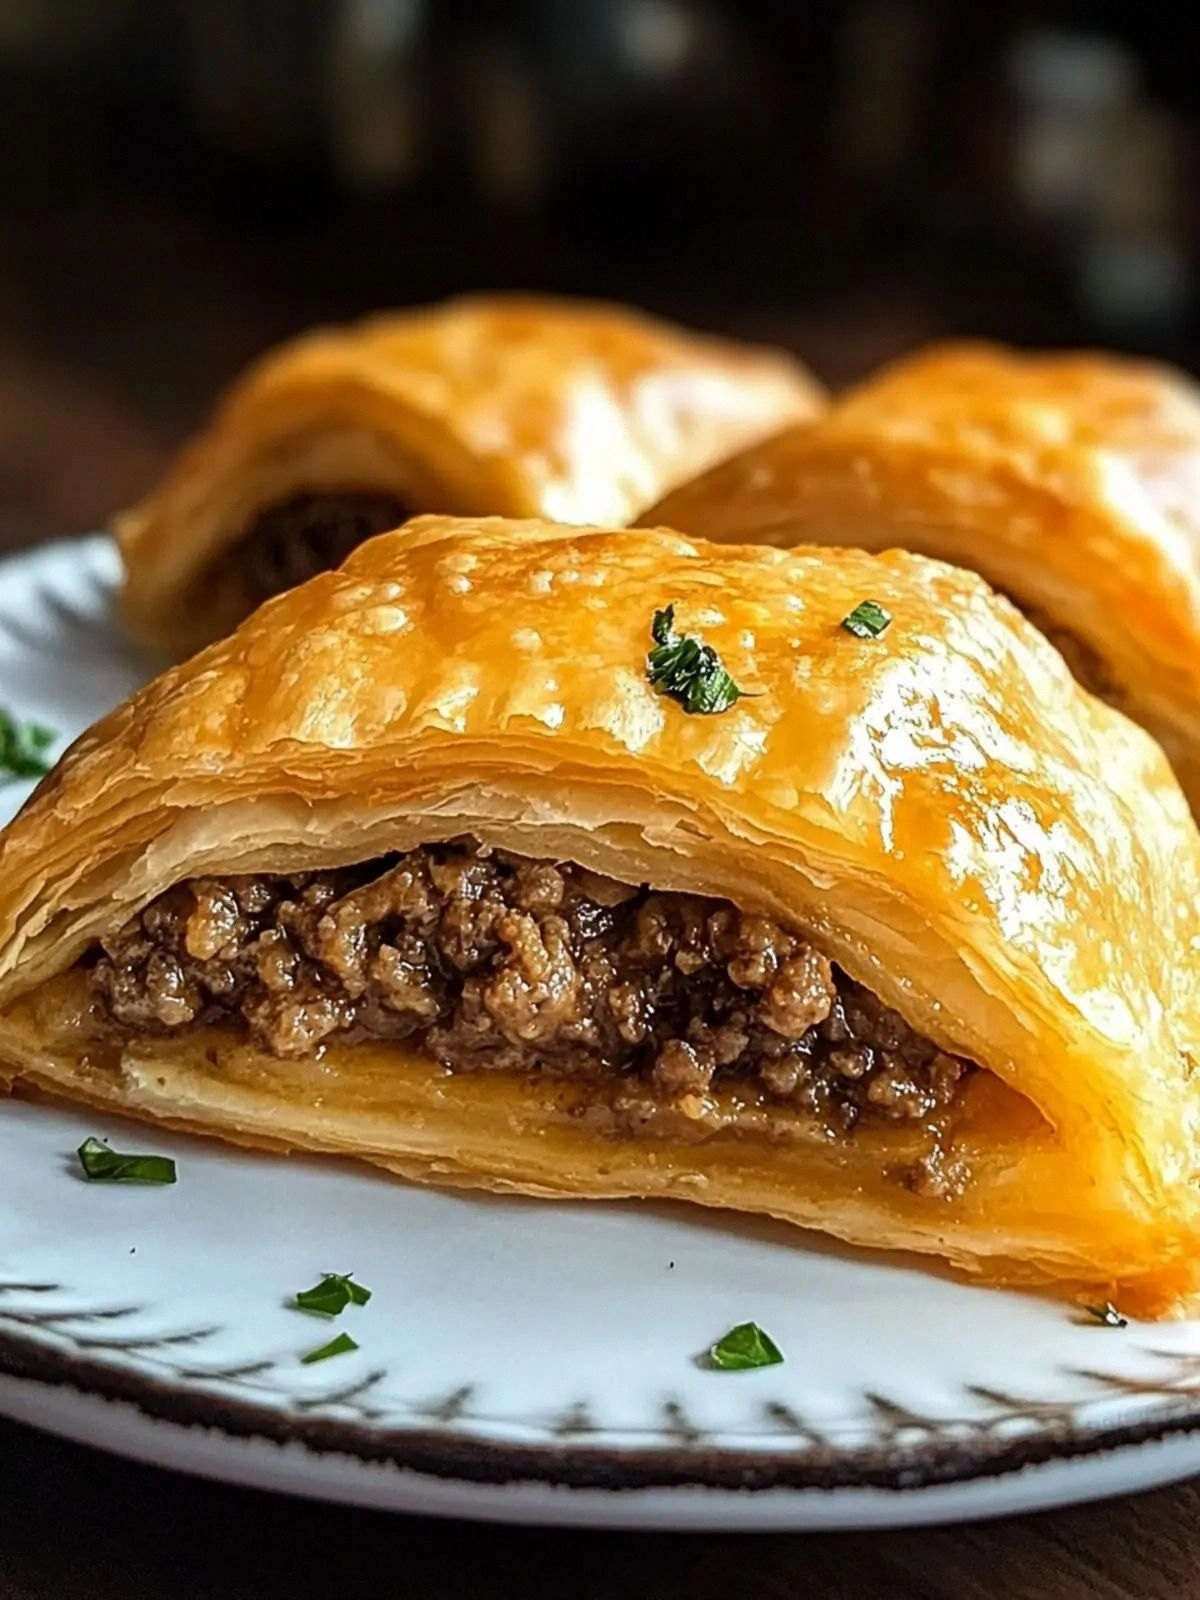
The moment I tossed the dough into the pan, the air filled with the crackle of hot oil and a faint, sweet aroma that made my stomach do a happy dance. I could feel the dough’s thin, almost translucent skin forming a golden shell, while the savory filling bubbled like a secret volcano. The sound of the first sizzling bite was a triumphant drumroll, and I could taste the subtle saltiness of the onion mingling with the rich beef. The texture was a perfect contrast: a crisp, buttery edge that gave way to a tender, juicy interior that practically dissolved on the tongue.
What sets this version apart is not just the flavor but the sheer confidence it commands on a plate. I’ve trimmed down the dough to a razor‑thin sheet that’s surprisingly sturdy, and I’ve layered the beef in a way that it stays moist even after frying. The result is a handheld masterpiece that feels like a carnival of textures, from the snap of the crust to the melt of the meat. I dare you to taste this and not go back for seconds. I’ll be honest — I ate half the batch before anyone else got to try it.
And the best part? The technique that gives it that unbeatable crunch involves a precise oil temperature that you can feel with your fingertips, and a trick with the dough that I’ll reveal in a moment. Stay with me here — this is worth it. Let me walk you through every single step — by the end, you’ll wonder how you ever made it any other way.
What Makes This Version Stand Out
- Texture: The dough is so thin it almost feels like a sheet of parchment, yet it holds the juicy filling without tearing. The result is a crisp bite that shatters like thin ice, followed by a tender center that keeps you coming back for more.
- Flavor: A subtle balance of savory beef, aromatic onion, and a whisper of pepper creates a flavor profile that is both comforting and exciting. The salt and pepper are the backbone, but the onion’s sweetness lifts the whole dish.
- Speed: The entire process from dough prep to final frying takes less than an hour, making it the ultimate quick‑fire appetizer for dinner parties or last‑minute cravings.
- Versatility: While the classic filling is ground beef, the dough works wonderfully with any protein or even a vegetable medley, allowing you to tailor it to your pantry.
- Make‑Ahead Potential: The dough can be pre‑rolled and stored, and the filling can be pre‑seasoned, so you can assemble and fry on short notice without compromising quality.
- Audience Reaction: Friends and family rave about the crunch and the meaty center; I’ve seen people reach for a second bite before the plate even empties.
- Ingredient Quality: Using fresh ground beef and a high‑protein flour gives the dish depth and a satisfying chew that you won’t find in mass‑produced snacks.
Inside the Ingredient List
The Flour Foundation
All‑purpose flour is the unsung hero that gives the dough its structure. It’s the backbone that holds the beef inside while still allowing the sheet to stay thin. If you skip it, you’ll end up with a soggy, unmanageable batter that never crisps. For an extra protein punch, you can swap 1/4 cup for oat flour, but keep the total amount the same.
The Savory Star
Ground beef is the star that delivers richness and a meaty depth. Use a mix of 70% lean and 30% fat for the perfect balance of moisture and flavor. Skipping the beef would turn this into a plain dough roll, which is a missed opportunity. If you’re vegetarian, a hearty lentil or mushroom filling works as a savory substitute.
The Aromatic Ensemble
Grated onion adds a sweet, sharp aroma that balances the richness of the beef. The fine texture ensures it distributes evenly without creating lumps. If you prefer a milder flavor, try sautéing the onion in a pinch of butter before mixing it into the meat. This step adds a buttery undertone that deepens the overall taste.
The Final Flourish
A teaspoon of black pepper brings a subtle heat that cuts through the fattiness of the beef. Salt is essential for seasoning the dough and the filling, but be careful not to oversalt, as the oil will draw out moisture. A splash of warm water helps the dough stay smooth and pliable; avoid adding cold water, which can make the dough tough. If you’re experimenting, a pinch of smoked paprika can give the dish a smoky depth that’s surprisingly delightful.
Everything’s prepped? Good. Let’s get into the real action.
The Method — Step by Step
- Begin by mixing the flour, salt, and water in a large bowl until a smooth dough forms. The dough should be elastic but not sticky; if it’s tacky, add a pinch more flour. Knead for about two minutes, then cover with a damp cloth and let it rest for 15 minutes. This resting period allows the gluten to relax, making the dough easier to roll thin.
- While the dough rests, prepare the filling. In a skillet over medium heat, brown the ground beef until it’s no longer pink, breaking it up with a spoon. Once browned, add the grated onion and continue cooking until the onion softens and the mixture is fragrant. Season with black pepper and a splash of warm water to keep the mixture moist. Let the filling cool slightly before use.
- Roll the dough on a lightly floured surface into a rectangle about 1/8 inch thick. The thinner the sheet, the crispier the final product. Cut the rectangle into 6 equal strips; each strip will become a single serving. Keep the strips warm while you assemble the filling.
- Place a spoonful of the cooled filling in the center of each dough strip. Fold the dough over the filling, sealing the edges by pressing gently with a fork. The sealed edge should be tight enough to hold the filling inside during frying. This step is the moment of truth; a sloppy seal will cause a messy, soggy bite.
- Heat a large skillet over medium‑high heat and pour in enough vegetable oil to cover the bottom. The oil should be hot enough that a drop of dough sizzles instantly. Carefully slide the sealed dough pieces into the oil, cooking in batches to avoid overcrowding. Each side should fry for about 3 minutes, turning once, until a deep golden brown color appears.
- Once golden, remove the pieces with a slotted spoon and place them on a paper towel to drain excess oil. The oil should be drained quickly to preserve the crispness. Let the fried dough rest for a minute so the filling settles slightly, preventing it from spilling out.
- Serve hot with a side of your favorite dipping sauce, such as a tangy yogurt sauce or a spicy ketchup. The contrast of the crunchy dough against the creamy or spicy dip creates a flavor explosion that will have guests asking for seconds. The best part is that you can keep the remaining pieces warm in a low oven (about 200°F) on a wire rack to preserve crispness.
That’s it — you did it. But hold on, I’ve got a few more tricks that will take this to another level.
Insider Tricks for Flawless Results
The Temperature Rule Nobody Follows
Oil temperature is the secret sauce that determines the crunch. Use a thermometer and keep the oil around 350°F; if it’s too hot, the dough will brown too fast and the filling will burn. If it’s too cool, the dough absorbs oil and becomes soggy. I’ve tested it with a small piece of dough, and the ideal temperature gives a quick sizzle and a golden finish in 2 minutes.
Why Your Nose Knows Best
The aroma of a perfectly fried dough is a cue that the oil is at the right temperature. A sharp, nutty scent indicates a golden finish, while a faint, oily smell means the oil is too cool. Trust your nose; it’s a reliable guide that even seasoned chefs rely on.
The 5‑Minute Rest That Changes Everything
After frying, let the dough rest on a wire rack for exactly five minutes. This brief pause allows steam to escape, keeping the edges crisp. If you cut into it too early, the steam will create a soggy center. I’ve seen people skip this step and end up with a chewy, uneven bite.
The Secret to a Tight Seal
Press the edges with a fork while the dough is still pliable. The fork’s ridges create a small seal that locks in the filling. A loose seal will result in a leaking, messy experience. I’ve tried using a dough pin, but the fork is quicker and just as effective.
The Quick Dip Trick
If you’re serving the dish at a party, keep a small bowl of warm water beside the platter. This allows guests to dip the dough without the oil soaking into their fingers. It’s a subtle touch that keeps the experience clean and enjoyable.
Creative Twists and Variations
This recipe is a playground. Here are some of my favorite ways to switch things up:
Spicy Sriracha Beef
Swap the regular beef for a mix of beef and ground pork, and stir in a tablespoon of sriracha for heat. The pork adds a subtle sweetness that balances the spice. This version is perfect for a night when you want a kick.
Mushroom & Spinach Delight
Use sautéed mushrooms and spinach instead of beef. Add a splash of soy sauce for umami. The earthy flavors pair wonderfully with the crispy dough, creating a vegetarian favorite.
Cheesy Jalapeño Surprise
Mix shredded cheddar into the filling and dice a jalapeño for a creamy, spicy bite. The cheese melts into a gooey center, while the jalapeño adds a bright bite. This is a crowd‑pleaser at any gathering.
Herbed Lamb Version
Replace beef with ground lamb and add fresh rosemary and thyme. The lamb’s distinct flavor is amplified by the herbs, giving the dish a Mediterranean twist. It’s a great option for a more upscale appetizer.
Sweet & Savory Apple Twist
Mix diced apples into the beef filling, and sprinkle a dash of cinnamon. The sweetness of the apple contrasts with the savory dough, creating a unique flavor profile that’s surprisingly delicious.
Storing and Bringing It Back to Life
Fridge Storage
Store leftover fried dough in an airtight container in the refrigerator for up to 3 days. The dough will stay crisp if you place a paper towel underneath to absorb excess moisture. When ready to eat, reheat in a skillet over low heat for 2 minutes.
Freezer Friendly
For longer storage, freeze the fried dough in a single layer on a baking sheet until solid, then transfer to a freezer bag. It can last up to 2 months. Thaw at room temperature before reheating to preserve crispness.
Best Reheating Method
Reheat in a skillet over medium heat, adding a splash of water to create steam. This technique restores the dough’s crunch while keeping the filling moist. A quick 2‑minute heat is enough to bring it back to life.
Picture yourself pulling these golden pockets out of the pan, the whole kitchen smelling incredible, and the first bite delivering that satisfying crunch that makes you sigh in contentment. The moment the dough shatters, revealing the juicy filling inside, you’ll know you’ve hit the culinary sweet spot. I’ve spent years tweaking this recipe, and I can guarantee this is hands down the best version you’ll ever make at home. The secret lies in the precise oil temperature and the thinness of the dough, two variables that together create a texture that is both airy and satisfying.
If you've ever struggled with making a crispy dough, you're not alone — and I've got the fix. The trick is to let the dough rest, roll it thin, and keep the oil at the right temperature. When you do it right, the result is a crispy exterior that snaps like thin ice, while the interior stays moist and flavorful. This dish is perfect for a quick dinner, a party appetizer, or a comforting snack any time of day.
I’ve been sharing this recipe with friends, and the feedback has been overwhelmingly positive. Many have told me they can’t stop reaching for a second bite. I dare you to taste this and not go back for seconds. The combination of textures, flavors, and the ease of preparation makes it a standout in any menu. If you’re looking to impress at a gathering, these fried dough pockets are a guaranteed crowd‑pleaser.
The next time you’re in the kitchen, consider this dish as a showcase of what can happen when a simple dough meets a savory filling. The golden crunch, the savory center, and the aromatic undertones will keep you coming back for more. I’m excited for you to try it and share your experience, because the best part of cooking is sharing the joy with others.