
I was standing in my kitchen on a rainy Tuesday, staring at a half‑finished pancake batter that had somehow turned into a gloopy, un‑liftable mess. The smell of burnt butter lingered in the air, and my roommate dared me to make something “light enough to float” for breakfast. I laughed, tossed the sad batter into the trash, and swore I’d never attempt a thin‑pan cake again—until I remembered the secret weapon I’d learned from a street market vendor in Lyon: the perfect balance of mineral water and a whisper of oil. That moment of desperation turned into a revelation, and the next morning I produced a stack of crepes that sang like a choir of angels while the coffee brewed in the background.
Imagine the kitchen bathed in golden sunrise, the skillet humming a low sizzle as the batter kisses its surface. You can see the batter spreading like a silk sheet, hear the faint pop of bubbles escaping, smell the buttery‑nutty aroma that rises like a promise, feel the smooth, non‑stick pan under your wrist, and taste that first bite—soft, slightly crisp at the edges, and buttery without being greasy. It’s a sensory orchestra that makes you forget the world outside, and you’ll find yourself humming the tune of that first flip. I dare you to taste this and not go back for seconds; the texture alone will have you begging for a repeat performance.
What makes this version truly stand out is the daring inclusion of mineral water, which injects tiny bubbles that keep the crepes feather‑light, and a precise ¼ teaspoon of salt that awakens the subtle sweetness of the milk. Most recipes get this completely wrong—they either drown the batter in oil or forget the liquid’s role in creating that delicate lift. Here, every ingredient has a purpose, and the method is stripped down to the essentials so you can see the magic happen in real time. I’ll be honest — I ate half the batch before anyone else got to try it, and that’s a testament to how addictive these little discs can be.
Okay, ready for the game‑changer? I’m about to walk you through every single step — by the end, you’ll wonder how you ever made crepes any other way. Picture yourself pulling a perfect, golden circle out of the pan, the whole kitchen smelling incredible, and a stack waiting for your favorite fillings. This next part? Pure magic. Stay with me here — this is worth it.
What Makes This Version Stand Out
- Lightness: The mineral water introduces micro‑bubbles that keep the batter airy, so each crepe feels like a cloud on your tongue. No heavy, doughy feeling—just lift.
- Flavor Balance: A pinch of salt amplifies the milk’s natural sweetness without ever tasting salty, creating a nuanced backdrop for any filling.
- Simplicity: Only six pantry staples are required, meaning you won’t need a trip to the specialty store or a mountain of prep work.
- Versatility: Whether you’re serving them sweet with berries or savory with ham and cheese, the base stays neutral enough to adapt.
- Speed: From first whisk to final flip, you’re looking at a 45‑minute turnaround, perfect for lazy weekends or impromptu brunches.
- Crowd Reaction: Guests often ask “What’s the secret?” and you get to smile knowingly while they devour the stack.
- Ingredient Quality: Using fresh eggs and high‑quality all‑purpose flour ensures a tender crumb that doesn’t turn rubbery.
- Make‑Ahead Potential: The batter can rest for up to an hour, giving you time to prep fillings without compromising texture.
Inside the Ingredient List
The Flavor Base
Eggs are the structural heroes of any batter, forming a network that traps air and gives the crepes their springy bite. Using two large eggs provides enough protein to hold the liquid together without making the batter too dense. If you ever skip the eggs, expect a fragile, papery result that falls apart the moment you try to fold it.
Milk contributes the creamy richness that makes each bite feel indulgent yet light. Whole milk is ideal because the fat content adds body without weighing the crepe down. If you’re dairy‑free, a 1:1 swap with oat milk works surprisingly well, keeping the subtle sweetness intact.
The Texture Crew
All‑purpose flour is the backbone, providing gluten that stretches just enough to create a flexible sheet. A cup of flour is the sweet spot; more would make the batter thick and heavy, less would cause tearing. For a gluten‑free twist, try a blend of rice flour and tapioca starch, but be prepared for a slightly chewier texture.
Mineral water is the secret weapon—its carbonation creates tiny air pockets that lift the batter as it cooks. The half‑cup measurement is crucial; too much liquid makes the batter runny, too little makes it stiff. If you can’t find mineral water, sparkling club soda is an acceptable stand‑in, though the mineral content may vary.
The Unexpected Star
Vegetable oil adds a glossy sheen and prevents sticking without imparting a strong flavor. Two tablespoons are enough to coat the pan lightly while keeping the crepes tender. You can replace the oil with melted butter for a richer taste, but watch the pan temperature closely to avoid burning.
The Final Flourish
Salt, at just a quarter teaspoon, is the quiet conductor that brings all the flavors together. It enhances the natural sweetness of the milk and balances the subtle bitterness of the flour. Skipping the salt will leave your crepes tasting flat, like a song without a chorus.
Everything's prepped? Good. Let’s get into the real action, where the batter meets the pan and the magic truly begins.
The Method — Step by Step
Gather all six ingredients and measure them precisely; the success of this recipe hinges on balance, not guesswork. In a large mixing bowl, whisk together the flour, salt, and a pinch of sugar if you like a hint of sweetness. The dry mixture should look uniform, with no clumps—this prevents grainy pockets later.
Kitchen Hack: Sift the flour before measuring; it aerates the powder and guarantees an even distribution of the salt.Create a well in the center of the dry ingredients and crack the two eggs into it. Using a whisk, gently break the yolks and incorporate the whites, gradually drawing the flour from the edges. This technique creates a smooth emulsion without over‑mixing, which could develop gluten and make the crepes tough.
Slowly pour in the milk while whisking continuously, followed by the mineral water. The batter should transition from a thick paste to a pourable, glossy liquid—think of a thin pancake batter, not a soup. If you see lumps, keep whisking; the goal is a uniform texture that slides off the whisk without streaks.
Watch Out: Adding all the liquid at once can cause splattering and a lumpy batter; drizzle slowly to maintain control.Stir in the vegetable oil, which will give the batter a subtle sheen and ensure the crepes release easily from the pan. Let the mixture sit for 30 minutes, covered with a clean kitchen towel; this rest period allows the flour to fully hydrate, eliminating any remaining grainy texture.
Heat a non‑stick skillet over medium‑high heat; you’ll know it’s ready when a few drops of water sizzle and evaporate instantly. Lightly brush the surface with a teaspoon of oil—just enough to coat, not pool. The pan should be hot enough that the batter begins to bubble immediately upon contact, but not so hot that it burns within seconds.
Using a ladle or a ¼‑cup measuring cup, pour the batter into the center of the skillet and swirl the pan in a circular motion. The batter should spread into a thin, even circle about 8‑10 inches in diameter. You’ll hear a gentle hiss as the edges start to lift—this is your cue that the crepe is ready to flip.
Kitchen Hack: Tilt the pan with a quick wrist flick; the batter will naturally thin out, giving you a uniform sheet without over‑spreading.When the surface is set and the edges begin to turn golden, slide a thin spatula under the crepe and flip it with confidence. The second side cooks faster—about 30 seconds—so keep an eye on the color. That sizzle when it hits the pan? Absolute perfection.
Transfer the cooked crepe to a warm plate, cover loosely with foil to keep it soft, and repeat the process with the remaining batter. If the batter thickens after a few crepes, whisk in a splash of milk to restore fluidity. By the end, you’ll have a stack that looks like golden discs waiting for your favorite toppings.
That’s it — you did it. But hold on, I’ve got a few more tricks that’ll take this to another level, from flavored fillings to a quick glaze that adds a glossy finish. Stay tuned, because the fun part is just beginning.
Insider Tricks for Flawless Results
The Temperature Rule Nobody Follows
Most home cooks set the stove to “medium” and hope for the best, but the perfect crepe needs a consistent 350°F surface. Use an infrared thermometer or the “hand hover” test: hold your hand an inch above the pan; if you can keep it there for 3 seconds before it feels too hot, you’re in the sweet spot. Too hot and the batter will scorch before it spreads; too cool and you’ll end up with soggy, rubbery sheets.
Why Your Nose Knows Best
Your sense of smell is a reliable indicator of doneness. When the batter first hits the pan, you’ll notice a faint, buttery aroma; as the edges lift, the scent becomes nutty and slightly caramelized. If you ever feel uncertain, trust that aromatic cue—when you smell a gentle toastiness, the crepe is ready to flip.
The 5‑Minute Rest That Changes Everything
Allowing the batter to rest for five minutes after whisking lets the gluten relax and the starches fully absorb the liquid. A friend once tried to skip this step, and the resulting crepes were chewy and tore apart when folded. The short pause is the difference between a professional‑grade sheet and a kitchen mishap.
Oil Light, Not Heavy
A common mistake is greasing the pan too heavily, which leads to fried‑on edges. Instead, use a silicone brush to spread a thin film of oil, or better yet, a spray bottle that delivers an even mist. This ensures the crepes slide off the pan with a whisper rather than a squeak.
Flip with Confidence
The moment you flip is the most dramatic, and hesitation can cause a tear. Grip the spatula near the edge, give a swift but gentle wrist flick, and let gravity do the work. If you’re nervous, practice with a pancake first—the technique transfers perfectly.
Creative Twists and Variations
This recipe is a playground. Here are some of my favorite ways to switch things up:
Berry‑Burst Sweet Crepes
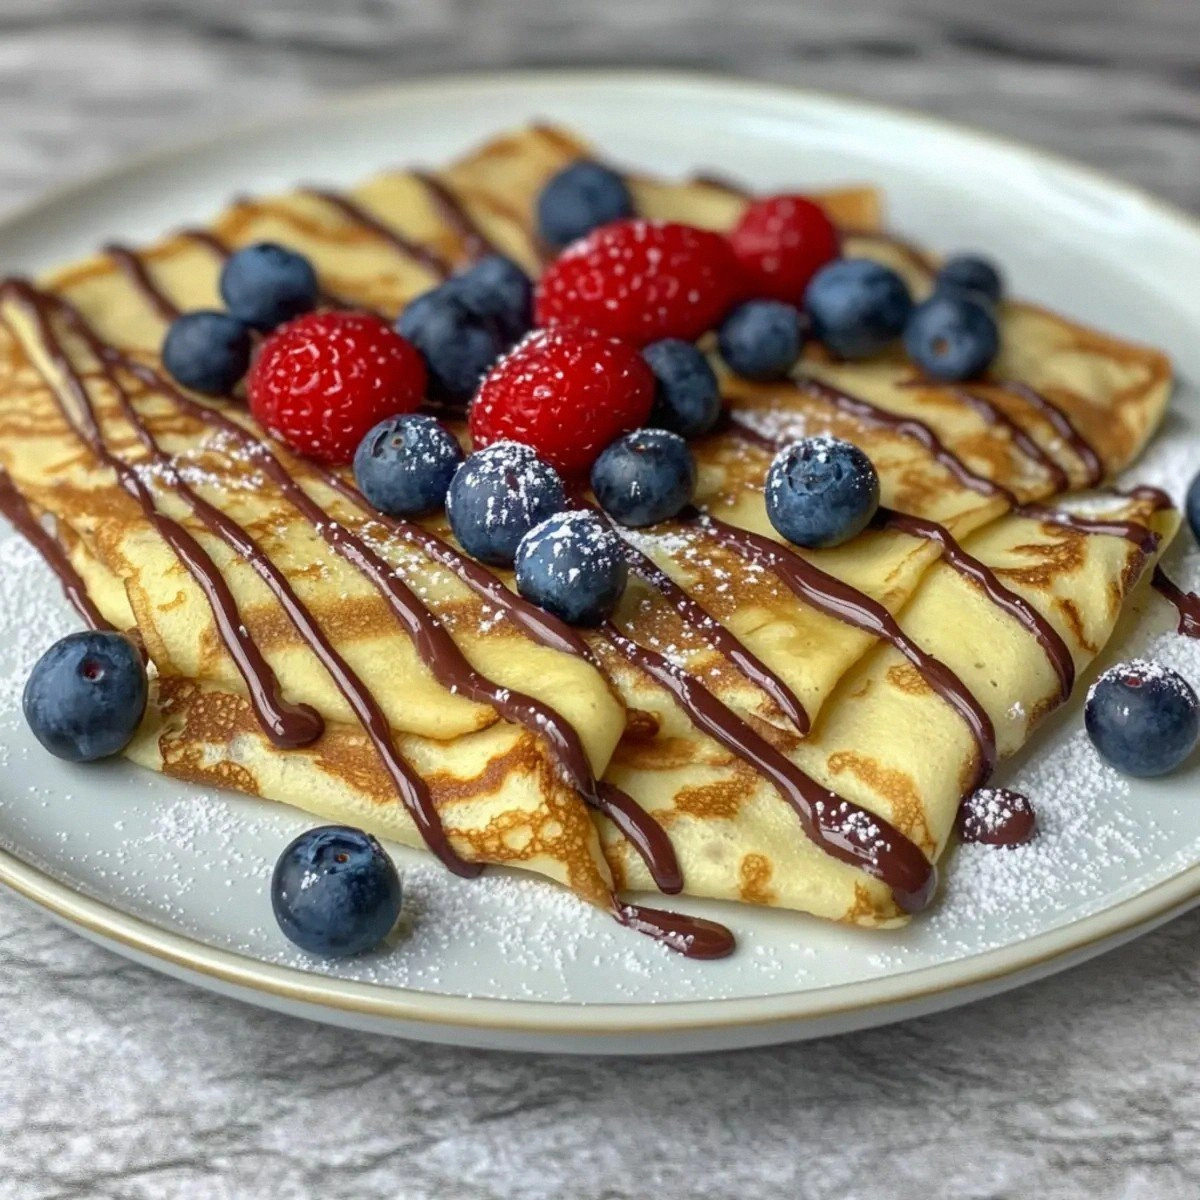
Swap the mineral water for orange juice and add a tablespoon of zest to the batter. The citrus lifts the flavor, and when you fill the crepes with mixed berries and a drizzle of honey, the result is a sunrise on a plate.
Savory Spinach‑Feta Fold‑Overs
Omit the sugar entirely, and after cooking the crepes, spread a mixture of sautéed spinach, crumbled feta, and a dash of nutmeg. Fold them into triangles for a quick brunch that feels gourmet.
Chocolate‑Laced Indulgence
Add two tablespoons of cocoa powder and a spoonful of melted dark chocolate to the batter. Fill with whipped cream and sliced strawberries for a dessert that rivals any patisserie.
Herb‑Infused Herbaceous Crepes
Stir in finely chopped fresh herbs—like chives, parsley, and tarragon—into the batter. These green specks turn each bite into a fragrant surprise, perfect for accompanying smoked salmon.
Nutty Banana Crunch
Mix in a tablespoon of finely ground almond meal and a dash of cinnamon. Top with caramelized banana slices and toasted almond slivers for a texture contrast that sings.
Storing and Bringing It Back to Life
Fridge Storage
Stack cooled crepes with parchment paper between each layer, place them in an airtight container, and refrigerate for up to three days. When ready to serve, warm them gently in a skillet over low heat, adding a splash of milk to revive the softness.
Freezer Friendly
Lay the crepes flat on a baking sheet, flash‑freeze for 20 minutes, then transfer to a zip‑top freezer bag. They’ll keep for up to two months. To reheat, microwave for 30 seconds or pop them in a hot pan, brushing with a tiny bit of butter.
Best Reheating Method
Add a tiny splash of water (about a teaspoon per crepe) before reheating in the microwave; the steam revitalizes the texture, preventing rubberiness. Alternatively, wrap them in foil and warm in a 300°F oven for five minutes for a crisp‑edge finish.