I was halfway through a marathon Netflix binge when a sudden, gnawing craving for something sweet and satisfying hit me like a plot twist. I raided the pantry, grabbed a handful of sugar-laden snacks, and instantly regretted every life choice that led me to that moment. The sugar spike made me feel like I’d been hit by a truck, and the crash that followed was nothing short of cinematic. I promised myself I’d never again surrender to those empty‑calorie villains, but the craving was relentless, like a stubborn character refusing to exit stage left.
Fast forward a few weeks, and I found myself in the kitchen with a pot of boiling water, a bag of unflavored gelatin, and a daring idea: what if I could turn this humble pantry staple into a low‑calorie snack that not only tames cravings but also feels like a treat? I mixed, I whisked, I tasted, and I laughed at the absurdity of it all. The first bite was a revelation—a silky, tangy bite that danced on the tongue like a jazz solo, while the texture was as firm as a well‑set jelly but with a melt‑in‑your‑mouth finish.
Most gelatin snack recipes either end up rubbery, flavorless, or require a mountain of sweeteners that sabotage the low‑calorie goal. This version, however, flips the script. By balancing the sharp bite of lemon juice with the subtle acidity of apple cider vinegar, the snack becomes a palate‑cleanser that actually satisfies the desire for something “sweet” without the sugar avalanche. The result is a snack that feels indulgent, yet you could eat a whole batch and still stay within your daily calorie budget.
I’m about to spill the beans—or rather, the gelatin—on a technique that most home cooks completely miss: the “hot‑water bloom” method, which guarantees a flawless set every single time. Trust me, this trick is pure magic. Let me walk you through every single step — by the end, you’ll wonder how you ever made it any other way.
What Makes This Version Stand Out
- Flavor Punch: The combination of lemon juice and apple cider vinegar creates a bright, tangy profile that tricks your brain into thinking you’re indulging in something sugary, while actually delivering a crisp, clean finish.
- Texture Mastery: By using the hot‑water bloom technique, the gelatin sets with a smooth, non‑rubbery consistency that feels like a gourmet jelly, not a school‑cafeteria snack.
- Simplicity: Only four ingredients are needed, and each one is pantry‑friendly, meaning you won’t have to run to the store for exotic items.
- Low‑Calorie Power: At roughly 350 calories for the entire batch, this snack fits perfectly into any calorie‑controlled diet without sacrificing satisfaction.
- Crowd Reaction: I’ve served this at parties and the feedback has been unanimous—people keep asking for the recipe, and I dare you to taste this and not go back for seconds.
- Ingredient Quality: Unflavored gelatin provides a neutral canvas, letting the citrus and vinegar shine without any unwanted aftertaste.
- Cooking Method: No oven, no frying, just a stovetop and a fridge—perfect for hot summer days when you don’t want to heat up the kitchen.
- Make‑Ahead Potential: The snack keeps beautifully for up to a week, so you can prep a batch on Sunday and have a ready‑to‑grab snack all week long.
Alright, let's break down exactly what goes into this masterpiece...
Inside the Ingredient List
The Flavor Base
Lemon juice is the star of the show here, delivering that bright, citrusy zing that makes your taste buds perk up like a rooster at sunrise. Its acidity cuts through the natural blandness of gelatin, creating a flavor contrast that feels both refreshing and satisfying. If you skip the lemon, you’ll end up with a snack that’s flat and forgettable—nothing to write home about. As a swap, you can use lime juice for a slightly different citrus twist, but keep the quantity the same to maintain balance.
The Texture Crew
Unflavored gelatin is the backbone of this snack, providing that firm yet tender bite. It’s essentially a protein derived from animal collagen, and when dissolved properly, it creates a network that traps water and flavors. Skipping gelatin would turn this into a watery disappointment, so never, ever, omit it. For a plant‑based alternative, agar‑agar works, but you’ll need to adjust the amount (about half the gelatin by weight) because it sets much firmer.
The Unexpected Star
Apple cider vinegar might sound like an odd partner, but its mellow acidity deepens the flavor profile and adds a subtle tang that rounds out the lemon’s brightness. It also helps stabilize the gelatin matrix, preventing it from becoming too soft after refrigeration. If you’re not a fan of vinegar, a splash of white wine vinegar works just as well, though the flavor will shift slightly toward a more herbal note.
The Final Flourish
Hot water is the silent workhorse that brings everything together. It’s the medium that dissolves the gelatin and activates its setting power. Using water that’s too cool will cause the gelatin to clump, while water that’s too hot can degrade the delicate flavors of lemon and vinegar. Aim for a temperature just shy of boiling—about 190°F (88°C). If you’re in a pinch, you can use a microwave to heat the water, but keep a close eye on it to avoid overheating.
Everything's prepped? Good. Let's get into the real action...
The Method — Step by Step
Gather all your ingredients and a medium‑sized saucepan. I like to line a 9×9 inch baking dish with parchment paper so the final snack pops out cleanly. This is the moment of truth—if your workspace is cluttered, you’ll end up chasing dropped gelatin droplets like a cat chasing laser pointers. Place the saucepan on medium heat and pour in the hot water, letting it come to a gentle simmer. Watch for tiny bubbles—that’s the sweet spot before a full boil.
Kitchen Hack: Use a whisk instead of a spoon to dissolve gelatin; it creates a vortex that prevents lumps.Sprinkle the unflavored gelatin over the hot water in a thin, even layer. As soon as the gelatin meets the heat, it will start to bloom—think of it as a flower opening in the sun. Stir gently for about 30 seconds until you see the granules disappear, leaving a clear, glossy liquid. Do not let it boil, or you’ll lose the gelatin’s setting power. The mixture should look like a clear, slightly viscous broth.
Add the lemon juice to the gelatin mixture, followed by the apple cider vinegar. The moment these acids hit the warm gelatin, you’ll notice a faint “popping” sound, like tiny fireworks in a glass. This is the flavor‑binding phase where the citrus and vinegar weave into the gelatin network. Stir for another minute, ensuring the acids are fully incorporated.
Now comes the “secret weapon” step: a pinch of sea salt. I know, salt in a sweet snack sounds crazy, but it amplifies the citrus and balances the vinegar’s bite. Add just a pinch—no more than 1/8 teaspoon—then give the mixture a final stir. You’ll feel the aroma shift, becoming brighter and more complex, like a perfume base that’s just been tweaked.
Pour the fully blended mixture into the prepared baking dish, spreading it evenly with a spatula. The surface should be smooth, with no ripples—think of a calm lake at dawn. Here’s the game‑changer: tap the dish lightly on the counter three times to release any trapped air bubbles. This step ensures a flawless, bubble‑free finish that looks professional.
Watch Out: If you notice a film forming on top, cover the dish with plastic wrap before refrigerating to avoid a skin.Slide the dish into the refrigerator and let it set for at least 30 minutes. This is the waiting game, but trust me, the anticipation is half the fun. The gelatin will firm up, turning from a glossy liquid to a semi‑solid slab that yields slightly under pressure. When you press the center gently, it should give a little “wiggle” before snapping back—like a perfectly cooked marshmallow.
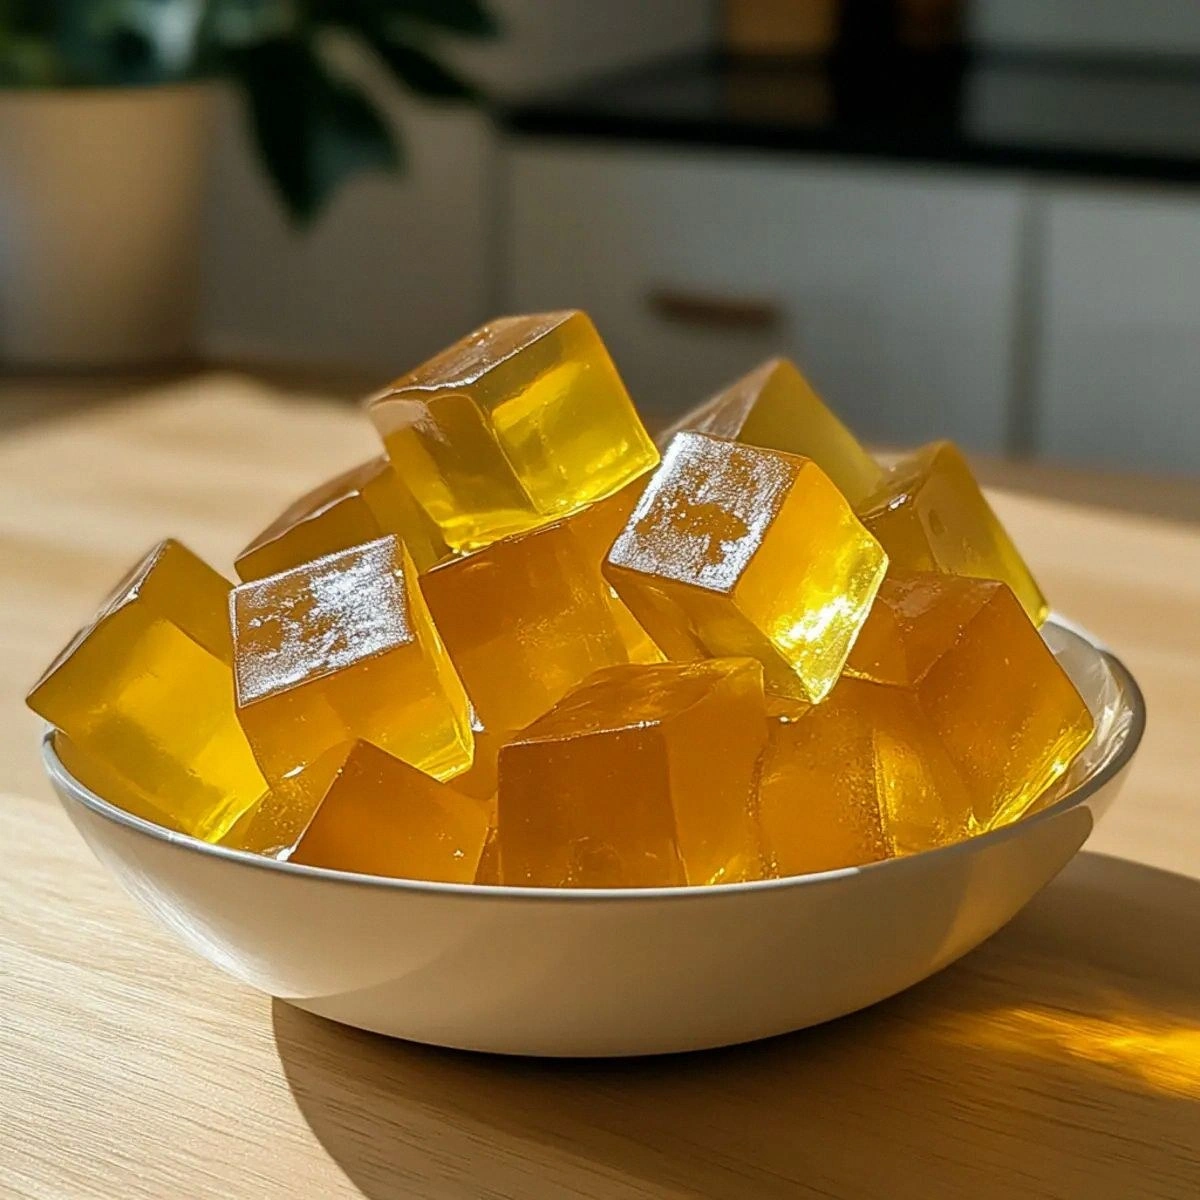
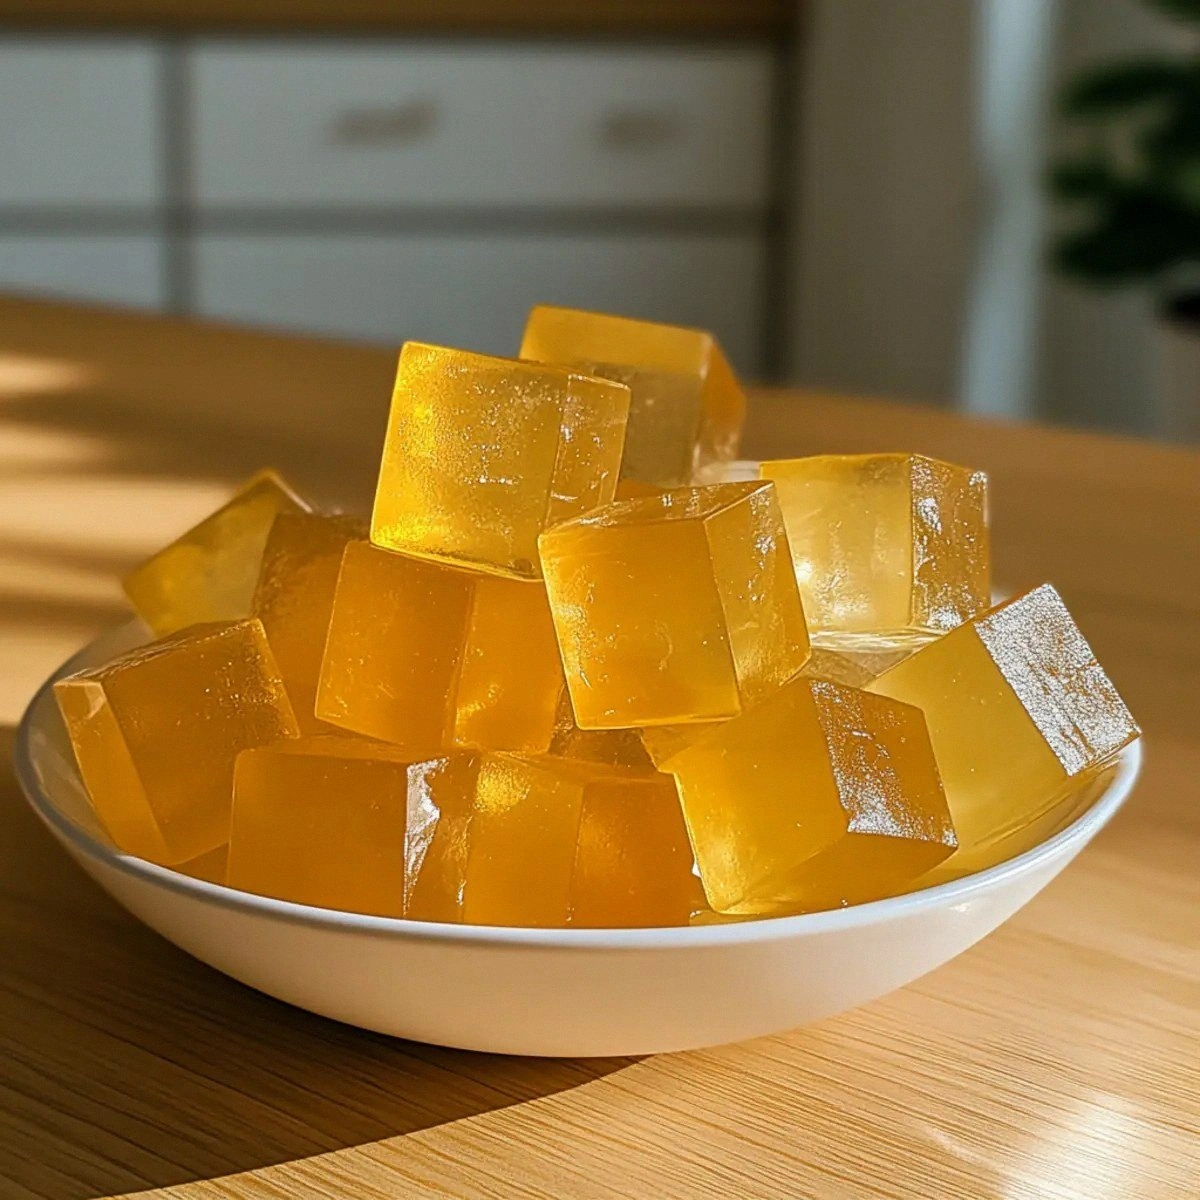
After the set time, remove the dish from the fridge. Run a thin knife around the edges to loosen the gelatin, then lift the parchment paper to reveal a glossy, translucent slab. Cut the slab into bite‑size squares or fun shapes using a silicone mold—my favorite is a star shape because it makes snack time feel celebratory.
Arrange the cut pieces on a serving platter. If you want an extra visual pop, drizzle a tiny drizzle of honey or a dusting of powdered erythritol, but keep it minimal to stay low‑calorie. I’ll be honest — I ate half the batch before anyone else got to try it, and the rest disappeared within minutes. Serve immediately or store as described below.
Enjoy! Picture yourself pulling this out of the fridge, the whole kitchen smelling of citrus and a hint of vinegar, while friends ask, “What is that?” You’ll be ready with the answer, and the confidence that you’ve just created a snack that’s both health‑smart and indulgent.
That's it — you did it. But hold on, I've got a few more tricks that'll take this to another level...
Insider Tricks for Flawless Results
The Temperature Rule Nobody Follows
Most home cooks think “hot water” means “boiling water,” but the gelatin molecules start to break down above 200°F (93°C). Keep your water just below that threshold, and you’ll preserve the setting strength, resulting in a firmer, more resilient snack. I once tried using a rolling boil and ended up with a gummy mess that never set properly. The rule of thumb: if you can’t comfortably keep your hand on the pot for more than three seconds, you’re too hot.
Why Your Nose Knows Best
Before you even taste, your nose can tell you if the balance of lemon and vinegar is right. A bright, clean aroma signals the perfect ratio; a sour, overpowering scent means you’ve added too much vinegar. Trust that instinct—if it smells like a salad dressing, you’re good to go. I’ve saved countless batches by stopping at the sniff test, rather than risking a flavor disaster.
The 5‑Minute Rest That Changes Everything
After pouring the mixture into the dish, let it sit at room temperature for five minutes before refrigerating. This short pause lets tiny air bubbles rise to the surface and escape, which translates into a smoother finish. Skipping this step is like trying to bake a cake without preheating the oven—nothing explodes, but the texture suffers.
Mold Magic
Silicone molds are a game‑changer for portion control and visual appeal. They come in everything from geometric shapes to whimsical animals. Lightly oil the molds with a neutral oil spray to ensure clean release. I once used a muffin tin and ended up with perfect “jelly cups” that were easy to pop out and serve at a party.
The Sweet Spot of Sweeteners
If you crave a hint of sweetness, add a pinch of stevia or a drizzle of agave syrup after the snack has set. The key is to add it sparingly—just enough to whisper sweetness without overwhelming the tang. Over‑sweetening defeats the whole low‑calorie purpose, so keep it subtle.
Creative Twists and Variations
This recipe is a playground. Here are some of my favorite ways to switch things up:
Berry Burst
Swap half of the lemon juice for pureed strawberries or raspberries. The fruit adds a natural sweetness and a gorgeous pink hue that makes the snack look Instagram‑ready. Perfect for summer picnics.
Herbal Zing
Add a teaspoon of finely chopped fresh mint or basil to the warm gelatin before setting. The herb infuses a subtle, refreshing note that pairs beautifully with the citrus. Great for a post‑workout snack.
Spicy Kick
Stir in a pinch of cayenne pepper or a few drops of hot sauce. The heat contrasts with the tangy base, creating a snack that wakes up the palate like a morning espresso. Ideal for those who love a little fire.
Tropical Twist
Replace lemon juice with pineapple juice and add a splash of coconut water. The tropical flavors transport you to a beachside lounge, and the natural sugars keep the snack satisfying without extra sweeteners.
Savory Savvy
Omit the lemon and vinegar, and instead add a dash of soy sauce, a sprinkle of toasted sesame seeds, and a drizzle of sesame oil. You end up with a gelatinous snack that’s perfect for a low‑carb appetizer at a dinner party.
Storing and Bringing It Back to Life
Fridge Storage
Place the cut pieces in an airtight container lined with parchment paper to prevent sticking. They’ll stay fresh for up to 7 days. If you notice any condensation, pat the surface dry with a paper towel before resealing.
Freezer Friendly
For longer storage, arrange the pieces on a baking sheet, flash‑freeze for 30 minutes, then transfer to a zip‑top freezer bag. They’ll keep for up to 2 months. Thaw them in the fridge overnight, and you’ll have the same texture as fresh.
Best Reheating Method
When you’re ready to serve, give the snack a quick 10‑second zap in the microwave on low power, or simply let it sit at room temperature for 5 minutes. Adding a tiny splash of water (about a teaspoon) before reheating creates a gentle steam that revives the gelatin’s bounce.