Picture this: it's 9:47 p.m., your best friend just texted "bringing six people over tomorrow," and your brain is doing that panicked math where you multiply hungry mouths by dessert expectations and come up with zero. I have been there, friend. I've stared into the abyss of a barren fridge and considered serving store-bought cookies arranged artfully on a plate while pretending they're artisanal. But then I remembered these mini cheesecakes—my kitchen superheroes that swoop in, rescue my reputation, and vanish faster than a Netflix subscription price increase. These aren't the sad, sunken, cracked-top disasters that haunt potluck tables. These are silky, cloud-light, perfectly portioned bites that look like they came from a boutique bakery where the barista judges your coffee order.
The first time I made them, I was trying to impress someone who shall remain nameless (okay, it was my future mother-in-law), and I was so nervous I forgot to set a timer. I yanked them out when they still jiggled like a 90s screensaver, convinced I'd ruined everything. Ten minutes later, they had set into the most luxurious texture I've ever tasted—like cheesecake and mousse had a beautiful baby. She took one bite, raised an eyebrow, and said, "Well, I guess you can cook." That was seven years ago, and I've made these at least once a month since, because they are foolproof, fast, and they make people think you're a dessert wizard.
Here's the magic: they bake in a muffin tin, which means no water bath, no springform pan drama, no wondering if the center is raw while the edges turn into rubber. Each little cake gets its own paper liner, so when you peel it away, you reveal pristine sides that look professionally done. The crust is buttery and crisp, the filling is tangy-sweet perfection, and the whole thing takes less time than finding a parking spot at Trader Joe's on a Saturday. I dare you to taste one and not immediately start planning who you can invite over just to show off.
Most recipes get this completely wrong. They overbake, overmix, and overthink. Mine uses a secret weapon: sour cream in the batter, which keeps everything light and adds that restaurant-quality tang. The temperature starts high to puff them gently, then drops to finish slow and steady. The result? Centers that stay creamy, tops that stay porcelain-smooth, and a flavor that makes people close their eyes and sigh. Picture yourself pulling these out of the oven, the whole kitchen smelling like vanilla clouds and buttery graham, and tell me you don't want to live in that moment forever. Let me walk you through every single step—by the end, you'll wonder how you ever made it any other way.
What Makes This Version Stand Out
Silky Texture: The batter whips up lighter than a TikTok dance trend, thanks to room-temperature cream cheese and a cloud of sour cream folded in at the end. No dense bricks here—each bite melts like frozen custard on a hot sidewalk.
Speed Demon: From fridge to face in under an hour, because they bake in 18 minutes flat. Compare that to a big cheesecake that needs a water bath, an hour in the oven, and a nerve-wracking cool-down that feels longer than a DMV line.
Vanishing Act: These disappear at parties faster than free Wi-Fi passwords. I've watched grown adults hover by the dessert table like seagulls at the beach, snagging three apiece and pretending they're "taking one for a friend."
No Cracks, No Tears: The low-and-slow finish plus a quick cool-down means you will never see the Grand Canyon on top of your cheesecake. They come out looking like they posed for a magazine cover.
Make-Ahead Hero: Bake on Sunday, freeze until Friday, thaw for 30 minutes, and serve like you just slaved all day. They taste identical to fresh—I've done blind taste tests with my harshest critics (my kids).
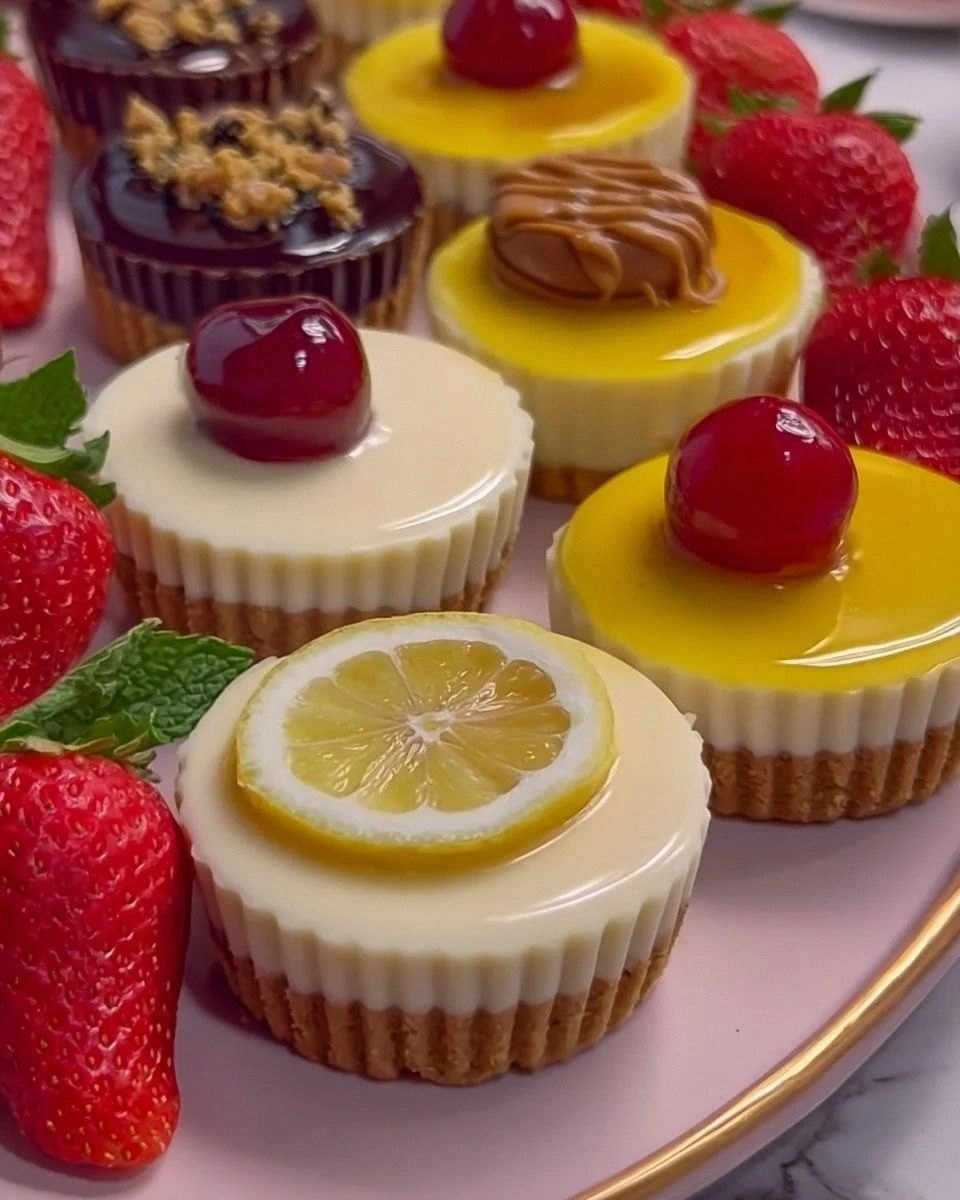
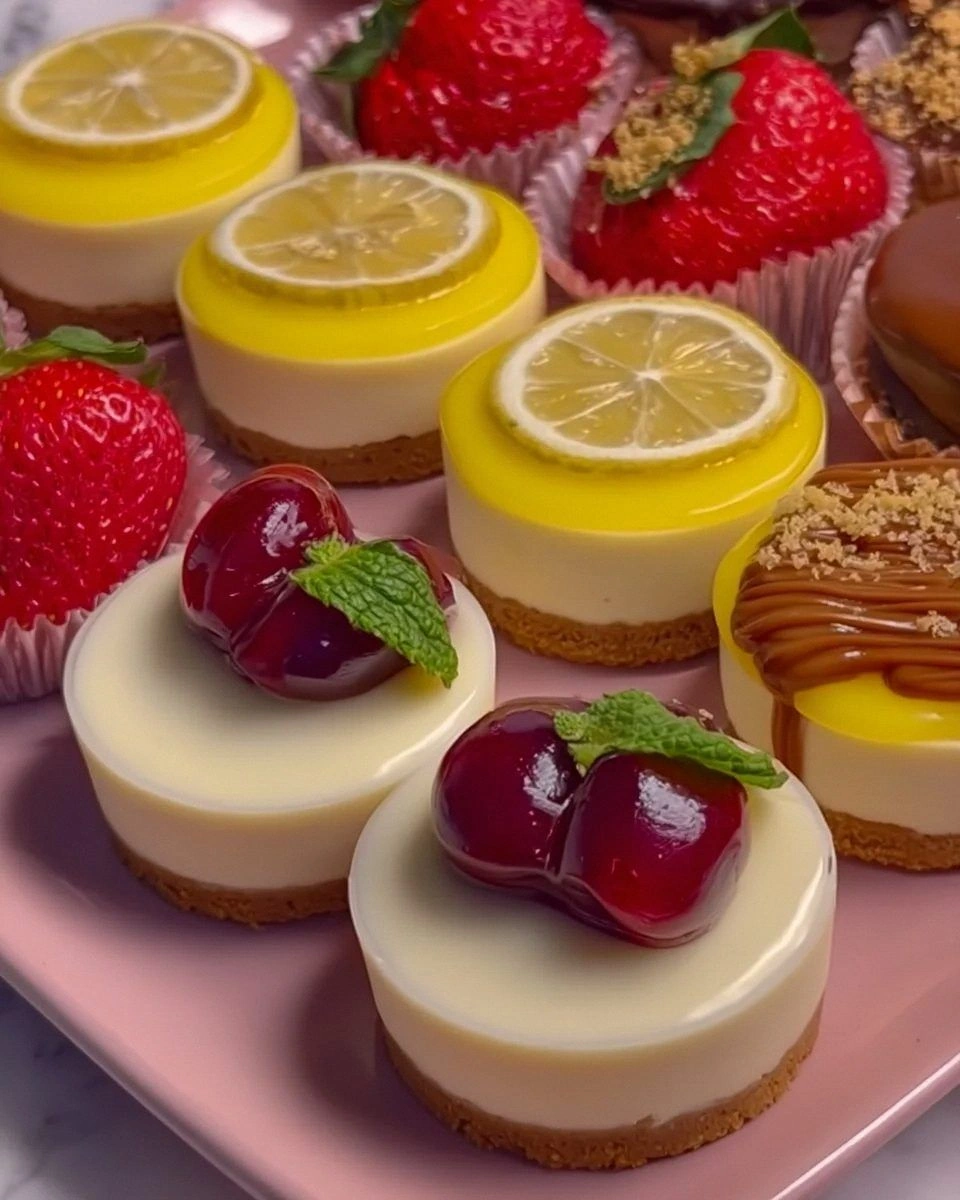
Flavor Playground: Once you master the base, you can swirl in lemon curd, dot with raspberry jam, or crown with chocolate ganache. It's like getting ten recipes for the effort of learning one.
Portion Control (Sort Of): Technically one is a serving, but who's counting? The tiny size makes you feel dainty while you inhale three in a row standing over the sink.
Alright, let's break down exactly what goes into this masterpiece...
Inside the Ingredient List
The Flavor Base
Cream cheese is the star, and you want the full-fat brick kind, not the whipped tub that feels like shaving foam. Full fat equals flavor and structure; anything labeled "light" turns these into sad little discs that taste like diet regret. I use Philadelphia because it melts silkier than store brands, but any brick with at least 33% fat works. Leave it out early; cold cream cheese refuses to blend and you'll end up beating air out while chasing lumps around the bowl.
Granulated sugar sweetens without competing, but I swap in two tablespoons of light brown sugar for depth. The molasses notes make people ask if there's caramel in the batter—just nod mysteriously. Don't use powdered sugar; the cornstarch mutes tang and leaves a chalky finish. Measure by spooning into the cup and leveling with a knife, because a packed cup equals overly sweet cakes that mask the citrusy snap.
The Texture Crew
Eggs bind everything together, but too much egg equals rubber. One whole egg plus one yolk gives structure plus extra richness without turning the texture into a bounce house. Separate the second egg over a small bowl so a broken yolk doesn't doom the whole batch. Room-temperature eggs whip more air, leading to that soufflé-like rise that collapses into creamy perfection.
Sour cream is my secret weapon—four tablespoons that rescue the batter from dryness and add cultured tang that screams "real bakery." Full-fat Greek yogurt works in a pinch, but it firms up more, giving you a cheesecake that feels like it lifts weights. If you only have low-fat sour cream, add an extra teaspoon of butter to the crust to compensate for lost richness.
The Unexpected Star
Heavy cream gets drizzled in at the end, loosening the batter so it pours like liquid silk and bakes into a texture that quivers like panna cotta. Skip the milk; water content is higher and you'll get air pockets. Half-and-half is acceptable but expect a slightly less luxurious mouthfeel. Whisk it in by hand at the very end to preserve the air you carefully beat into the cream cheese.
The Final Flourish
Vanilla extract is non-negotiable, but use the good stuff—Madagascar bourbon if you can find it—because imitation vanilla leaves a chemical aftertaste that ruins the vibe. A pinch of kosher salt sharpens every other flavor the way sunglasses make colors pop on a bright day. Lemon zest is optional but transformative; micro-plane just the yellow, not the bitter white pith, and you'll add sunshine without announcing "Hey, this is lemon!"
Everything's prepped? Good. Let's get into the real action...
The Method — Step by Step
- Preheat your oven to 350°F (175°C) and line a 12-cup muffin tin with paper liners. Trust me on the liners—greasing the tin directly leaves half your crust glued to the metal like cement. Slide a whole graham cracker into a zip bag, channel your inner rage, and roll until you have fine crumbs that look like beach sand after a perfect day. Mix with melted butter that smells like movie-theater popcorn and a whisper of sugar until the texture resembles wet sand you could build a castle with, then press one heaping tablespoon into each cup. Use the bottom of a spice jar to tamp it down firmly; a loose crust will crumble like your resolve on a Monday morning.
- Slide the tray into the oven for five minutes—just enough time for the butter to sizzle and the kitchen to smell like Saturday morning cartoons. While that's happening, beat the cream cheese on medium speed for a full two minutes. This isn't a polite stir; you want to whip air into it until it looks like fluffy clouds tinged with optimism. Scrape the bowl twice because the stuff at the edges stays stubbornly cold and lumpy, and lumps in your final batter are the culinary equivalent of wearing socks with sandals.
- Add the sugar steadily while the mixer runs, letting it disappear completely before the next spoonful. The mixture will lighten from dense yellow to pale satin, signaling that the grit is dissolved and the sugar is beginning to melt into the fat. Stop once and run your finger through—if you feel sugar crystals, keep mixing. This step determines whether your cheesecakes have a velvety finish or a sandy bite that makes people question your life choices.
- Drop in the room-temperature egg plus yolk, one at a time, beating just until incorporated. Over-mixing here whips in too much air, which expands in the oven and then collapses into cracks big enough to make you cry. Think of it as folding in kindness rather than beating in frustration. The batter should look glossy and flow like thick pancake batter, not stiff like frosting.
- Pour in the sour cream, vanilla, and optional lemon zest, then mix on low just until you see streaks disappear. The batter should now smell like ice cream on a summer boardwalk and look like silk pajamas. Use a spatula to fold from the bottom up once, ensuring no white pockets remain, because those will bake into unattractive white freckles that scream "amateur hour."
- Drizzle in the heavy cream while the mixer is on its lowest speed, then stop the moment it disappears. The batter will loosen and glisten like liquid moonlight. Let it sit for two minutes so air bubbles rise and pop; impatient souls who skip this step end up with pock-marked tops that look like teenage skin.
- Lower the oven to 325°F (160°C). Spoon or ladle the batter over the pre-baked crusts, filling each cup almost to the top. The mixture will puff gently, so leave only a sliver of liner showing like a tidy collar. Tap the pan on the counter twice to coax hidden air bubbles to the surface; they'll pop and leave you with glass-smooth tops.
- Bake for 18 minutes total, but check at 14. You're looking for centers that jiggle like gelatin when you nudge the pan, while the outer inch looks matte rather than wet. If they still look shiny all over, give them two more minutes and watch like a hawk—over-baking is the fastest route from creamy to chalky.
- Turn the oven off, crack the door with a wooden spoon, and let them sit in the cooling oven for 10 minutes. This gentle finish prevents the dramatic temperature drop that causes sinking centers and fissures deep enough to hide secrets. Your kitchen will smell so good you'll consider bottling the air and selling it as a perfume called "Comfort."
- Transfer the tin to a wire rack and cool for 30 minutes, then refrigerate at least two hours or overnight. The chilling sets the custard and transforms texture from wobbly to spoon-soft. If you're in a rush, pop them into the freezer for 45 minutes, but don't you dare serve them warm—they'll taste like sweet scrambled eggs and break your heart.
That's it—you did it. But hold on, I've got a few more tricks that'll take this to another level...
Insider Tricks for Flawless Results
The Temperature Rule Nobody Follows
Everything at room temperature isn't just chef snobbery; it's chemistry. Cold cream cheese refuses to blend smoothly, and cold eggs seize in fat, creating curdled bits that never disappear. Set a timer for 45 minutes before you start, or microwave cream cheese (unwrapped) on 50% power for 15-second bursts, flipping between each. Touch the center—it should feel like the inside of your wrist, not chilly. The payoff is batter so smooth it reflects your smiling face like a sugary mirror.
Why Your Nose Knows Best
Don't trust timers blindly; trust aroma. When you smell fragrant vanilla and toasty graham drifting from the oven, you're two minutes from perfect doneness. That scent means the proteins are setting and the Maillard reaction is kissing the crust golden. If you wait for a timer while your nose is screaming "now," you'll over-bake. I've saved more batches by following my nose than any gadget.
The 5-Minute Rest That Changes Everything
After mixing, let the batter sit five minutes before portioning. This pause allows air bubbles to rise and pop, giving you crater-free tops. Stir once gently with a spatula to knock out any stubborn pockets, then pour. A friend tried skipping this step once—let's just say her cheesecakes looked like lunar landscapes, and nobody took photos for the 'gram.
The Peel Test for Paper Liners
Buy parchment, not plain paper, liners. The difference is the non-stick coating that releases cleanly instead of tearing away half your crust. Before serving, chill the cheesecakes until cold, then peel slowly while supporting the base. If any crust sticks, slide a thin knife between paper and cake to release. It's like undressing a present without ripping the bow.
Refrigerator Real Estate
Cool them uncovered for the first hour so condensation doesn't rain onto the surface and create sticky tops. After that, cover loosely with foil or slide into a container with a slightly ajar lid. Trapped moisture ruins the velvety finish and makes them taste like refrigerator instead of cheesecake. Yes, that's a flavor—and not a good one.
Creative Twists and Variations
This recipe is a playground. Here are some of my favorite ways to switch things up:
Berry Swirl Beauties
Drop ½ teaspoon raspberry jam onto each filled cup and drag a toothpick in figure eights for marbled tops that look like Monet painted dessert. Use good jam, not corn-syrup fruit goo, or the flavor will taste like cafeteria memories. Bake as directed; the jam melts into jewel-toned rivers that set like stained glass.
Salted Caramel Dream
Substitute dark brown sugar for the white and fold in one tablespoon of bourbon. After cooling, spoon homemade salted caramel on top so it drips down the sides like slow lava. Sprinkle with flaky salt. People will propose marriage; you've been warned.
Chocolate Bottom Bliss
Press one teaspoon of melted bittersweet chocolate onto the graham crust before adding batter. It hardens into a crunchy layer that shatters like thin ice under the creamy filling. Kids think it's magic; adults pretend they're sophisticated while licking chocolate off their thumbs.
Lemon Cloud Kisses
Add one tablespoon lemon juice and double the zest for bright, sherbet-like tang. Top with candied lemon peels that sparkle like stained glass windows. Serve these after a heavy meal and watch guests revive like wilted lettuce in water.
Pumpkin Spice Autumn Vibes
Swap in ¼ cup pumpkin puree, reduce sour cream to two tablespoons, and add ½ teaspoon cinnamon plus a pinch each of nutmeg and cloves. Top with maple-sweetened whipped cream. If you've ever struggled with seasonal desserts, you're not alone—and I've got the fix.
Mocha Marvel
Dissolve one teaspoon instant espresso powder in the vanilla before adding. Stir in mini chocolate chips that melt into gooey pockets. The result tastes like your favorite coffee shop merged with a bakery and had delicious babies.
Storing and Bringing It Back to Life
Fridge Storage
Cold, covered, and consumed within four days is the sweet spot. Stack them in a single layer in an airtight container with parchment between layers if you must double-decker. After day four they start tasting tired, like a joke you've heard too often. If you need longer, head to the freezer—they freeze beautifully for two months.
Freezer Friendly
Flash-freeze on a tray until solid, then transfer to a zip bag with as much air removed as possible. Label with the date; future you will thank present you. Thaw overnight in the fridge or at room temp for 30 minutes. They emerge tasting exactly like fresh, which is why I always make a double batch and hoard half like a dessert dragon.
Best Reheating Method
Cheesecake prefers chill, but if you like them slightly softer, let them sit at room temperature 15 minutes before serving. Never microwave—it turns texture rubbery and edges into sad puddles. For a just-baked vibe, place in a 200°F (95°C) oven for five minutes, then cool five more. Add a tiny splash of water to the container before reheating—it steams back to perfection.