It started on a rainy Wednesday when I was trying to salvage a soggy leftover pizza and ended up with a kitchen disaster that tasted like regret. I tossed the pizza into a pan, hoping the heat would rescue it, but it turned into a greasy mess that clung to the skillet like a bad habit. That night, I stared at the charred crust and thought, “There has to be a better way to resurrect this kind of flavor.” That thought sparked a midnight culinary experiment that would soon become my secret weapon for every dinner.
Picture the aroma of tomato sauce simmering with a splash of vodka, the gentle hiss as olive oil kisses the pan, and the anticipation that builds when a chicken breast sizzles and releases a golden crust. The sound of the sizzling is like applause for the dish, the sight of the sauce thickening into a glossy, velvety coat, and the touch of a perfectly crisped edge that shatters like thin ice when you bite into it. The first bite is an explosion of umami and a subtle citrus kick from the vodka, followed by the creamy whisper of mozzarella. The flavor is so layered that every mouthful feels like a new revelation.
What makes this version stand out isn’t just the ingredients—it’s the way they dance together. The vodka isn’t a gimmick; it lifts the acidity of the tomato sauce, creating a silky finish that feels like a secret handshake between flavors. The chicken, brined and lightly breaded, holds its moisture while the crust delivers a satisfying crunch. Fresh basil is folded in at the end, brightening the dish with a herbal spark that cuts through the richness. This isn’t the run-of-the-mill chicken parmesan; it’s a symphony of textures and tastes that will have you saying, “I dare you to taste this and not go back for seconds.”
I’m not just telling you a recipe; I’m handing you a ticket to a kitchen experience that will become a staple on your table. By the end of this post, you’ll wonder how you ever made it any other way. Let me walk you through every single step—by the end, you’ll wonder how you ever made it any other way.
What Makes This Version Stand Out
- Flavor: The vodka-infused sauce transforms ordinary tomato into a luxurious, silky texture that coats the chicken like velvet, leaving no bite untouched.
- Texture: The breaded chicken delivers a crisp, golden crust that shatters like thin ice, while the inside stays tender and juicy.
- Ingredient Quality: Fresh basil and high‑quality mozzarella add a depth that canned ingredients simply can’t match.
- Simplicity: With only seven core ingredients, the recipe feels approachable yet sophisticated.
- Make‑ahead Potential: The sauce can be pre‑made and stored, allowing you to assemble the dish in minutes on a busy weeknight.
- Visual Appeal: The glossy sauce and melted cheese create a presentation that looks as good as it tastes.
- Crowd Reaction: Friends and family often ask for a second plate, and I confess I ate half the batch before anyone else got a chance.
- Versatility: It works beautifully with pasta, rice, or as a sandwich filling, making it a multi‑use pantry staple.
Alright, let's break down exactly what goes into this masterpiece…
Inside the Ingredient List
The Flavor Base
Vodka Sauce: This isn’t just tomato sauce; it’s a silky, slightly sweet tomato blend enhanced by a splash of vodka that lifts the acidity. The vodka evaporates during cooking, leaving behind a subtle citrus note that brightens the dish. If you skip it, the sauce will feel flat and heavy. For a richer flavor, use a high‑quality canned tomato sauce and a generous splash of good vodka.
Fresh Basil: Fresh basil is the secret weapon that injects brightness into the sauce. It cuts through the richness of the cheese and the heaviness of the tomato. If you can’t find fresh basil, a small pinch of dried basil will do, but the aroma won’t be as vibrant.
The Texture Crew
Breadcrumbs: Breadcrumbs create that essential crunch that balances the creamy sauce. Use panko for an extra airy texture or homemade breadcrumbs for a more rustic feel. Skipping breadcrumbs will leave the chicken too soft and the sauce will cling to the pan instead of coating the meat.
Eggs: Eggs bind the breadcrumbs to the chicken, ensuring a uniform coating that holds together when you bite into it. If you’re vegan or allergic, you can substitute with a splash of water mixed with a tablespoon of flour, but the texture will change.
The Unexpected Star
Red Pepper Flakes: A pinch of red pepper flakes adds a subtle heat that balances the richness of the cheese. If you’re heat‑averse, simply omit them; the dish will still be deliciously savory.
The Final Flourish
Mozzarella Cheese: Mozzarella melts into a gooey, stringy texture that pulls the sauce together. Use a high‑moisture mozzarella for maximum meltiness. If you prefer a sharper flavor, a blend of mozzarella and provolone works well.
Everything's prepped? Good. Let's get into the real action…
The Method — Step by Step
- Begin by patting the chicken breasts dry with paper towels. This step is crucial for a crispy crust; moisture will steam the breading instead of searing it. Season both sides generously with salt and pepper, then set aside. The aroma of freshly seasoned chicken will set the tone for the entire dish.
- Set up a breading station: place the eggs in a shallow dish and whisk them until frothy. In a separate bowl, spread out the breadcrumbs. This classic method ensures an even coating; if you’re short on time, a single dip in the egg followed by a coat of breadcrumbs is fine.
- Dip each chicken breast into the beaten eggs, letting excess drip off, then dredge it in breadcrumbs, pressing lightly to adhere. The double coating will give that perfect crunch. Let the coated chicken rest for a minute; this allows the breading to set and prevents it from sliding off during cooking.
- Heat a large skillet over medium‑high heat and add enough olive oil to coat the bottom. Once the oil shimmers, place the chicken in the pan, leaving space between pieces. The sizzle you hear is the sound of flavor locking in—don’t move the chicken until the bottom turns golden brown.
- Cook the chicken for 5–6 minutes per side until the exterior is a deep golden brown and the internal temperature reaches 165°F. The edges will start pulling away from the pan, indicating readiness. This is the moment of truth; the chicken’s exterior should be crisp, while the inside remains juicy.
- While the chicken cooks, pour the vodka sauce into a saucepan and bring to a gentle simmer over medium heat. Add a splash of vodka, stir, and let the alcohol evaporate. The sauce should thicken slightly and develop a glossy sheen—this is the foundation of the dish.
- When the chicken is browned, reduce the heat to low and pour the simmering sauce over the chicken, ensuring each piece is well coated. Sprinkle the mozzarella evenly across the top and add a pinch of red pepper flakes. The cheese will melt into a stretchy, golden blanket.
- Cover the skillet with a lid and let everything simmer for 8–10 minutes, allowing the cheese to melt and the flavors to meld. The sauce should be rich and silky, with the basil releasing its aromatic oils. This step ensures every bite is saturated with sauce.
- Finish by adding fresh basil leaves on top, letting them wilt slightly in the residual heat. The basil’s bright green color and fresh scent will contrast beautifully against the creamy sauce. Serve immediately for maximum flavor and texture.
That’s it—you did it. But hold on, I’ve got a few more tricks that will take this to another level…
Insider Tricks for Flawless Results
The Temperature Rule Nobody Follows
Many cooks lower the heat too quickly after searing, causing the sauce to stick to the pan and the chicken to steam instead of finish crisping. Keep the skillet at a steady medium‑high heat until the chicken is browned, then reduce to low only when adding the sauce. This ensures a perfect balance between a crunchy exterior and a moist interior.
Why Your Nose Knows Best
Before you start, inhale the aroma of the vodka sauce. If it smells bright and slightly tangy, it’s ready. If it’s flat, let it simmer a few more minutes. Your nose can tell you if the sauce has developed enough depth.
The 5‑Minute Rest That Changes Everything
After cooking, let the chicken rest on a plate for five minutes. The juices redistribute, preventing a dry bite. A friend once skipped this step, and the result was a soggy sandwich—lesson learned.
The Breaded Layer Trick
Press the breadcrumbs onto the chicken firmly before cooking. This creates a tighter crust that holds the sauce and cheese better, preventing it from sliding off during the simmer.
The Basil Timing Secret
Add fresh basil at the very end, just before serving. The heat wilts the leaves slightly but preserves their bright flavor. Adding basil too early can cause it to wilt completely, losing its vibrant color and aroma.
Creative Twists and Variations
This recipe is a playground. Here are some of my favorite ways to switch things up:
Mediterranean Crunch
Swap the breadcrumbs for crushed pita chips and add chopped Kalamata olives to the sauce. The result is a salty, Mediterranean vibe that pairs wonderfully with a side of hummus.
Spicy Cajun Kick
Infuse the sauce with a tablespoon of Cajun seasoning and replace the mozzarella with smoked Gouda. The smoky heat will elevate the dish to a bold, southern-inspired flavor profile.
Herb‑Infused Grilled Version
Grill the chicken instead of pan‑frying, brushing it with a mixture of rosemary, thyme, and olive oil. The grill marks add a charred aroma that complements the creamy sauce.
Cheese‑Blasted Variations
Use a blend of mozzarella and provolone for a richer melt or add a handful of shredded cheddar for a sharper bite. The cheese variety changes the mouthfeel and depth of flavor.
Pasta Powerhouse
Serve the chicken over al dente spaghetti, tossing the pasta in the sauce before plating. The noodles soak up the sauce, creating a comforting, all‑in‑one meal.
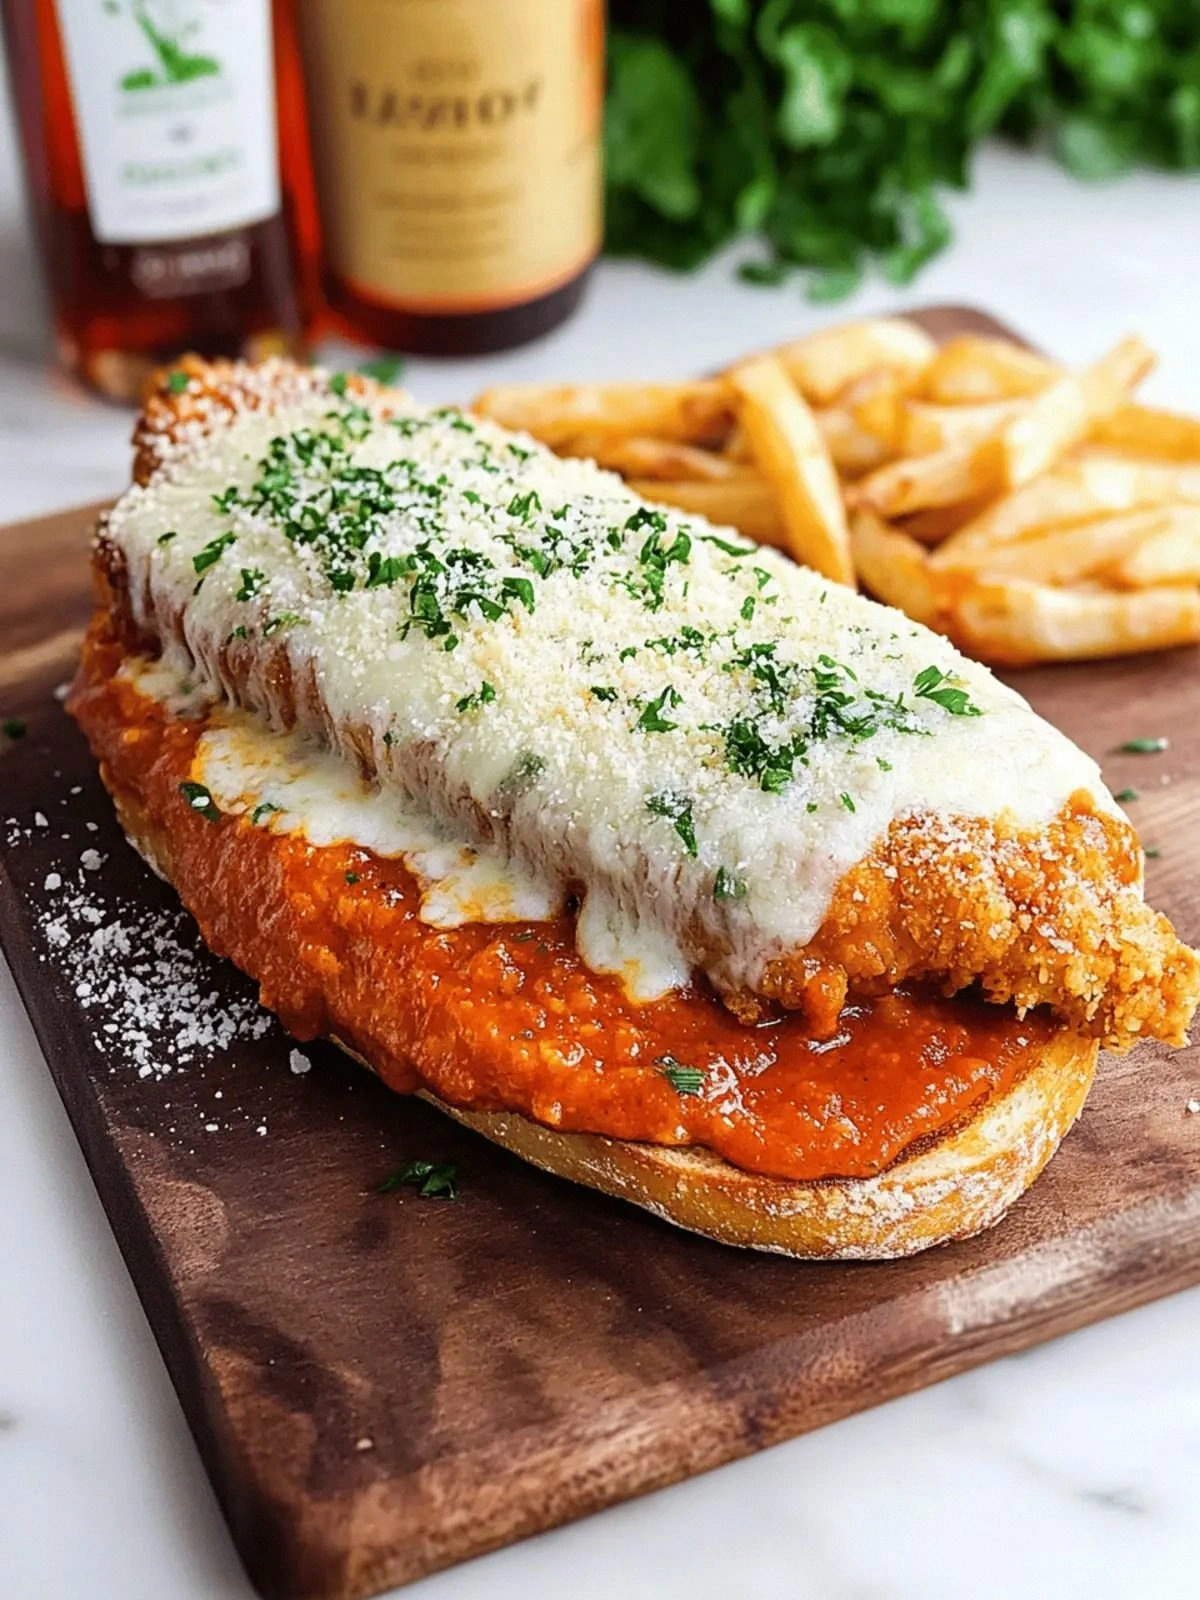
Sandwich Supreme
Slice the cooked chicken and layer it on crusty Italian bread with fresh basil and a drizzle of olive oil. The sandwich becomes a handheld delight that’s perfect for lunch or dinner.
Storing and Bringing It Back to Life
Fridge Storage
Store the cooked chicken and sauce separately in airtight containers for up to 4 days. Keep the sauce in a sealed glass jar and the chicken in a separate plastic container to maintain freshness.
Freezer Friendly
Freeze the chicken in a single layer on a parchment‑lined tray before transferring to freezer bags. The sauce can be frozen for up to 3 months. When ready, thaw overnight in the fridge.
Best Reheating Method
Reheat the sauce in a saucepan over low heat, adding a splash of water to keep it silky. Warm the chicken in a preheated oven at 350°F for 10 minutes until heated through. This method preserves the sauce’s texture and the chicken’s juiciness.