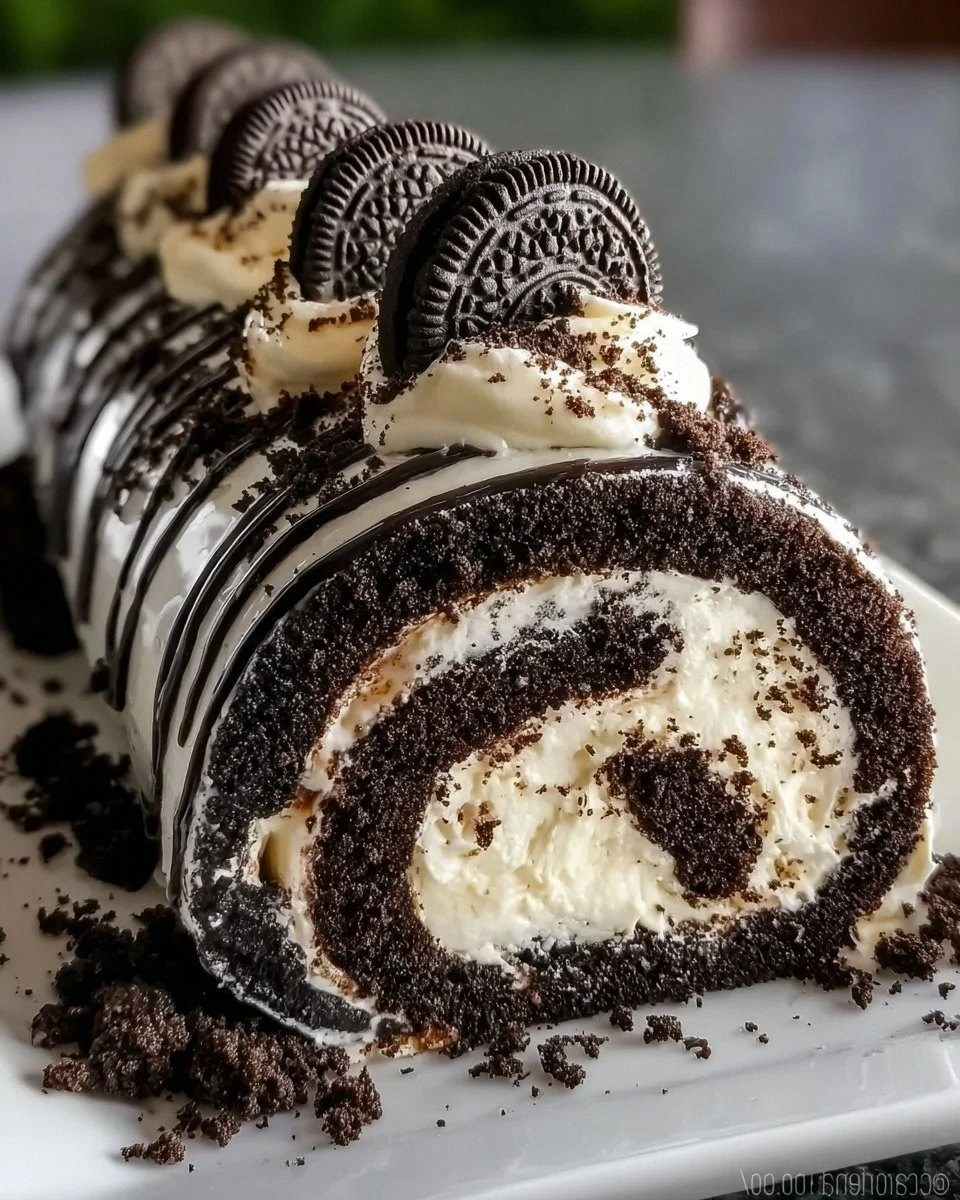
I was sitting on my couch, scrolling through endless recipe blogs, when my roommate dared me to create the ultimate Oreo roll that would make even the most hardened dessert snob weep with joy. I laughed, grabbed a box of chocolate cake mix, and thought, “What could possibly go wrong?” Little did I know that a simple mishap—mistaking the sugar for salt—would lead me down a rabbit hole of flavor experiments, late‑night taste tests, and a kitchen that smelled like a chocolate‑covered carnival. The result? A dessert that feels like a hug from a childhood memory, but with a grown‑up twist that says, “I’ve got my life together, but I still love cookies.”
Picture this: a golden‑brown sponge rolled so thin it practically whispers, a silky cream cheese filling that clings to the crumb like a lover’s embrace, and a cascade of crushed Oreos that crunch with every bite. The aroma of melted white chocolate drifts through the air, mingling with the deep cocoa notes of the cake, while the faint hint of vanilla teases your nose like a secret promise. When you slice into it, the steam rises like a soft cloud, and the first forkful is a symphony of textures—soft, creamy, crunchy, and decadently sweet—all dancing together in perfect harmony. That moment, when the fork slides through the roll and the flavors explode, is pure magic.
Most Oreo roll recipes out there either over‑complicate the process or skimp on the crucial ingredients that give this dessert its signature “creamy” character. I’ve tried the store‑bought mixes, the “no‑bake” shortcuts, and even a version that used whipped topping instead of real cream cheese—none of them delivered that lush mouthfeel that makes you want to lick the plate clean. This version stands out because it respects the classic foundation (a reliable cake mix) while elevating every component with thoughtful additions: a splash of vanilla, a drizzle of white chocolate, and extra crushed Oreos that add an unexpected crunch. The secret? A technique borrowed from pastry chefs—rolling the cake while it’s still warm, which locks in moisture and prevents cracks.
I’m about to walk you through every single step—down to the exact moment you should hear that satisfying “pop” as the edges of the cake start to pull away from the pan. By the end, you’ll wonder how you ever settled for a plain slice of cake when you could be indulging in this Oreo Roll Chocolate Creamy masterpiece. Ready? Let’s dive in and turn your kitchen into a dessert wonderland.
What Makes This Version Stand Out
- Texture: The cake stays ultra‑tender thanks to the oil‑and‑water balance, while the cream cheese filling provides a luxurious silkiness that never feels heavy.
- Flavor Depth: A hint of vanilla and the bittersweet notes of white chocolate drizzle create layers that keep you reaching for more.
- Simplicity: Using a boxed cake mix saves time without sacrificing taste, making this a weeknight hero that feels like a celebration.
- Crunch Factor: Crushed Oreos are folded into the filling and sprinkled on top, delivering that satisfying snap you crave.
- Crowd Reaction: I dare you to serve this at a party and watch the room go silent as everyone eyes the roll—then hear the collective gasp when they take the first bite.
- Make‑Ahead Potential: The roll can be assembled a day ahead, refrigerated, and still taste like it just left the oven.
- Ingredient Quality: We use real butter and cream cheese, not margarine or shortcuts, ensuring a rich, authentic flavor.
- Versatility: Swap white chocolate for dark, add a splash of espresso, or sprinkle toasted coconut for endless variations.
Inside the Ingredient List
The Flavor Base
The heart of this roll starts with a box of chocolate cake mix. This pre‑measured blend guarantees consistent cocoa intensity while saving you the hassle of measuring flour, cocoa, and leavening agents separately. If you’re feeling adventurous, swap the mix for a homemade blend of 1 ½ cups flour, ½ cup cocoa, 2 tsp baking powder, and a pinch of salt for a truly artisanal touch. The vanilla extract adds a fragrant undertone that lifts the chocolate from flat to fabulous; a splash of pure vanilla is worth its weight in gold, especially when paired with the buttery richness of the filling.
The Texture Crew
Eggs act as the structural glue, ensuring the cake rises evenly and holds its shape when you roll it. Three large eggs provide the perfect balance—too few and the cake will be crumbly; too many and it becomes rubbery. Vegetable oil keeps the crumb moist and tender; you can swap in melted coconut oil for a subtle tropical note that pairs surprisingly well with the chocolate. Water rounds out the batter, creating a silky texture that feels like velvet on the palate. Finally, powdered sugar is dusted over the roll for a light, snow‑kissed finish that adds just enough sweetness without overwhelming the cocoa.
The Unexpected Star
Cream cheese is the secret weapon that transforms this from a simple cake roll into a “creamy” experience. Its tangy richness cuts through the sweetness and creates a luscious mouthfeel that’s impossible to resist. Unsalted butter is melted into the cream cheese mixture, adding a buttery depth that makes the filling glide effortlessly over the sponge. Extra Oreos, crushed finely, are folded into the filling, introducing a crunchy texture that punctuates each bite. For the grand finale, white chocolate is melted and drizzled over the top, offering a glossy, sweet contrast to the dark chocolate cake.
The Final Flourish
Whole Oreos are reserved for decoration—stacked on top, they add visual drama and an extra bite of crunch. When you pull them apart, they reveal a creamy center that mirrors the filling inside, creating a satisfying symmetry. This final garnish not only looks Instagram‑ready but also reinforces the Oreo theme, ensuring every forkful feels like a celebration of the iconic cookie.
Everything's prepped? Good. Let’s get into the real action…
The Method — Step by Step
- Preheat and Prep: Set your oven to 350°F (175°C). Grease a 15×10‑inch jelly roll pan and line it with parchment paper, allowing the paper to overhang the short sides. This overhang will be your handle when you roll the cake later. I like to lightly dust the parchment with flour to prevent sticking. Kitchen Hack: Tap the parchment paper gently after greasing to create a tiny air pocket; this makes the cake release effortlessly after baking.
- Mix the Batter: In a large bowl, combine the chocolate cake mix, eggs, vegetable oil, water, and vanilla extract. Beat on medium speed for about 2 minutes until the batter is smooth and glossy—no lumps, just a dark, velvety river of chocolate. The batter should flow slowly off the whisk, resembling a thick milkshake. Watch Out: Over‑mixing can incorporate too much air, leading to a cake that’s airy but prone to cracking when rolled.
- Bake the Sponge: Pour the batter into the prepared pan, spreading it evenly with a spatula. Slide it into the oven and bake for 12‑15 minutes, or until a toothpick inserted in the center comes out clean and the top springs back lightly. You’ll know it’s ready when the edges start to pull away from the parchment—this is the “golden signal” that the cake is firm enough to roll.
- Cool and Flip: As soon as the cake emerges, invert the pan onto a clean kitchen towel. Peel away the parchment carefully—don’t pull too hard or you’ll tear the delicate crumb. Place the towel (still on top of the cake) and roll the cake gently from the short side, using the towel as a guide. This steam‑wrapped roll will stay supple; let it rest for 5 minutes while you prepare the filling.
- Prepare the Creamy Filling: In a medium bowl, beat softened cream cheese until smooth. Add melted unsalted butter, powdered sugar, and a splash of vanilla, then continue beating until light and fluffy. Fold in the crushed extra Oreos, reserving a handful for the top garnish. The mixture should be thick enough to stay in place but soft enough to spread without tearing the cake.
- Unroll and Spread: Carefully unroll the warm cake onto a fresh sheet of parchment. Spread the cream cheese filling evenly, reaching the edges but leaving a tiny border to prevent overflow. The filling should be generous—think of it as a blanket that hugs every crumb. Once the filling is in place, re‑roll the cake, this time using the fresh parchment as a clean surface.
- Drizzle and Decorate: Melt the white chocolate in a microwave‑safe bowl, stirring every 20 seconds until smooth. Drizzle the glossy chocolate over the rolled cake in a lazy, artistic pattern. Sprinkle the remaining crushed Oreos and whole Oreo cookies on top for that signature crunch and visual pop. Let the chocolate set for a few minutes—if you’re impatient, pop the roll under a very low broiler for 30 seconds to speed up the hardening.
- Slice and Serve: Using a sharp serrated knife, cut the roll into 1‑inch thick slices. Clean the knife between cuts with a warm, damp cloth to ensure each slice stays neat. Arrange the slices on a platter, and if you want to wow your guests, dust a light veil of powdered sugar over the top. That final snow‑kiss is the finishing touch that says, “I’m serious about dessert.”
Insider Tricks for Flawless Results
The Temperature Rule Nobody Follows
Never roll a completely cooled cake. The secret is to roll while it’s still warm—around 120°F (49°C). At this temperature the starches are relaxed, which means the cake won’t snap back and crack. If you wait until it’s room temperature, you’ll end up with a jagged roll that looks more like a crumpled newspaper than a sleek dessert. I’ve seen beginners try to “let it cool completely” and then spend an hour fighting a stubborn cake. Trust me, a warm roll is the difference between “wow” and “whoops.”
Why Your Nose Knows Best
When the cake is baking, keep your nose close to the oven. A sweet, buttery scent that deepens into a rich chocolate aroma signals it’s almost done. If you smell a faint “raw flour” note, give it another minute. Your sense of smell is a more reliable timer than a clock, especially when ovens vary by a few degrees. I once pulled a cake out a minute early because the timer rang, but the faint raw smell told me to stay put—and the extra 30 seconds saved the roll from a dry interior.
The 5‑Minute Rest That Changes Everything
After you roll the cake the first time, let it rest for exactly five minutes on the towel. This pause lets the steam settle, creating a flexible “memory” in the crumb that makes the second roll effortless. Skipping this rest is a common mistake; you’ll feel the cake resist, and the filling may start to ooze out the sides. Think of it as a brief meditation for your cake—five minutes of calm before the final performance.
Butter‑Boosted Filling
Melt the butter before adding it to the cream cheese. Warm butter integrates more smoothly, eliminating lumps and ensuring a glossy, uniform filling. If you add cold butter, the mixture will look speckled and may separate during baking, leading to a grainy texture. The melted butter also adds a subtle caramel note that elevates the overall flavor profile.
Crush, Don’t Pulverize
When crushing extra Oreos, aim for medium‑sized crumbs, not a fine powder. Those tiny shards provide the perfect bite‑size crunch without turning the filling into a cookie‑filled paste. Use a zip‑top bag and a rolling pin—press firmly, then give a gentle roll. This technique gives you control over crumb size and keeps the filling light.
Creative Twists and Variations
This recipe is a playground. Here are some of my favorite ways to switch things up:
Espresso‑Infused Roll
Add 1 tsp of instant espresso powder to the batter and a tablespoon of strong brewed coffee to the cream cheese filling. The coffee’s bitterness balances the sweet Oreo and chocolate, creating a sophisticated flavor that coffee lovers will adore.
Mint‑Chocolate Fusion
Swap half of the white chocolate drizzle for a mint‑flavored white chocolate or melt regular white chocolate and stir in ½ tsp peppermint extract. Garnish with a few crushed mint chocolate chips for a refreshing twist that feels like a holiday treat year‑round.
Nutty Crunch Variation
Fold ¼ cup toasted chopped hazelnuts or almonds into the cream cheese filling. The nuts add a buttery crunch that complements the Oreo crumbs and adds a pleasant nutty aroma.
Fruit‑Laced Surprise
Stir in ¼ cup finely diced dried cherries or cranberries into the filling. The tartness of the fruit cuts through the richness, offering a burst of flavor that pairs surprisingly well with chocolate.
Gluten‑Free Champion
Use a gluten‑free chocolate cake mix and substitute the flour in the crushed Oreo topping with almond flour. The texture stays tender, and the almond flavor adds an extra layer of depth.
Storing and Bringing It Back to Life
Fridge Storage
Wrap the roll tightly in plastic wrap, then place it in an airtight container. It will keep fresh for up to 4 days. The cream cheese filling stays stable, and the cake retains its moisture thanks to the sealed environment. If you notice the surface drying out, lightly brush it with a teaspoon of milk before resealing.
Freezer Friendly
Slice the roll first, then arrange the slices on a parchment‑lined tray and freeze for 2 hours. Transfer the frozen slices to a zip‑top freezer bag. They’ll last up to 2 months. When you’re ready to serve, let them thaw in the fridge for an hour, then bring them to room temperature for the best texture.
Best Reheating Method
To revive a refrigerated slice, place it on a microwave‑safe plate, sprinkle a tiny splash of water (about a teaspoon) over the top, and cover loosely with a damp paper towel. Microwave on medium power for 20‑30 seconds. The steam generated by the water restores the cake’s softness and melts the white chocolate drizzle back into a glossy sheen.