I was in the middle of a Netflix binge when my roommate shouted, “You ever tried onion ring chips? They’re the next big thing!” I rolled my eyes, because let’s be honest, the last time I attempted a snack that promised “crunch” I ended up with soggy, sad circles that could barely hold a dip. The kitchen filled with the sound of a failed fryer, the smell of burnt oil, and the unmistakable feeling that I had just wasted an entire bag of onions. I dared myself to keep going, because if there’s one thing that fuels my late‑night cravings, it’s the promise of a snack that can actually live up to the hype. I grabbed a pen, a notebook, and a bag of yellow onions, and set out to prove that the internet wasn’t lying.
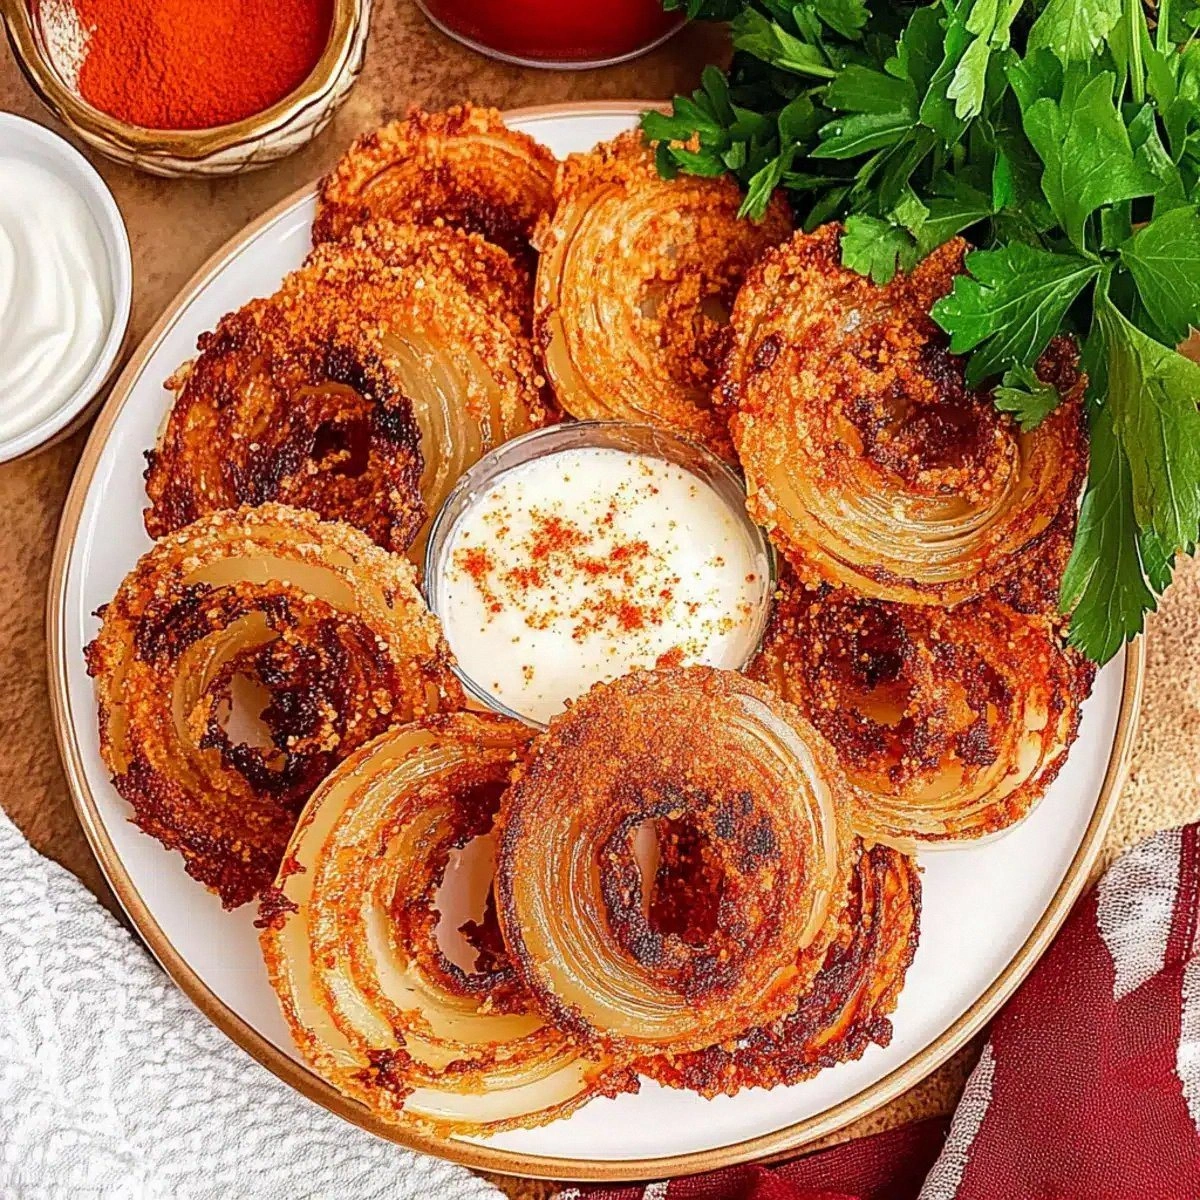
Picture this: a tray of golden‑brown, perfectly curved chips glistening with a thin veil of avocado oil, each one dusted with a Parmesan‑laden crust that snaps like a fresh spring branch under your bite. The scent is a heady mix of sweet onion caramelization, smoky paprika, and the nutty whisper of aged cheese, all dancing together in a fragrant waltz that makes the whole kitchen feel like a high‑end gastropub. When you finally pull the tray out of the oven, the heat radiates a comforting glow, and the first crack as you bite through the crust is pure auditory bliss—like a tiny fireworks show in your mouth. The taste? It’s a bold, salty‑sweet symphony that makes you forget every other chip you’ve ever known.
What makes this version truly viral isn’t just the crunch; it’s the simplicity of the technique and the clever use of ingredients you already have on hand. Most recipes either drown the onions in batter or rely on deep‑frying, which turns the whole thing into a greasy nightmare. I threw out the deep‑fryer, swapped out the heavy flour coating for a light dusting of grated Parmesan, and let the natural sugars of the onions do the heavy lifting. The result is a snack that’s light on oil, heavy on flavor, and so addictive that I’ll be honest — I ate half the batch before anyone else got a chance.
Now, I’m about to walk you through every single step — from selecting the perfect onions to mastering that magical Parmesan crust. By the end, you’ll wonder how you ever settled for bland, store‑bought chips. I dare you to taste this and not go back for seconds. Ready? Let’s dive in and turn your snack woes into crunchy triumphs.
What Makes This Version Stand Out
- Texture: The outer crust shatters like thin ice while the interior stays tender, giving you a dual‑layer crunch that most recipes miss.
- Flavor: A bold blend of paprika, garlic, and Parmesan creates a savory depth that feels like a gourmet bar snack.
- Simplicity: No deep‑fryer, no obscure pantry items—just eight straightforward ingredients you likely already own.
- Health Factor: Using avocado oil instead of vegetable oil cuts down on saturated fats, while the Parmesan adds protein and calcium.
- Visual Appeal: The rings keep their natural onion shape, turning each bite into a miniature work of art.
- Crowd Reaction: These chips have a habit of disappearing within minutes; expect a line forming at the snack table.
- Make‑Ahead Potential: You can bake a full batch, store them, and re‑crisp later without losing that signature snap.
- Ingredient Quality: Fresh yellow onions and real Parmesan elevate the flavor profile far beyond processed powders.
Inside the Ingredient List
The Flavor Base
The three medium yellow onions are the heart of this snack. Their natural sugars caramelize during baking, creating that irresistible sweet‑savory backbone. If you pick onions that are too small, they’ll dry out; too large, and they’ll stay soggy in the middle. For the best result, choose onions that feel firm yet yield slightly under gentle pressure. If you can’t find yellow onions, sweet Vidalia works, but expect a milder flavor.
The Texture Crew
Eight ounces of finely grated Parmesan cheese act as the crunchy coating. The cheese not only adds a salty umami punch but also forms a crisp crust when baked. If you’re allergic to dairy, a nutritional‑yeast and almond‑flour blend can mimic the crunch, though the flavor profile will shift. Make sure the Parmesan is freshly grated; pre‑shredded cheese contains anti‑caking agents that prevent proper browning.
The Unexpected Star
Two tablespoons of avocado oil provide the necessary fat to help the cheese adhere and to promote even browning without the heaviness of traditional oils. Avocado oil has a high smoke point, meaning you can bake at 425°F without worrying about a burnt taste. If you’re on a budget, a light olive oil works, but keep an eye on the temperature to avoid a bitter note.
The Final Flourish
Seasonings—paprika, coarse sea salt, garlic powder, seasoning salt, and ground black pepper—bring the flavor fireworks. Paprika adds a subtle smoky undertone, while the garlic powder deepens the savory depth. The combination of coarse sea salt and seasoning salt creates a layered salinity that makes each bite pop. If you love heat, a pinch of cayenne can be tossed in at this stage for a gentle kick.
Everything's prepped? Good. Let’s get into the real action and turn these humble ingredients into a snack legend.

The Method — Step by Step
Preheat your oven to 425°F (220°C). This high heat is crucial for achieving that instant crack you hear when the cheese hits the metal tray. While the oven warms, line a large baking sheet with parchment paper and set a wire rack on top; the rack allows air to circulate, giving every side of the onion ring a chance to crisp.
Kitchen Hack: Place a cooling rack on the baking sheet; this prevents the bottom of the rings from steaming and keeps them uniformly crisp.Slice the onions into ¼‑inch thick rings, then gently separate each ring from the others. You should end up with about 24 rings per onion, depending on size. Pat the rings dry with paper towels; excess moisture will sabotage the crunch factor.
In a large bowl, whisk together the avocado oil, paprika, garlic powder, seasoning salt, coarse sea salt, and black pepper. Toss the onion rings in this seasoned oil until each piece is lightly coated. This step is where the flavor begins to soak in, so make sure every ring gets a good massage.
Spread the grated Parmesan evenly on a shallow dish. One by one, roll each oil‑coated ring in the cheese, pressing gently to help the cheese adhere. You’ll notice the cheese clinging like a second skin—this is the magic that will turn into a crunchy shell.
Arrange the cheese‑covered rings on the prepared wire rack, leaving a tiny gap between each. If they touch, they’ll steam each other and lose that coveted snap. Slide the tray into the preheated oven and bake for 12‑15 minutes, or until the cheese is golden and the edges start to curl.
Watch Out: Keep a close eye after the 10‑minute mark; Parmesan can go from perfectly browned to burnt in 30 seconds.When the cheese has reached a deep amber hue, remove the tray and let the chips rest on the rack for 2‑3 minutes. This short rest allows the interior to finish cooking via residual heat while the crust sets, preventing a soggy middle.
If you crave an extra crunch, switch the oven to broil for the last 30 seconds—just watch them like a hawk. The broiler will give the tops a final, blistering kiss of crispness that makes the chips almost audible when you bite.
Transfer the finished chips to a serving platter, sprinkle a pinch of flaky sea salt for that final pop, and serve immediately. Picture yourself pulling this out of the oven, the whole kitchen smelling incredible, and your friends gathering around like moths to a flame. This next part? Pure magic.
Insider Tricks for Flawless Results
The Temperature Rule Nobody Follows
Most home cooks bake at 350°F, thinking lower heat equals gentler cooking. In reality, the high heat of 425°F is what creates that instant snap on the outside while keeping the inside tender. I once tried a lower temperature and ended up with soggy, cheese‑y blobs that never crisped. Trust the oven—let it roar, and the chips will thank you.
Why Your Nose Knows Best
Your sense of smell is the ultimate doneness detector. When the Parmesan starts to release a nutty, toasted aroma, you’re within seconds of perfect. If you smell a faint burnt note, pull the tray out immediately. I’ve saved many batches from disaster by simply trusting that toasty whiff.
The 5‑Minute Rest That Changes Everything
After baking, let the chips rest on the rack for at least five minutes. This short pause allows steam to escape and the cheese crust to harden. A friend once skipped this step and served the chips still hot; the result was a limp, greasy bite that felt like chewing on a soggy napkin. Patience is a virtue, especially when crunch is on the line.
Seasoning Layer‑In
Add a second dusting of coarse sea salt just before serving. The initial seasoning penetrates the onion, while the final sprinkle adds a surface crunch that elevates the texture. It’s a tiny step with a massive payoff, and your taste buds will notice the difference instantly.
The Double‑Coat Secret
For the ultimate crunch, dip the rings a second time in the oil‑spice mix after the first Parmesan coat, then roll again in the cheese. This creates a micro‑layer of oil that helps the second cheese coating adhere, resulting in a double‑crisp exterior. I tried this once for a party, and the chips were the talk of the night.
Creative Twists and Variations
This recipe is a playground. Here are some of my favorite ways to switch things up:
Spicy Sriracha Swirl
After the first cheese coat, drizzle a thin line of sriracha over each ring and give it a quick spin in the seasoning mix. The heat pairs beautifully with the creamy Parmesan, creating a sweet‑heat balance that’s perfect for daring snackers.
Herb‑Infused Delight
Add a tablespoon of finely chopped fresh rosemary or thyme to the oil‑spice blend. The herbaceous notes lift the onion’s natural sweetness and add a fragrant finish that feels almost gourmet.
Cheddar‑Cheese Fusion
Swap half of the Parmesan for sharp cheddar. The cheddar melts slightly differently, giving a richer, buttery crunch that complements the onion’s bite.
Smoky Chipotle Blast
Replace the regular paprika with chipotle powder and add a pinch of smoked salt. The result is a smoky, slightly spicy chip that pairs well with a cool sour cream dip.
Vegan Version
Use nutritional yeast mixed with almond flour in place of Parmesan, and swap avocado oil for coconut oil. The texture remains crisp, and the flavor still carries that umami punch, making it a crowd‑pleaser for plant‑based eaters.
Storing and Bringing It Back to Life
Fridge Storage
Place cooled chips in an airtight container lined with a paper towel to absorb excess moisture. They’ll stay crisp for up to three days, though the first day is always the best. If you notice any soft spots, give them a quick 5‑minute re‑bake at 350°F.
Freezer Friendly
Arrange the chips in a single layer on a baking sheet and freeze for 30 minutes, then transfer to a zip‑top bag. Frozen chips keep for up to two months. When you’re ready, bake straight from the freezer at 425°F for 8‑10 minutes; they’ll emerge as if freshly made.
Best Reheating Method
To revive that original crunch, spread the chips on a hot skillet over medium heat, add a splash (about a teaspoon) of water, and cover for 30 seconds. The steam lifts any stale texture, while the direct heat re‑crispes the cheese crust. This trick works better than a microwave, which merely softens the chips.