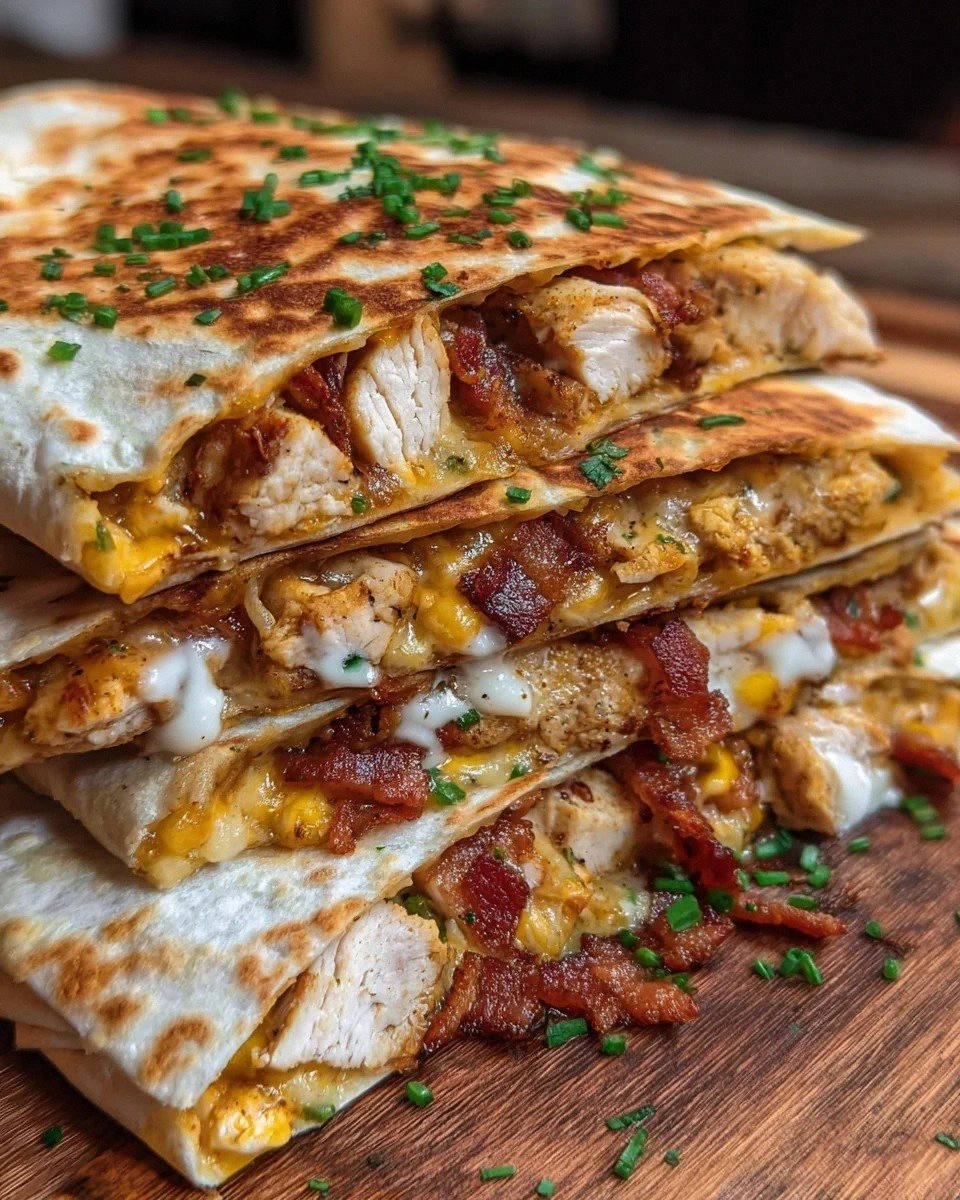
Last weekend I found myself in a classic kitchen showdown: the stovetop was a battlefield, the smoke alarm was on standby, and my friends were chanting, “What’s for dinner?” I was half‑heartedly reaching for a frozen pizza when a sudden craving for something smoky, cheesy, and just a little bit daring crashed the party. I grabbed a pack of chicken thighs, a slab of bacon, and a jar of chipotle peppers, and the idea of a quesadilla that could double as a main course was born. That moment of panic‑turned‑inspiration turned into a culinary experiment that blew my expectations out of the water, and I’m still buzzing from the flavor fireworks.
Imagine the kitchen humming with the sizzle of bacon, the aroma of garlic and chipotle mingling like a smoky tango, and the buttery melt of cheddar and mozzarella stretching in slow motion. The heat from the pan makes the tortillas puff up just enough to give that satisfying crunch, while the inside stays gooey, creamy, and just a touch tangy from the buttermilk‑ranch sauce. You can practically hear the cheese sigh as it melts, feel the heat radiating from the pan, and taste the bright pop of lime cutting through the richness. It’s a full‑sensory experience that makes you want to hug the skillet and never let go.
Most quesadilla recipes either skimp on protein, drown the dish in cheese, or forget the magic of a good sauce. This version flips the script by marrying tender chicken thighs with crisp bacon, then coating everything in a chipotle‑ranch sauce that’s as smooth as silk and as bold as a rodeo. The secret? A quick brine for the chicken, a dash of fresh herbs, and a precise pan‑searing technique that locks in juices while giving the tortillas a golden‑brown armor. I dare you to taste this and not go back for seconds; the combination is so addictive it practically writes its own love letter to your palate.
Let me walk you through every single step — by the end, you’ll wonder how you ever made quesadillas any other way. Okay, ready for the game‑changer? This next part? Pure magic. Stay with me here — this is worth it.
What Makes This Version Stand Out
- Flavor Explosion: The chipotle‑ranch sauce delivers a smoky heat that dances with the tang of lime and the richness of mayo, creating a layered taste that keeps you guessing with every bite.
- Texture Symphony: Crispy bacon, juicy chicken, and a perfectly toasted tortilla combine for a crunch‑to‑tender ratio that’s nothing short of addictive.
- Simplicity Meets Sophistication: With pantry staples and a few fresh herbs, you get a restaurant‑quality dish without needing a culinary degree.
- Ingredient Quality: Using boneless skinless chicken thighs ensures moisture, while fresh herbs add brightness that pre‑packaged mixes can’t match.
- Crowd‑Pleaser Factor: Even the most skeptical eaters admit they’re hooked after the first bite—perfect for game nights or family dinners.
- Make‑Ahead Potential: The sauce can be prepared ahead of time, and the cooked chicken stores beautifully, shaving minutes off the final assembly.
- Versatile Cooking Method: Whether you use a cast‑iron skillet, a non‑stick pan, or a griddle, the technique adapts without sacrificing flavor.
- Balanced Nutrition: A good mix of protein, healthy fats, and controlled carbs makes this a satisfying yet not overly heavy option.
Inside the Ingredient List
The Flavor Base
Boneless skinless chicken thighs: These are the heart of the dish, offering juicy, tender meat that soaks up every spice you throw at it. If you skip them for breast meat, expect a drier texture that won’t hold the sauce as well. Look for thighs with a thin layer of fat; that extra fat renders into flavor. If you can, ask the butcher to trim them to an even size for uniform cooking.
Bacon: The crispy, smoky crunch of bacon is the secret weapon that elevates the quesadilla from ordinary to unforgettable. It adds a salty depth that balances the heat of the chipotle peppers. For the best texture, render the bacon slowly over medium heat, then finish it under the broiler for that perfect snap. If you’re watching calories, turkey bacon works, but you’ll lose some of that authentic smokiness.
Chipotle peppers & Adobo sauce: These smoked jalapeños bring a bold, earthy heat that’s not just spicy but also slightly sweet. The adobo sauce amplifies that smoky profile while adding a silky richness. Mince the peppers finely to distribute heat evenly, and don’t be shy about using the sauce—just a tablespoon packs a punch. If you prefer milder heat, remove the seeds before mincing.
The Texture Crew
Shredded cheddar cheese: Its sharp, tangy flavor cuts through the richness of the bacon and chicken, while its meltability gives you that glorious stringy pull. Opt for a medium‑aged cheddar for the best balance of flavor and melt. If you use pre‑shredded cheese, beware of anti‑caking agents that can affect the texture.
Shredded mozzarella cheese: This brings a creamy, stretchy quality that softens the sharpness of cheddar, creating a harmonious melt. Fresh mozzarella works wonders, but for convenience, a good quality low‑moisture mozzarella does the trick. If you’re lactose‑intolerant, try a dairy‑free melt that mimics mozzarella’s stretch.
Flour tortillas: The vessel that holds everything together, a good tortilla should be pliable yet sturdy enough to crisp without tearing. Look for tortillas made with 100% flour and a hint of lard for extra flavor. If you’re gluten‑free, a corn tortilla can be used, but expect a different texture and flavor profile.
The Unexpected Star
Buttermilk, sour cream, and mayonnaise: Combined, they form the velvety chipotle ranch sauce that coats every bite like a silky blanket. The acidity of buttermilk brightens the sauce, while sour cream adds tang, and mayo contributes richness. If you’re out of buttermilk, whisk a tablespoon of lemon juice into regular milk and let it sit for five minutes.
Fresh herbs (dill, parsley, chives): These green accents add a burst of freshness that lifts the heavy flavors. Chop them finely so they distribute evenly throughout the sauce. If you can’t find fresh herbs, dried versions work in a pinch—just use one‑third the amount.
Garlic, onion powder, and garlic powder: Aromatics that build the foundation of flavor. Fresh garlic gives a pungent kick, while the powders add depth without moisture. Be careful not to over‑salt; the bacon already brings a salty punch.
The Final Flourish
Lime juice: A splash of citrus that brightens the entire dish, cutting through the richness and adding a zing that makes the flavors pop. Add it at the end of the sauce to preserve its fresh aroma. If you don’t have lime, a splash of white wine vinegar can mimic the acidity.
Salt and pepper: The universal seasoning duo that brings all the flavors together. Season the chicken early, then adjust the final seasoning after the sauce is mixed. Remember, a pinch of pepper can be the difference between a bland bite and a flavor explosion.
Everything's prepped? Good. Let’s get into the real action…
The Method — Step by Step
Start by marinating the chicken thighs. In a bowl, combine the chicken with a tablespoon of lime juice, a pinch of salt, pepper, onion powder, and garlic powder. Toss until every piece is evenly coated, then let it sit for at least 15 minutes. This brief marination infuses the meat with brightness and ensures the seasoning penetrates deep. While the chicken rests, preheat a large cast‑iron skillet over medium‑high heat.
Render the bacon. Lay the bacon strips in the hot skillet, turning occasionally, until they’re golden and crisp—about 6‑8 minutes. Transfer the bacon to a paper‑towel‑lined plate, then pour off most of the rendered fat, leaving about a tablespoon in the pan for flavor. This leftover fat will be the cooking medium for the chicken, adding a smoky undertone that you can’t get from any other source.
Cook the chicken. Add the marinated chicken thighs to the skillet, searing each side for 4‑5 minutes until a deep caramel color forms. As the chicken browns, you’ll hear that satisfying sizzle that signals flavor building. Once both sides are nicely seared, lower the heat to medium, cover the pan, and let the chicken finish cooking in its own juices for another 5‑7 minutes. The cover traps steam, keeping the meat moist—this is the moment of truth.
Shred the chicken. Once the thighs are cooked through (internal temp 165°F), transfer them to a cutting board and let them rest for two minutes. Then, using two forks, shred the meat into bite‑size pieces. The shredding process not only makes the chicken easier to distribute in the quesadilla but also creates more surface area for the sauce to cling to.
Prepare the chipotle ranch sauce. In a mixing bowl, whisk together buttermilk, sour cream, mayonnaise, minced chipotle peppers, adobo sauce, minced garlic, lime juice, chopped dill, parsley, and chives. Taste and adjust with salt or a dash more lime if needed. The sauce should be thick enough to coat the back of a spoon but still pourable—think of it as a velvety drizzle that clings lovingly to every ingredient.
Assemble the quesadillas. Lay a flour tortilla on a clean surface, then spread a generous spoonful of the chipotle ranch sauce across the surface, leaving a small border around the edges. Sprinkle a mixture of shredded cheddar and mozzarella, followed by the shredded chicken, crumbled bacon, and a scattering of green onions. Top with another drizzle of sauce, then place a second tortilla on top, pressing gently to seal.
Cook the quesadillas. Heat a clean skillet over medium heat and add a thin brush of oil or a pat of butter. Place the assembled quesadilla in the pan; you’ll hear a faint hiss as the tortilla contacts the hot surface. Cook for 3‑4 minutes on each side, or until the tortilla is golden brown and the cheese has fully melted. The edges should start pulling away from the pan, a clear sign that the crust is ready to crack.
Rest and slice. Transfer the cooked quesadilla to a cutting board and let it sit for a minute—this short rest lets the molten cheese set just enough to slice cleanly. Using a sharp pizza cutter or a chef’s knife, cut the quesadilla into six wedges. Serve immediately, drizzling any remaining chipotle ranch sauce on top for an extra burst of flavor.
That's it — you did it. But hold on, I've got a few more tricks that'll take this to another level…
Insider Tricks for Flawless Results
The Temperature Rule Nobody Follows
Most home cooks crank the heat to “high” hoping for a fast crust, but that’s a recipe for burnt edges and under‑melted cheese. The secret is to start medium, let the tortilla crisp, then drop to medium‑low for the final minute. This gradual heat reduction lets the cheese melt evenly while the tortilla develops that perfect, buttery crunch. I once tried the “high‑heat” shortcut and ended up with a quesadilla that tasted like charcoal—lesson learned.
Why Your Nose Knows Best
Before you even taste the quesadilla, trust the aroma. When the chipotle ranch sauce is ready, it should smell smoky, tangy, and slightly sweet—if you detect any raw garlic or a metallic bite, give it another minute. Your nose can detect under‑seasoned or over‑cooked elements faster than your palate, so use it as a real‑time quality gauge. I once under‑seasoned the sauce and only realized it when the scent was flat; a quick pinch of salt revived the whole profile.
The 5‑Minute Rest That Changes Everything
After cooking, let the quesadilla rest for exactly five minutes before slicing. This brief pause allows the cheese to firm up just enough to avoid a gooey mess, while the heat redistributes, ensuring each bite is uniformly warm. Skipping this step leads to soggy interiors and a loss of that satisfying snap when you bite into the crust. It’s a tiny patience exercise that pays off big.
Herb‑Infused Oil for an Extra Layer
While the pan heats, drizzle a teaspoon of herb‑infused oil (olive oil mixed with chopped dill and chives) onto the tortilla before adding the fillings. This tiny addition adds a subtle aromatic lift that you won’t notice until the very last bite, making the flavor profile feel more complex. It’s a pro‑chef trick that’s easy to replicate at home.
Double‑Layer Cheese for Maximum Stretch
Instead of mixing cheddar and mozzarella together, layer them: cheddar first, then mozzarella on top. The cheddar provides flavor, while the mozzarella creates that glorious stretch. This stacking technique ensures each bite delivers both sharpness and silkiness. One friend tried the opposite order and reported a “cheese‑clump” that didn’t melt evenly—order matters.
Creative Twists and Variations
This recipe is a playground. Here are some of my favorite ways to switch things up:
Southwest Veggie Boost
Swap the chicken for roasted corn, black beans, and diced bell peppers. Add a sprinkle of cumin and coriander to the sauce for an earthy depth. This vegetarian version still packs the smoky heat but offers a lighter, farm‑fresh vibe that’s perfect for a summer lunch.
Spicy Pineapple Punch
Introduce diced pineapple and a drizzle of honey into the filling for a sweet‑heat contrast. The fruit’s acidity balances the chipotle, while the honey amplifies the caramelization on the tortilla. Ideal for those who love a tropical twist on classic comfort.
Cheesy Bacon Bomb
Double the bacon and fold in extra sharp cheddar plus a splash of blue cheese crumbles. The result is a decadent, umami‑rich bite that’s practically a bacon lover’s dream. Serve with a cold beer for the ultimate indulgence.
Low‑Carb Lettuce Wrap
Replace the flour tortillas with large butter lettuce leaves. This reduces carbs dramatically while still delivering the smoky, cheesy goodness. The lettuce adds a crisp, fresh crunch that contrasts nicely with the warm fillings.
Herb‑Infused Chipotle Ranch
Blend fresh cilantro and a pinch of smoked paprika into the ranch sauce for a herbaceous, smoky upgrade. The cilantro adds a bright, citrusy note that lifts the entire dish. Great for those who love a garden‑fresh flavor profile.
Storing and Bringing It Back to Life
Fridge Storage
Place any leftover quesadillas in an airtight container and store them in the refrigerator for up to 3 days. Separate the sauce in a small jar to prevent sogginess. When you’re ready to eat, reheat in a skillet over medium heat for 2‑3 minutes per side, adding a tiny splash of water to the pan—this creates steam that revives the crispness.
Freezer Friendly
Wrap each assembled but uncooked quesadilla tightly in plastic wrap, then place them in a freezer‑safe zip‑top bag. They’ll keep for up to 2 months. To cook from frozen, thaw overnight in the fridge, then follow the cooking instructions as if fresh. The sauce may thicken a bit after freezing; whisk in a splash of buttermilk before spreading.
Best Reheating Method
For the ultimate reheated crunch, use a preheated oven or toaster oven at 375°F for 8‑10 minutes, flipping halfway through. The dry heat restores the tortilla’s golden exterior while melting the cheese evenly. If you’re in a hurry, a quick microwave followed by a 30‑second skillet sear works, but the oven method wins on texture.