Picture this: it is eleven thirty on a random Tuesday night, the city outside is quiet enough to hear the hum of the refrigerator, and I am standing over my counter in pajamas, clutching a half-eaten chocolate bar like it is Excalibur. I had sworn off desserts for the week—again—but the craving hit like a cartoon anvil. The problem was not just any sweet; I wanted that marriage of fudgy chocolate and silky peanut butter that makes your eyes roll back like you have seen a ghost made of nostalgia. I rummaged through my pantry, found the dregs of a semi-sweet chocolate bag, some suspiciously old cocoa powder, and a jar of peanut butter that had already been finger-swiped more times than I care to admit. Ten minutes later I was melting, whisking, tasting, and silently cursing because I knew I would eat half the batch before sunrise. The next morning I texted my neighbor “emergency dessert drop-off,” shoved a foil-wrapped square into her mailbox, and by noon she was banging on my door demanding the recipe and a glass of milk. That, my friend, is how these Chocolate Peanut Butter Brownie Bars were born—out of shameless midnight hunger and the refusal to settle for dry, cakey brownies that taste like beige disappointment.
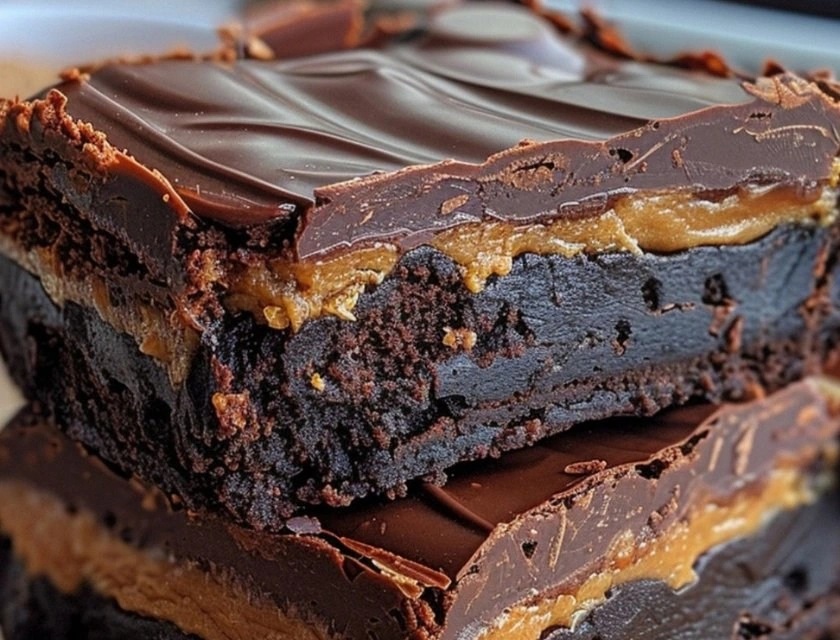
Most brownies you meet are either too sweet or tragically crumbly, sporting that thin, papery top that peels off like old paint. They lack soul. These bars, however, are the culinary equivalent of a warm blanket straight from the dryer: weighty, aromatic, and ridiculously comforting. The base is a dark, fudgy brownie that crackles just enough on top to give your teeth something to celebrate. Buried inside is a vein of peanut butter filling so smooth it could talk a loan shark out of interest, and the whole thing is capped with a whisper-thin layer of ganache that snaps delicately under the fork before dissolving into pure velvet. One bite and you will understand why I hide them in the freezer behind the frozen peas—my own edible insurance policy against house guests who “just stopped by.”
If you have ever struggled with peanut butter swirls that sink to the bottom or brownies that emerge from the oven looking like chocolate moon craters, you are not alone. I have pulled out more sunken trays than I care to count, each failure a delicious but dense brick suitable for home defense. The game-changer came when I stopped treating peanut butter like a decorative ribbon and started treating it like a layer—one that could stand up to the brownie’s heft without either one bullying the other. I also learned that temperature is everything: butter that is too hot will cook your eggs into scrambled sadness, and chocolate that is not chopped finely enough will seize faster than you can say “microwave mishap.” Stick with me here, because once you understand the why, the how becomes almost embarrassingly easy.
Okay, ready for the game-changer? We are going to make three distinct components—brownie, peanut butter filling, and ganache—but we will stagger temperatures and textures so each layer knows exactly where to sit and when to shine. By the end of this post you will have a pan of bars that look bakery-case perfect yet are forgiving enough to survive a little “quality-control sampling” while they cool. Picture yourself pulling this out of the oven, the whole kitchen smelling like a Willy Wonka pop-up, and slicing into neat squares that reveal that gorgeous peanut butter stripe. Let me walk you through every single step—by the end, you will wonder how you ever made it any other way.
What Makes This Version Stand Out
- Intentional Layers: Instead of random swirls, we create a defined peanut butter sheet that stays put, giving you a perfect ratio in every bite rather than a geological mystery.
- Double Chocolate Punch: We use both melted semi-sweet chocolate and cocoa powder for depth—think of it as surround-sound chocolate rather than a one-note sweet.
- Texture Spectrum: Fudgy brownie, cloud-like peanut butter, and a snappy ganache top merge into a trifecta that keeps your palate guessing and your fork moving.
- One-Bowl Brilliance: Despite sounding fancy, the brownie batter comes together in a single saucepan, meaning fewer dishes and more couch time.
- Make-Ahead Magic: These bars slice cleaner and taste richer after an overnight chill, so you can prep, sleep, and serve like a relaxed dessert hero.
- Crowd Confessions: I have yet to meet a human who can stop at one square; office taste testers actually formed a line and slow-clapped when I walked in with the tray.
- Freezer Friendly: Wrap individual squares, stash for emergencies, and you have a midnight snack that thaws in the time it takes to pour a glass of milk.
Alright, let's break down exactly what goes into this masterpiece...
Inside the Ingredient List
The Flavor Base
Butter is not just a fat here; it is the messenger that carries all the chocolatey nuances straight to your taste buds. We start with unsalted because we want to control the salt level precisely—too much and the peanut butter will taste like a salted caramel imposter, too little and the whole dessert falls flat like a joke without a punchline. Semi-sweet chocolate plays the reliable best friend: assertive enough to stand up to sugar yet mellow enough to let peanut butter shine. Chop it finely so it melts quickly and evenly; those big chunks will stubbornly refuse to incorporate and you will end up with polka-dotted batter that bakes up cratered and uneven.
The Texture Crew
Granulated sugar does more than sweeten; it gives the brownie that shiny tissue-thin top that shatters delicately under your tooth. Brown sugar brings molasses notes and extra chew because of its natural moisture, a one-two punch of flavor and function. Eggs are the invisible scaffolding—skip one and your bars will slump like a tired soufflé. Vanilla is not optional; it is the aromatic bridge between cocoa and peanut, the diplomatic translator that makes sure both parties get along at the flavor summit.
The Unexpected Star
Creamy peanut butter is, of course, the headliner, but the secret handshake is powdered sugar. Most recipes just warm peanut butter and swirl—cute, but it melts into the brownie and disappears like a party guest slipping out early. By folding in a touch of powdered sugar we create a pliable, Play-Doh-like layer that bakes up fluffy yet distinct. Think of it as giving the peanut butter a backbone so it does not get bullied by all that cocoa muscle.
The Final Flourish
Heavy cream and dark chocolate join forces at the end to form a ganache so glossy you could check your hair in it. The ratio is intentionally lean so the topping stays thin, adding snap rather than heaviness. Use good dark chocolate—something you would happily snack on during a Netflix binge—because ganache has nowhere to hide subpar ingredients. Heavy cream with at least 36% fat whips up silkier; low-fat substitutes will give you a sad, separated mess that looks like chocolate cottage cheese, and nobody wants that on their dessert.
Everything's prepped? Good. Let's get into the real action...
The Method — Step by Step
- Set your oven to 350°F (175°C) and line an 8-inch square pan with parchment, leaving wings on two sides so you can lift the finished slab like a golden trophy. This is not the moment for foil; foil can stick and tear your beautiful layers, leaving you with sad shreds that look like a chocolate earthquake. While the oven wakes up, place a medium saucepan over low heat and add the butter plus the chopped semi-sweet chocolate. Stir often—about every 30 seconds—until the mixture resembles liquid velvet and smells like a childhood candy shop. Remove from heat immediately; residual heat will finish melting any stubborn bits and prevents the chocolate from scorching, which can taste like bitter regret.
- Whisk both sugars into the still-warm chocolate butter. The warmth helps the sugars dissolve slightly, so you will not bite into gritty crystals later. Crack in the eggs, one at a time, whisking like you mean it after each addition. The batter will go from grainy to shiny and thick, a visual cue that the eggs are properly emulsified and your brownies will not have the texture of rubber soles. Stir in the vanilla; take a sniff—pure aromatherapy.
- In a small bowl, whisk flour, cocoa powder, and salt so the leavening and seasoning are evenly dispersed. Dump the dry mix onto the wet and fold with a spatula just until you no longer see streaks of flour. Over-mixing activates gluten and gives you cakey brownies, the arch-nemesis of everything we stand for here. The batter will resemble glossy mud; resist the urge to taste it—okay, go ahead, but do not say I did not warn you when half mysteriously disappears.
- Spread about two-thirds of the brownie batter into your prepared pan and smooth the top so it is level. This first layer anchors everything; an uneven base means your peanut butter sheet will slide like a drunk penguin. Bake for 12 minutes—just enough to set the surface but keep it soft and receptive to the next layer. While it bakes, move to step five.
- Stir together creamy peanut butter and powdered sugar until you have a pliant, slightly sweet play-dough. It should hold its shape when you scoop it but not crumble like dry cookie dough. If your brand of peanut butter is very runny, add another spoon of powdered sugar; if it is the stiff natural kind, loosen with a teaspoon of milk. You are aiming for the consistency of refrigerated frosting—spreadable yet stable.
- Retrieve the pan from the oven; the surface should look puffed and faintly crackly but still jiggly underneath. Carefully dollop the peanut butter mixture across the surface and use an offset spatula to coax it into an even blanket. Work gently—think of icing a delicate cake, not troweling cement. If it tears a bit, patch with a swipe of leftover brownie batter; nobody will judge you, and the finished slices will forgive all sins.
- Spoon the remaining brownie batter over the peanut butter sheet in several glops. Use the back of your spoon to marble and nudge it toward the edges, but do not stress about full coverage—swirls are your friend here. Drag the tip of a butter knife through the layers in figure-eights, creating canyons of chocolate and peanut butter that look like abstract art. Resist over-swirling; too much mixing muddies the distinct layers we worked so hard to achieve.
- Return the pan to the oven and bake for another 18–22 minutes. The edges should rise and firm, the center should just barely shimmy when you jostle the pan, and a toothpick inserted at an angle should come out with a few moist crumbs—not wet batter, not completely clean. Remember, carry-over heat will finish the bake; better to under-bake slightly than to over-bake and lose that fudgy soul.
- Cool the pan on a wire rack for 30 minutes; your kitchen will smell like a chocolate factory had a baby with a peanut farm. While it cools, prepare the ganache: heat heavy cream until it just begins to steam—tiny bubbles around the perimeter are your cue. Pour over chopped dark chocolate, let it sit undisturbed for one minute, then whisk from the center outward until glossy and unified. The mixture should ribbon thickly off the spoon like liquid fondant.
- Pour the ganache over the warm brownie and tilt the pan so it flows into every nook. A small offset spatula helps coax it to the corners without gouging the soft surface. Let the ganache set at room temp for 15 minutes, then transfer the pan to the fridge for a minimum of two hours. Chilling makes cutting cleaner; warm ganache plus warm brownie equals Jackson Pollock on your cutting board, and nobody wants to lick the floor.
That's it—you did it. But hold on, I have got a few more tricks that'll take this to another level...
Insider Tricks for Flawless Results
The Temperature Rule Nobody Follows
Room-temperature eggs mix more evenly, preventing little white flecks that scream amateur hour. If you forgot to plan ahead, submerge cold eggs in warm (not hot) water for five minutes while you chop chocolate. Same goes for peanut butter: if yours lives in the fridge, let it lounge on the counter for 20 minutes so it spreads like jazz instead of tearing your delicate layers. Temperature harmony equals texture harmony, and texture harmony equals people fighting over the last corner piece.
Why Your Nose Knows Best
Do not trust the timer blindly; your oven is a unique snowflake with hot spots and mood swings. When you start smelling intense chocolate—about two minutes before the timer dings—peek through the door. If the surface has a glossy sheen and the edges have pulled slightly from the pan, grab that toothpick. A friend once told me her brownies “smelled done” but she waited for the buzzer; the result was a Sahara-dry slab that could have doubled as a paving stone.
The 5-Minute Rest That Changes Everything
After the ganache sets but before you slice, let the bars sit at room temp for five minutes. This micro-rest softens the ganache just enough to prevent hairline cracks, yet keeps the brownie firm so your layers stay photographic. I once skipped this and served cracked squares to my book club; the taste was flawless, but the group chat still roasts me for “fault-line brownies.” Learn from my shame.
Creative Twists and Variations
This recipe is a playground. Here are some of my favorite ways to switch things up:
Milk Chocolate Hazelnut Bars
Swap the semi-sweet chocolate for milk chocolate and replace peanut butter with Nutella. The result is a gentler, candy-bar vibe that kids inhale faster than you can say “homework.” Top the ganache with crushed toasted hazelnuts for crunch that mimics your favorite Italian café treat.
Spicy Mexican Mocha Edition
Add a teaspoon of cinnamon and a pinch of cayenne to the brownie batter, then stir a shot of espresso powder into the ganache. The heat sneaks up like a plot twist, and the coffee amplifies the cocoa, making the whole thing taste like a mocha with attitude.
Salted Caramel Pretzel Smash
Drizzle cooled bars with store-bought caramel and sprinkle crushed pretzels on top of the ganache before it sets. Salty-sweet fans will propose marriage; just warn them you are already taken—by dessert.
White Chocolate Raspberry Swirl
Use white chocolate in the ganache and dot the surface with spoonfuls of raspberry jam, dragging a toothpick through for pink lightning bolts. Tangy fruit cuts the richness like a squeeze of lemon on fried chicken.
Coconut-Almond Dream
Fold toasted coconut into the peanut butter layer and swap dark chocolate for almond-infused chocolate in the ganache. Close your eyes and you are basically eating a candy bar that rhymes with “Almond Boy.”
Double Peanut Punch
Stir chopped honey-roasted peanuts into the brownie batter and replace half the butter with peanut butter. Peanut lovers will achieve nirvana; dentists will send thank-you notes.
Storing and Bringing It Back to Life
Fridge Storage
Once fully cool, lift the slab out using the parchment wings and cut into squares. Store in an airtight container layered with wax paper; they will keep for five days in the fridge. The cold intensifies the chew, turning each bite into a truffle-like experience. Let them sit at room temp for ten minutes before serving if you want the ganache to loosen its tie a bit.
Freezer Friendly
Wrap individual squares in plastic, then foil, and stash in a zip bag for up to two months. Thaw overnight in the fridge or 30 minutes on the counter. Pro move: microwave a frozen square for 12 seconds; the ganache turns into molten fudge while the brownie stays cool and dense—hot-cold contrast that feels illegal.
Best Reheating Method
If you must reheat a whole pan (say, for a potluck), cover with foil and warm at 275°F for 8 minutes. Add a tiny splash of water to the container before sealing; the gentle steam rehydrates any edge dryness and revives that fresh-from-the-oven aroma that makes guests follow their noses into the kitchen.