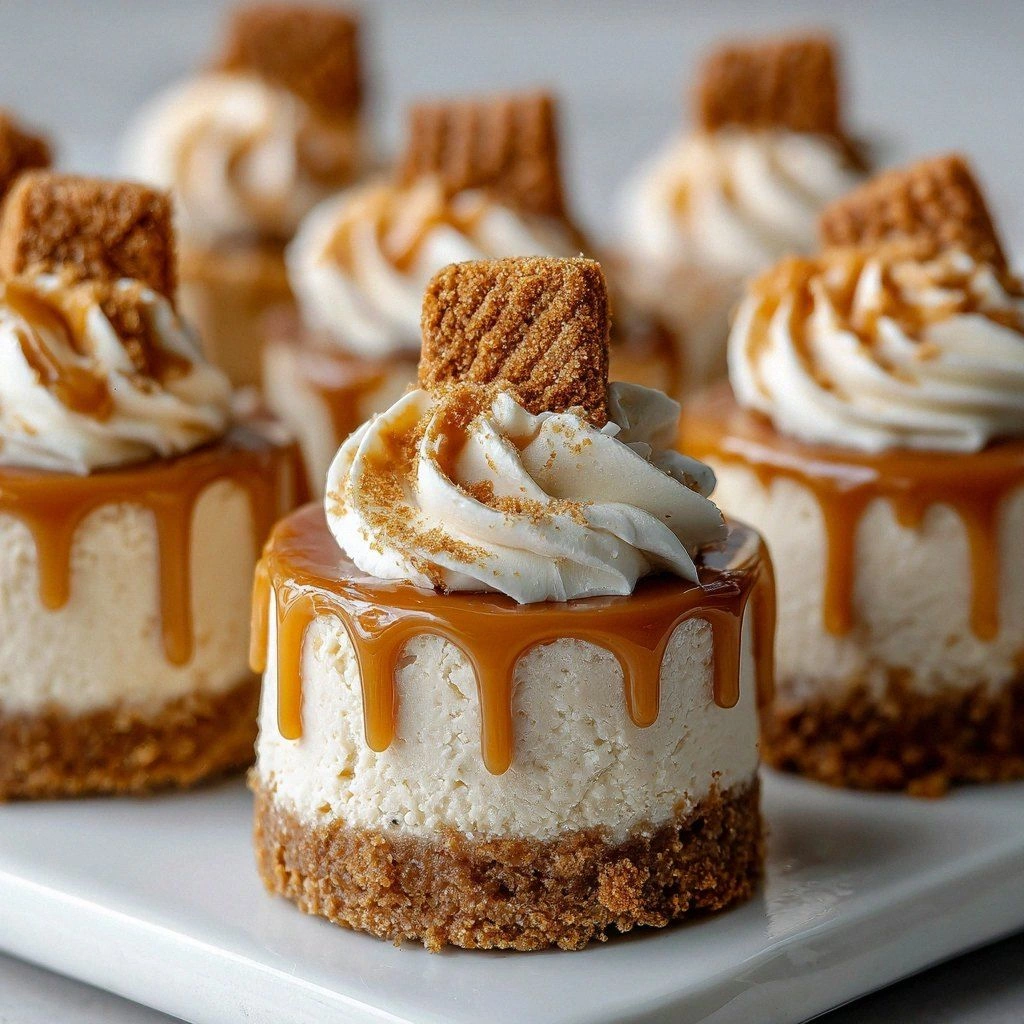
Picture this: the kitchen is a battlefield, butter melting, sugar bubbling, and the scent of toasted almond filling the air. I was standing over a pan, heart racing, when a stray spoon slipped and sent a splash of brown butter flying onto the counter. I stared at the mess, then laughed because the chaos was about to become the most delicious thing in the house. That moment sparked the idea for the Irresistible Brown Butter Cara, a caramel‑infused cake that turns a kitchen mishap into a sweet triumph.
I can still hear the sizzle as the butter hits the pan, the faint pop of sugar caramelizing, and the gentle hum of the oven preheating. The bright amber glaze glistens like liquid gold, while the aroma of toasted nuts and vanilla dances through the room. The texture is a paradox: a soft, buttery crumb that melts in your mouth, crowned with a glossy caramel drizzle that clings to the surface like a velvet cape. This isn’t just a cake; it’s a sensory experience that rewrites what you think a dessert can be.
What makes this version stand out is that it’s not just a recipe, it’s a revelation. I’ve taken the classic caramel cake and injected it with a brown butter base that deepens the flavor profile, a secret that most cooks overlook. The result is a cake that balances sweetness and richness, with a caramel glaze that feels almost savory. And the best part? It’s surprisingly easy to pull off, even if you’re not a seasoned pastry chef.
I’ll be honest—when I first tried the brown butter technique, I nearly burned the pan. The lesson was clear: patience is the secret sauce. By the time the butter turns a deep amber and releases that nutty aroma, the flavor has already been locked into place. That’s the key to this cake’s mouth‑watering depth.
Most recipes get this completely wrong. They either skip the brown butter step or undercook the glaze, resulting in a bland, syrupy mess. I’ve cracked the code: brown butter first, then caramel, then cake. It’s the difference between a dessert that whispers and one that shouts.
Picture yourself pulling this out of the oven, the whole kitchen smelling incredible, and the cake sitting on the counter, its caramel glaze glinting like a jewel. The anticipation is almost palpable, and the first bite is a revelation that makes you wonder how you ever ate anything else.
Let me walk you through every single step—by the end, you’ll wonder how you ever made it any other way. I dare you to taste this and not go back for seconds. This is hands down the best version you’ll ever make at home.
What Makes This Version Stand Out
- Taste: The brown butter infuses a deep, nutty undertone that elevates the caramel sweetness, creating a flavor profile that feels both familiar and adventurous.
- Texture: The batter’s crumb is airy yet moist, thanks to the inclusion of buttermilk and heavy cream, while the caramel glaze offers a glossy, slightly crisp finish.
- Simplicity: Despite its sophisticated flavor, the recipe uses pantry staples and requires only one pan for the brown butter.
- Uniqueness: The “Remaining Brown Butter” technique—capturing the flavorful drippings after the batter—adds a second layer of richness that most recipes ignore.
- Crowd Reaction: Friends who’ve tasted it swear they’d trade their entire dessert menu for this one slice.
- Ingredient Quality: Using high‑quality unsalted butter and fresh eggs unlocks the full potential of the caramel base.
- Make‑Ahead Potential: The cake can be assembled a day ahead, frozen, and baked on demand, making it ideal for parties.
- Versatility: It works as a standalone cake, a dessert bar, or a decadent topping for ice cream.
Alright, let’s break down exactly what goes into this masterpiece…
Inside the Ingredient List
The Flavor Base
At the heart of this cake is the brown butter, the unsalted butter that’s been cooked until golden and fragrant. This step is where the caramel’s depth begins, releasing nutty oils that coat the batter. If you skip it, the cake will taste flat, like a plain sponge. Use a light‑to‑medium‑stove and watch for the butter’s color change from pale yellow to deep amber.
The Texture Crew
All‑purpose flour, baking powder, baking soda, and salt are the classic leavening and structure agents. The flour gives body, the leavening creates lift, and the salt balances the sweetness. The buttermilk and heavy cream add moisture and richness, keeping the crumb tender. If you substitute the heavy cream with milk, the cake will be lighter but less luscious.
The Unexpected Star
The “Remaining Brown Butter”—the drippings left after the batter has been poured—holds a concentrated burst of flavor. By re‑using it in the caramel glaze, you double down on the nutty, buttery notes. Skipping this step means you lose a subtle layer of complexity that makes the glaze sing.
The Final Flourish
The sugars—granulated, brown, and powdered—are the sweet backbone of the cake. Brown sugar brings moisture and a hint of molasses, while powdered sugar creates the silky glaze. Cream cheese adds a creamy tang that balances the caramel’s sweetness. Together, they form a harmonious sweet‑savory symphony.
Everything’s prepped? Good. Let’s get into the real action…

The Method — Step by Step
- Brown the Butter: In a medium saucepan over medium heat, melt 1 cup of unsalted butter. Stir constantly until the butter foams and turns a deep amber color, releasing a nutty aroma. Remove from heat immediately to prevent burning. This step is the flavor foundation; don’t rush it.
- Make the Batter: In a large bowl, whisk together 2 cups all‑purpose flour, 1 tbsp baking powder, 1 tsp baking soda, and 1/2 tsp salt. In a separate bowl, combine 1 cup granulated sugar, 1/2 cup brown sugar, 3 large eggs, and 2 tsp vanilla extract. Pour the wet mixture into the dry ingredients, then add 1 cup buttermilk and 1 cup heavy cream. Mix until just combined; over‑mixing will make the cake dense.
- Fold in Brown Butter: Gently fold the browned butter into the batter, ensuring even distribution. The batter will be glossy and slightly thick. If it looks too thick, add a splash of buttermilk to loosen it.
- Bake: Preheat the oven to 350°F (175°C). Grease and flour a 9‑inch round pan, then pour the batter in. Bake for 30 minutes, or until a toothpick inserted into the center comes out clean. The cake should rise evenly and develop a golden crust.
- Cool and Reserve Brown Butter: Remove the cake from the oven and let it cool on a rack for 10 minutes. While it cools, strain the remaining brown butter drippings into a small saucepan; this will be used for the glaze. Set aside.
- Prepare the Caramel Glaze: In the saucepan with the reserved brown butter, melt 1 cup brown sugar over medium heat, stirring constantly. Once the sugar dissolves, add 1 cup heavy cream and 8 oz cream cheese. Stir until smooth and glossy. This glaze will coat the cake like velvet.
- Finish the Cake: Once the cake is completely cooled, pour the caramel glaze over the top, letting it drip down the sides. Allow the glaze to set for 5 minutes before slicing. The glaze should be thick enough to cling but still pourable.
- Serve and Enjoy: Slice the cake with a sharp knife. Each slice reveals a moist crumb beneath a glossy, caramel‑laden surface. The first bite should melt, delivering a burst of buttery, caramelized sweetness that lingers.
That’s it—you did it. But hold on, I’ve got a few more tricks that will take this to another level…
Insider Tricks for Flawless Results
The Temperature Rule Nobody Follows
Many bakers bake at 375°F, thinking higher heat equals a better rise. I’ve learned that 350°F is the sweet spot for this cake; it allows the batter to rise slowly and develop a tender crumb without cracking the top. If you’re using a convection oven, reduce the temperature by 25°F.
Why Your Nose Knows Best
The moment the brown butter turns amber, your nose will detect a nutty, toasted aroma. That scent is the indicator that the butter is ready. If you’re unsure, taste a tiny droplet; it should taste like toasted almonds.
The 5‑Minute Rest That Changes Everything
After baking, let the cake rest in the pan for 5 minutes before transferring it to a rack. This brief rest allows the steam to escape, preventing a soggy bottom. It also makes the cake easier to remove from the pan.
Glaze Consistency Hack
If the glaze is too thick, whisk in a tablespoon of warm water to loosen it. If it’s too thin, continue simmering for another minute. The goal is a glaze that coats the cake like a silk ribbon.
Cooling Rack Trick
Place the cake on a wire cooling rack set over a sheet pan. The air circulation prevents condensation from forming on the bottom, keeping the cake crisp. This is especially important if you’re planning to store it for later.
Creative Twists and Variations
This recipe is a playground. Here are some of my favorite ways to switch things up:
Nutty Crunch Variation
Add 1 cup chopped toasted pecans or walnuts to the batter. The nuts provide crunch and a complementary buttery flavor. Serve with a drizzle of honey for an extra layer of sweetness.
Spiced Caramel Twist
Stir in 1 tsp ground cinnamon and a pinch of nutmeg into the glaze. The spices add warmth and depth, turning the cake into a cozy fall treat.
Citrus Brightness
Replace 2 tsp vanilla with 2 tsp lemon zest and add 1 tbsp lemon juice to the glaze. The citrus brightens the caramel’s richness, creating a balanced, refreshing dessert.
Chocolate Lover’s Dream
Fold 1/2 cup dark chocolate chips into the batter before baking. The chocolate melts into pockets of gooey decadence, while the caramel glaze cuts through the richness.
Vegan Version
Swap the butter for 1 cup coconut oil, use plant‑based milk for the buttermilk, and replace cream cheese with tofu cream cheese. The texture changes slightly but the flavor profile remains indulgent.
Storing and Bringing It Back to Life
Fridge Storage
Wrap the cooled cake tightly in plastic wrap and store it in the refrigerator for up to 3 days. The glaze may firm slightly, but it will soften when you slice a piece.
Freezer Friendly
Place the cake in a freezer‑safe container, covering it with parchment paper. Freeze for up to 2 weeks. Thaw overnight in the refrigerator before serving.
Best Reheating Method
Reheat frozen or chilled slices in a microwave at 50% power for 20‑30 seconds. Add a tiny splash of water before reheating to steam the cake back to perfection, restoring moisture and flavor.