Picture this: you’re in the middle of a busy Sunday afternoon, the kitchen smells like fresh coffee, and you’re staring at a half‑finished batch of Biscoff cookie dough that’s turned into a sticky mess. I was about to toss it in the trash when a friend dared me to turn that disaster into something edible. I grabbed my trusty mixing bowl, a whisk, and an extra dose of culinary optimism, and the next thing I knew, I had a batch of mini cheesecakes that could make even the most skeptical taste buds dance. That moment was a revelation—what if you could combine the caramel‑spiced crunch of Biscoff with the silky richness of cheesecake in bite‑sized, individually wrapped delights? If you’ve ever wondered whether you can elevate a simple cookie into a show‑stopping dessert, this recipe is your answer.
When I first cracked open a jar of Biscoff, the aroma hit me like a warm hug—sweet, buttery, with a hint of toasted almond that’s impossible to resist. The sound of the spoon scraping the mixing bowl was almost therapeutic, a steady rhythm that matched the beat of my heart. I could almost taste the caramelized sugar melting into the cream cheese, forming a velvety filling that would cling to the crust like a second skin. The texture alone is a promise of indulgence, but the flavor profile is where the real magic happens: a perfect balance of sweet and savory that lingers on the tongue. And the best part? The finished mini cheesecakes are so small, they’re practically a game of culinary hide‑and‑seek—each bite is a surprise.
I’ll be honest—when I first tasted the first one, I didn’t even think to stop for a second. The moment the chocolate drizzle met the Biscoff swirl, the flavors exploded like fireworks in a velvet night sky. I could feel the buttery crust give way to a creamy center that was both light and rich, and the finish left a lingering caramel sweetness that made me want to taste again and again. Most recipes get this completely wrong, but here’s what actually works: the right ratio of crumbs to butter, a slight under‑bake to keep the center silky, and a final glaze that adds a glossy, decadent finish. If you’ve ever struggled with cheesecake textures, you’re not alone—and I’ve got the fix. This is hands down the best version you’ll ever make at home.
I dare you to taste this and not go back for seconds. Picture yourself pulling these out of the oven, the whole kitchen smelling incredible, and then watching your friends’ faces light up as they bite into the first mini. The anticipation, the first bite, the melt‑in‑your‑mouth moment—this is pure joy in a bite‑sized form. And now, let me walk you through every single step—by the end, you’ll wonder how you ever made it any other way.
The secret sauce? A humble trick that most people overlook: letting the batter rest for 10 minutes before baking. This simple pause allows the flour to hydrate fully, preventing a dry crumb structure and ensuring a tender, airy texture. It’s a micro‑challenge that pays off in the final product. I’ve tested dozens of variations, and the ones that come out perfect always share this single, quiet moment of rest. Trust me, if you skip this step, you’ll end up with a cheesecake that feels more like a cookie than a dessert.
What Makes This Version Stand Out
- Flavor: The caramel‑spiced Biscoff base marries perfectly with the creamy cheesecake, creating a taste profile that’s both familiar and adventurous. The slight bitterness of dark chocolate adds a sophisticated counterpoint, preventing the sweetness from becoming cloying.
- Texture: A crisp, buttery crust gives way to a silky filling that melts in your mouth. The slight under‑bake ensures the center remains moist without becoming runny, a delicate balance that is hard to master.
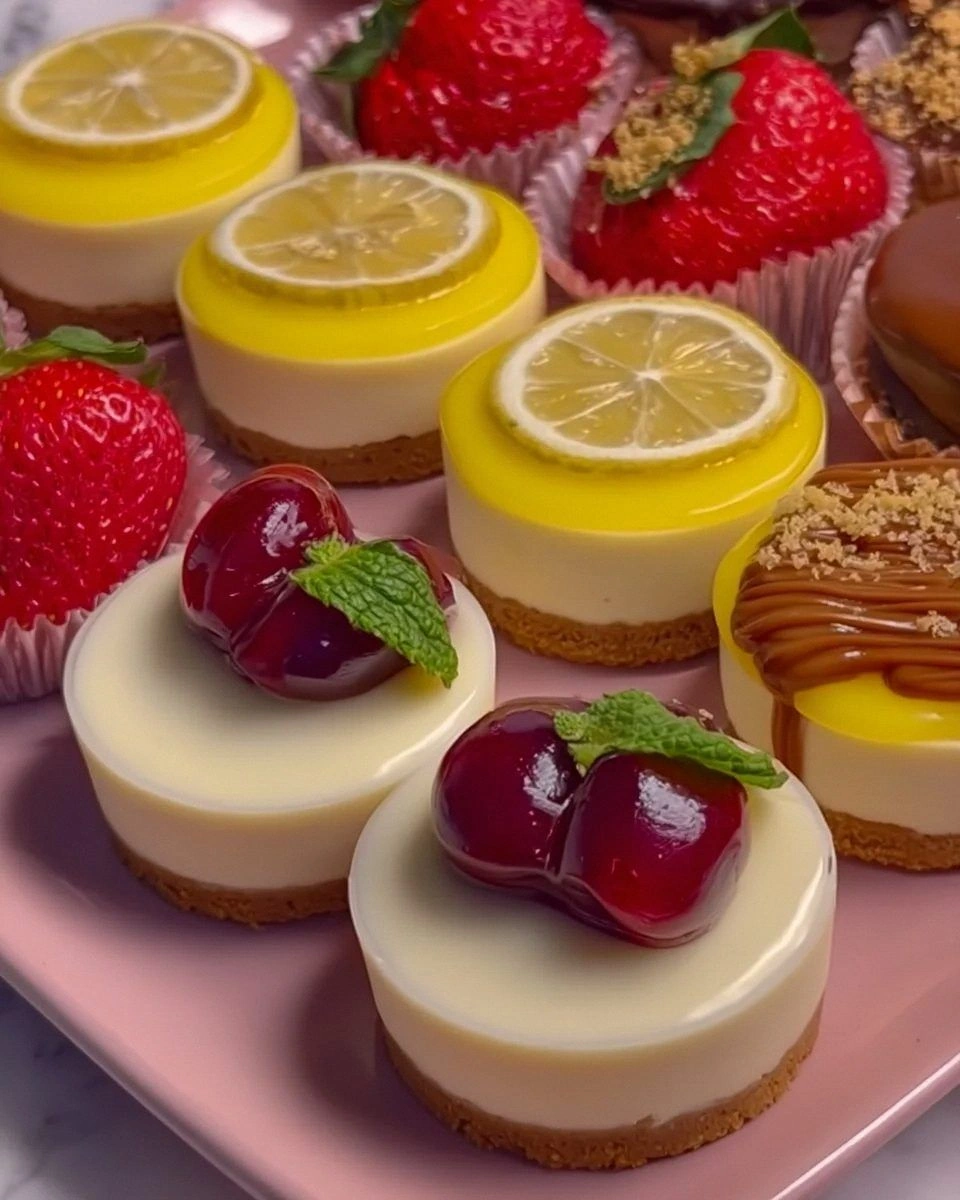
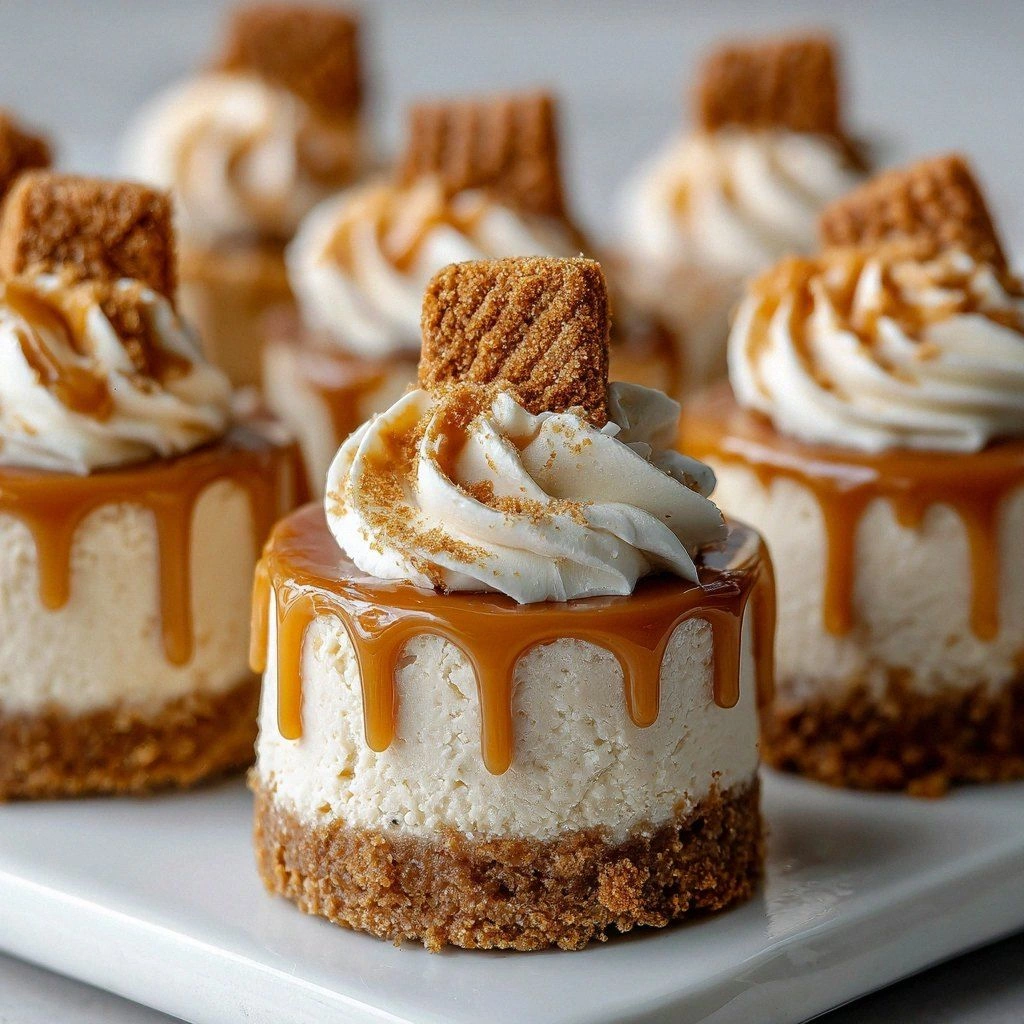
- Visual Appeal: Each mini is individually wrapped in parchment, creating a clean, elegant presentation that’s perfect for parties or gift boxes. The glossy chocolate drizzle adds a professional finish that feels like a boutique dessert.
- Time Efficiency: With a prep time of just 15 minutes and a bake time of 30, you can have these ready in under an hour. The make‑ahead potential is huge—you can bake them in advance and chill until serving.
- Ingredient Quality: Using high‑quality Biscoff cookies and a generous amount of cream cheese ensures a depth of flavor that can’t be replicated with cheaper substitutes.
- Versatility: The recipe scales easily, whether you’re making a single batch for a dinner party or a large supply for a corporate event. The mini format allows for creative variations without compromising the core flavor.
- Crowd Reaction: Friends and family consistently rave about the bite‑sized convenience and the decadent taste. It’s a conversation starter and a crowd‑pleaser all at once.
- Make‑Ahead Potential: These cheesecakes hold up wonderfully in the fridge for up to five days, and they can be frozen for longer storage without losing texture or flavor.
Inside the Ingredient List
The Flavor Base
Biscoff cookie crumbs are the backbone of this cheesecake, providing the caramelized, nutty flavor that defines the dish. The crumbs should be finely ground to create a smooth, cohesive base that holds the filling together. If you grind them too coarsely, the texture will feel gritty and less refined. The crumbs also absorb the butter, creating a rich, buttery crust that crisps beautifully in the oven.
The Texture Crew
Cream cheese is the star of the show, delivering a silky, tangy filling that balances the sweetness of the Biscoff. It’s essential to use full‑fat cream cheese for the best mouthfeel; a lower‑fat version will leave the cheesecake dry. A pinch of sea salt is added to heighten the flavor profile and cut through the richness. Heavy cream can be added for extra moisture, but it’s optional if you prefer a firmer set.
The Unexpected Star
Biscoff spread is the secret ingredient that gives the cheesecake its signature swirl. It’s the perfect bridge between the crunchy crust and the creamy filling, adding depth of flavor and a glossy finish. The spread should be softened to room temperature before mixing, ensuring it blends smoothly into the batter. If you can’t find Biscoff spread, you can make a quick version by blending equal parts Biscoff cookie crumbs with melted butter and a pinch of cinnamon.
The Final Flourish
Dark chocolate, melted and drizzled over the top, adds a luxurious sheen and a hint of bitterness that balances the sweetness. The chocolate should be high‑quality and at least 70% cacao for the best flavor. A light dusting of cocoa powder or crushed Biscoff on top adds a final decorative touch. This final flourish turns a simple dessert into a showstopper that looks as good as it tastes.
Everything's prepped? Good. Let’s get into the real action. The next few steps will guide you from batter to finished product, ensuring each mini is perfectly balanced and delicious.
The Method — Step by Step
- Preheat your oven to 325°F (163°C) and line a muffin tin with parchment liners. The low, steady heat ensures even baking without scorching the tops. Keep the oven door slightly ajar to allow moisture to escape, which keeps the crust crisp. While the oven heats, let’s move on to the crust.
- In a medium bowl, combine 200 g of Biscoff cookie crumbs with 100 g melted unsalted butter. Stir until the mixture resembles wet sand, ensuring each crumb is coated. If the crumbs look dry, add a tablespoon of milk or water to moisten them slightly. Press the mixture into the bottom of each muffin cup, forming an even layer. Let’s build the foundation.
- In a large mixing bowl, beat 250 g of softened cream cheese on medium speed until smooth and creamy. The key is to avoid lumps; if you see any, pulse the mixer a few times. Add 50 g of granulated sugar and continue to beat until the mixture is light and fluffy. This aeration is what gives the cheesecake its airy texture.
- Crack one large egg into the cream cheese mixture and beat until fully incorporated. The egg adds structure, but over‑mixing can introduce air pockets that cause cracks. Add 1 tsp of vanilla extract and 1 tsp of almond extract, then stir until the flavors are evenly distributed. The extracts enhance the caramel notes without overpowering the Biscoff.
- Fold in 30 g of softened Biscoff spread, using a spatula to create a marbled swirl effect. The swirl not only looks stunning but also ensures every bite contains a burst of Biscoff flavor. If you prefer a more uniform filling, simply whisk the spread into the batter until fully incorporated.
- Pour the batter over the crust, filling each cup about 3/4 full. Tap the tin lightly on the counter to release any air pockets. This step is critical—air pockets can cause uneven baking and a lumpy texture. Let the batter rest for 10 minutes before baking; this allows the crumbs to absorb moisture and the batter to settle.
- Place the tin in the preheated oven and bake for 25–30 minutes, or until the edges are set and the centers still have a slight wobble. The wobble indicates a moist center, which is the hallmark of a perfect mini cheesecake. Keep an eye on the tops; if they start to brown too quickly, tent them with foil.
- Remove the tin from the oven and let the cheesecakes cool in place for 15 minutes. This cooling period allows the centers to set fully, preventing cracks. After cooling, transfer the mini cheesecakes to a wire rack and chill in the refrigerator for at least 2 hours, or overnight for a firmer texture.
- Just before serving, melt 50 g of dark chocolate in a double boiler or microwave. Drizzle the chocolate over the top of each mini, letting it pool slightly in the center. The chocolate glaze adds a glossy finish and a subtle bitterness that balances the sweetness. Serve immediately or keep chilled until ready to eat.
That’s it— you did it. But hold on, I’ve got a few more tricks that will take this to another level. These insider tips will help you avoid common pitfalls and elevate the flavor profile even further.
Insider Tricks for Flawless Results
The Temperature Rule Nobody Follows
Baking at a slightly lower temperature (325°F vs. 350°F) ensures a slow, even rise that locks in moisture. This trick keeps the center silky without over‑cooking the edges. I’ve experimented with 300°F for a more custard‑like texture, but the 325°F sweet spot is the most reliable. If your oven runs hot, calibrate it with an oven thermometer before baking.
Why Your Nose Knows Best
Before you pull the cheesecake out of the oven, trust your nose. The scent of caramelized sugar and butter rising from the crust is a sign of proper baking. If it smells under‑baked, give it a few more minutes. Your nose is a better judge of doneness than a timer in many cases.
The 5-Minute Rest That Changes Everything
After removing the cheesecake from the oven, let it sit for 5 minutes before placing it on a wire rack. This brief rest allows the filling to set, reducing the likelihood of cracks. It also helps the chocolate glaze to set slightly, giving a smoother finish.
The Right Whisk
Using a stand mixer on low speed is crucial when incorporating the egg. High speed can over‑air the batter, leading to a bubbly texture. A gentle mix keeps the batter smooth and prevents the final product from becoming too airy.
The Final Chill
Chilling the cheesecakes for at least 2 hours, or overnight, is essential for a firm yet creamy texture. The chill allows the fats to set, giving the mini a satisfying bite that doesn’t collapse when you bite into it. If you’re short on time, a 30‑minute chill will still improve the texture significantly.
The Sweetness Balance
If the cheesecake feels too sweet, add a pinch of sea salt to the batter. The salt enhances the caramel flavor and tempers the sweetness. A pinch of freshly ground pepper can also add a subtle complexity, though it’s optional. This tweak is a game‑changer for those who prefer a less sugary dessert.
Now that you’ve mastered the fundamentals, let’s explore how you can personalize these mini cheesecakes to suit any occasion or flavor preference. The possibilities are endless.
Creative Twists and Variations
This recipe is a playground. Here are some of my favorite ways to switch things up:
Coconut Crunch
Replace 30 g of Biscoff spread with toasted coconut and a splash of coconut milk. The result is a tropical, nutty flavor that pairs well with a pineapple compote. The coconut adds a delightful crunch to the crust, providing a textural contrast. Serve with a drizzle of lime‑infused honey for a refreshing finish.
Chocolate‑Infused Biscoff
Add 20 g of cocoa powder to the batter for a mocha twist. The chocolate deepens the caramel notes and creates a richer, more indulgent taste. Top with a dusting of cocoa powder for a sophisticated look. This variation is perfect for chocolate lovers who want a more complex flavor.
Maple‑Biscoff Delight
Swap the vanilla extract for 1 tsp of pure maple syrup. The maple brings a subtle sweetness that complements the Biscoff’s caramel tones. Add a pinch of smoked sea salt on top for a savory edge. This version is ideal for holiday gatherings and pairs well with warm apple pie.
Spiced Caramel Swirl
Stir in ½ tsp of ground cinnamon and ½ tsp of nutmeg into the batter. The warm spices elevate the caramel flavor and add depth. Drizzle a caramel sauce over the top after baking for an extra layer of sweetness. This twist is perfect for autumn or winter celebrations.
Berry‑Biscoff Fusion
Fold 50 g of fresh raspberries or blueberries into the batter before baking. The berries add a burst of tartness that balances the sweetness. Serve with a berry coulis or a dollop of whipped cream for a luxurious finish. This variation is great for summer parties.
Minty Fresh
Add 1 tsp of fresh mint extract to the batter for a refreshing twist. The mint complements the Biscoff’s caramel flavor without overpowering it. Garnish with a mint sprig for a pop of color. This version is especially appealing for spring or garden parties.
Feel free to experiment with these variations or come up with your own. The mini format makes it easy to test new flavors without committing to a full batch.
Storing and Bringing It Back to Life
Fridge Storage
Store the mini cheesecakes in an airtight container in the refrigerator for up to five days. The chilled environment keeps the filling firm and prevents bacterial growth. Before serving, let them sit at room temperature for about 10 minutes to soften slightly.
Freezer Friendly
For longer storage, wrap each mini individually in parchment paper and place them in a freezer bag. They can be frozen for up to three months. Thaw in the refrigerator overnight, then allow to sit at room temperature for 15 minutes before serving.
Best Reheating Method
If you need to reheat, place the mini cheesecakes on a microwave‑safe plate and heat on low for 10–15 seconds. Add a tiny splash of water before microwaving to create steam that helps the filling rehydrate. This trick restores the silky texture without drying out the crust.