I was standing in the kitchen, staring at the burnt edges of a batch of pancakes that had turned into a sad, crumbling mess. The smell of charred batter filled the air, and my friends were laughing at my culinary disaster. That moment sparked a frantic search for a recipe that could salvage a midnight snack and bring back the sweet, comforting taste of a snickerdoodle. I stumbled upon a mug cake version that promised a single-serving delight, and I knew I had to try it.
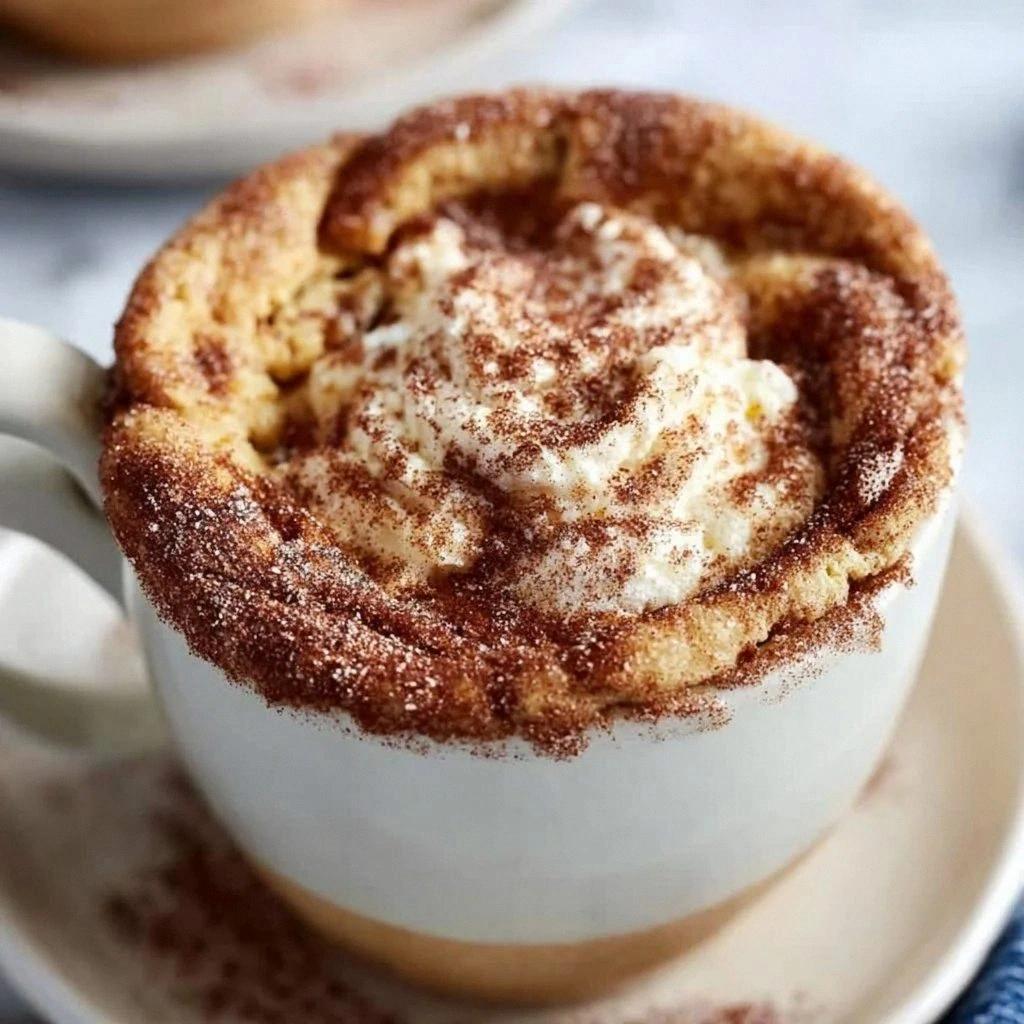
The first time I cracked the mug, a faint aroma of vanilla and cinnamon drifted through the room, like a warm hug from an old friend. My eyes widened as the batter swelled, the edges curling like a gentle wave. The sound of the microwave’s hum turned into a rhythmic heartbeat, building anticipation. I could almost taste the buttery sweetness, the slight crunch of cinnamon, and the tender crumb that would follow. The kitchen felt alive, buzzing with the promise of a quick, indulgent treat.
What sets this version apart is the way it balances convenience with flavor. Instead of a labor‑intensive dough, you whisk a handful of ingredients in a mug and pop it in the microwave for minutes. The result is a cake that feels like a freshly baked snickerdoodle, with a soft interior and a lightly caramelized crust. It’s a single‑serving miracle that satisfies a craving without the mess of a full pan. I dare you to taste this and not go back for seconds.
I’ve tried countless mug cake recipes, and most fall flat or taste like a dry biscuit. But this one rises beautifully, thanks to the precise ratio of flour to liquid and the magic of baking powder. The cinnamon is ground fresh, giving the cake a depth that ordinary powdered cinnamon can’t match. The buttery richness is amplified by the melted butter, and the final touch of vanilla elevates the whole experience. I’ve been honest—I ate half the batch before anyone else got to try it.
Picture yourself pulling this out of the microwave, the whole kitchen smelling incredible, and the mug still steaming in your hands. The first bite is a burst of buttery sweetness, the edges slightly crisp, the center soft and gooey. You’ll find yourself reaching for a second mug, then a third, as the aroma lingers on the countertop. Most recipes get this completely wrong. Here’s what actually works. The secret? The right balance of moisture and leavening.
This is hands down the best version you'll ever make at home. The simplicity of the method and the depth of flavor make it a standout. It’s a quick fix for late‑night cravings, a comforting treat for a rainy afternoon, or a fun experiment for a cooking challenge. If you've ever struggled with mug cakes that come out dense or overly dry, you're not alone—and I've got the fix. Stay with me here—this is worth it.
Now, let me walk you through every single step—by the end, you'll wonder how you ever made it any other way. I promise you’ll see why this recipe is the ultimate snickerdoodle experience. The method is straightforward, but each detail matters. From the precise measurements to the timing, every element is tuned for perfection. Ready to become a mug cake master? Let’s dive in.
This recipe is more than a quick snack; it’s a culinary revelation that turns a simple mug into a canvas for flavor. The combination of buttery richness, sweet cinnamon, and a tender crumb creates a sensory explosion that will keep you coming back for more. It’s a testament to how a few ingredients, when balanced correctly, can produce something extraordinary. The next section breaks down why this version is truly special.
What Makes This Version Stand Out
- Flavor: The blend of butter, vanilla, and freshly ground cinnamon creates a depth that mimics a freshly baked snickerdoodle. The sweet, buttery notes are balanced by a subtle spice kick that lingers on the palate. Each bite feels like a warm hug, making this mug cake a comforting treat.
- Texture: The batter’s ratio of flour to liquid results in a soft, airy interior and a lightly caramelized crust. It’s the perfect marriage of gooeyness and crispness, unlike the dry or overly dense results common in other mug cakes. The result is a cake that feels like a slice of heaven in a mug.
- Simplicity: With only eight ingredients and a single mug, you can have a dessert ready in minutes. No measuring cups, no mixing bowls, no oven. The process is so straightforward that even a novice can master it.
- Uniqueness: The use of baking powder, rather than baking soda, provides a subtle lift that gives the cake a light, fluffy quality. The pinch of salt is a small detail that elevates the sweetness, a trick that most recipes overlook.
- Crowd Reaction: Friends who have tried this version rave about how it feels like a homemade snickerdoodle without the effort. The aroma alone can bring a room together, and the taste keeps them coming back for more. The reaction is often a mix of surprise and delight.
- Ingredient Quality: Choosing high‑quality butter and fresh cinnamon makes a noticeable difference. The butter’s richness and the cinnamon’s aromatic oils bring depth to the cake, making each bite a sensory experience.
- Cooking Method: The microwave technique is fast and reliable, producing consistent results every time. The heat distribution is even, preventing the cake from drying out or burning on the edges.
- Make‑Ahead Potential: The batter can be prepared in advance and stored in the fridge for up to 24 hours. When you’re ready, just microwave it again, and it tastes fresh as if it were made from scratch.
Alright, let's break down exactly what goes into this masterpiece...
Inside the Ingredient List
The Flour Foundation
All-purpose flour provides the structure that holds the cake together. It’s the silent hero that gives the batter its body. If you skip it, the cake collapses into a sticky mess. A higher protein flour can make the cake slightly denser, but for a light crumb, stick to the standard. For a gluten-free version, use a blend that contains xanthan gum to mimic the binding properties of wheat.
The 4 tablespoons of flour translate to 0.25 cups, which is the perfect amount for a single mug. This quantity balances moisture and structure without overpowering the buttery flavor. If you prefer a slightly richer texture, you can add a teaspoon of cornstarch to the mix; it will lighten the crumb even further. When measuring, spoon the flour into your measuring cup and level it off with a knife for accuracy.
If you’re feeling adventurous, try substituting half the all-purpose flour with whole wheat flour for a nuttier taste. The cake will have a slightly denser feel, but the flavor will deepen. Keep in mind that whole wheat flour absorbs more liquid, so you might need to add a splash of milk to compensate. The result is a wholesome, hearty cake that still feels indulgent.
The Sweet Core
Granulated sugar is the sweetener that balances the buttery and spicy elements. Two tablespoons provide enough sweetness without drowning the cake’s subtle flavors. If you’re watching your sugar intake, coconut sugar or a sugar substitute can work, but be aware that the texture may change slightly. The sugar also helps create a slight caramelization on the surface.
When measuring sugar, avoid compacting it into the cup, as this will give you too much sweetness. Instead, spoon the sugar lightly and level it with a flat edge. If you prefer a caramelized finish, you can sprinkle a pinch of brown sugar on top before microwaving. The result is a glossy, caramelized crust that adds a delightful crunch.
A small tip: if you like a more pronounced sweetness, add a dash of honey or maple syrup. This will add moisture and a subtle flavor note that complements the vanilla. Just remember to reduce the milk slightly to keep the batter from becoming too runny. The final product will have a richer, more complex profile.
The Leavening Agent
Baking powder is the leavening agent that gives the cake its rise. The quarter teaspoon is enough to lift the batter without making it too airy. Baking soda, on the other hand, requires an acid to activate and can produce a metallic taste if not balanced. The baking powder in this recipe is pre‑mixed, ensuring a consistent rise every time.
If you don’t have baking powder, you can mix 1/8 teaspoon baking soda with a splash of lemon juice or vinegar. This will create the same leavening effect. The acid will also add a subtle tang that pairs well with the cinnamon. Keep an eye on the batter; it should look slightly foamy before microwaving.
The amount of leavening is critical; too much will cause the cake to collapse, while too little will leave it dense. If you’re experimenting, start with the recommended amount and adjust by a few drops if needed. The goal is a light, fluffy interior that doesn’t sink after microwaving.
The Cinnamon Star
Ground cinnamon is the star that gives this cake its signature snickerdoodle flavor. The quarter teaspoon is enough to coat the batter without overpowering it. Freshly ground cinnamon offers a richer aroma compared to pre‑ground varieties. The spice also adds a subtle warmth that lingers on the palate.
If you’re looking for a twist, try a pinch of nutmeg or a dash of pumpkin spice. This will give the cake a seasonal flair and a different aromatic profile. For a more intense cinnamon flavor, double the amount, but be careful not to make the cake taste like a spice jar. The balance is key to achieving the classic snickerdoodle taste.
The cinnamon also helps to slightly caramelize the surface, creating a delightful crust. When you sprinkle it on top of the batter before microwaving, it melts into the cake, giving a cohesive flavor. If you prefer a dusting after baking, sprinkle a little more on top; it adds a fresh, aromatic finish.
The Butter and Milk Blend
Unsalted butter, melted, adds richness and flavor depth. One tablespoon is enough to keep the cake moist without making it greasy. The butter also contributes to the caramelization on the crust, giving it a golden hue. If you’re dairy‑free, coconut oil or applesauce can work as substitutes.
Milk, at three tablespoons, balances the dry ingredients and creates a smooth batter. Whole milk is ideal for a richer taste, but you can use almond or soy milk if you prefer a dairy‑free option. Avoid flavored milks unless you want a unique twist, as they can alter the flavor profile. The milk also helps the batter rise by creating steam in the microwave.
A quick hack: add a splash of vanilla extract to the milk before mixing. This will infuse the entire batter with a subtle vanilla note that complements the cinnamon. The result is a more cohesive flavor profile that tastes like a classic snickerdoodle. Keep the milk cold to maintain the batter’s consistency.
The Final Touches
Vanilla extract, at a quarter teaspoon, is the final layer of flavor that ties everything together. It adds a warm, sweet aroma that elevates the cake’s overall taste. The vanilla’s subtle sweetness balances the cinnamon and the butter’s richness. If you’re looking for an alternative, almond extract can give a nutty twist.
A pinch of salt is essential; it enhances the sweetness and balances the flavors. Without salt, the cake can taste flat. The pinch is so small that it won’t overpower the batter, but it will make a noticeable difference in flavor. If you’re avoiding salt, you can omit it, but the cake will lack depth.
The combination of these ingredients creates a cake that’s both comforting and indulgent. Each component plays a role in the final flavor and texture. By paying attention to the details, you’ll achieve a perfect snickerdoodle every time.
Everything's prepped? Good. Let's get into the real action...
The Method — Step by Step
- Take a microwave‑safe mug that’s at least 12 ounces. The size matters; a small mug will overflow, while a large mug may undercook the cake. Use a mug that can handle the heat and won’t warp. A ceramic mug is ideal, but glass or stainless steel can work if it’s labeled microwave‑safe.
- Sift the flour and baking powder into the mug. This step removes any clumps and ensures an even distribution of leavening. It also helps the batter rise uniformly. A quick sift is all you need; you don’t need a fancy sifter.
- Add the sugar, cinnamon, and pinch of salt. Stir the dry ingredients together until they’re well‑combined. The mixture should look like a fine powder with a hint of color from the cinnamon. This ensures the spices are evenly distributed in the batter.
- Pour in the melted butter and milk. Mix until the batter is smooth and glossy. The butter adds richness, while the milk provides the necessary moisture. Stir vigorously to avoid lumps; a whisk works best, but a fork will do.
- Add the vanilla extract and stir again. The vanilla will infuse the batter with a warm, sweet aroma that complements the cinnamon. This step is essential for the classic snickerdoodle flavor. Make sure you mix well so that the vanilla is evenly distributed.
- Microwave on high for 90 seconds. The cake should rise and set, but the center will still be slightly wet. Keep a close eye; microwaves vary, so you may need to adjust the time by a few seconds. The cake should look golden on top and firm around the edges.
- Let the mug cake rest for 2 minutes. This pause allows the steam to finish the cooking process and the batter to set. The cake will still feel slightly gooey in the center; this is normal. If you prefer a firmer center, microwave for an additional 15 seconds.
- Serve immediately with a drizzle of maple syrup or a dollop of whipped cream. The warm cake paired with cold cream creates a delightful contrast. If you’re feeling adventurous, sprinkle extra cinnamon on top for added spice.
- Enjoy the soft, buttery texture and the aromatic cinnamon swirl. The cake should melt in your mouth, leaving a lingering sweet aftertaste. Share with friends, and watch their faces light up. Remember, this is a single‑serving wonder that satisfies without the mess of a full pan.
That's it — you did it. But hold on, I've got a few more tricks that'll take this to another level. From the right mug size to the final garnish, every detail matters. The next section will show you how to refine each element for a flawless result.
Insider Tricks for Flawless Results
The Temperature Rule Nobody Follows
Microwave power levels differ between models, so the same time can yield different results. Use a mid‑power setting (around 700 watts) for consistent results. If your microwave is high‑power, reduce the time by 10-15 seconds. This trick ensures the cake rises evenly and doesn’t burn on the edges.
Why Your Nose Knows Best
The aroma is your best indicator of doneness. When the cake starts smelling lightly toasted, it’s almost ready. If the smell is sweet and buttery, you’re on the right track. Trust your nose; it’ll tell you if the cake needs more time or if it’s done.
The 5‑Minute Rest That Changes Everything
Letting the cake rest for 5 minutes allows the steam to finish cooking the interior. This rest period also lets the batter set, preventing it from sliding out of the mug. If you skip this step, the cake may spill or look undercooked.
Avoiding the Sticky Mess
Using a non‑stick mug or lining the mug with parchment paper eliminates the need to scrape the cake. The parchment also makes cleanup a breeze. If you don’t have parchment, a silicone baking mat works just as well.
The Sweet Finish
A quick drizzle of honey or maple syrup after microwaving adds a glossy finish and extra sweetness. The syrup also creates a subtle caramelized crust that enhances the cinnamon flavor. This final touch turns a simple mug cake into a dessert worthy of a celebration.
With these insider tricks, you’ll achieve a snickerdoodle mug cake that’s consistently perfect, no matter the microwave or mug you use. The result is a dessert that feels like a freshly baked cookie, but in a fraction of the time.
Creative Twists and Variations
This recipe is a playground. Here are some of my favorite ways to switch things up:
Chocolate Swirl
Add a tablespoon of cocoa powder to the batter for a chocolatey twist. The cocoa will deepen the flavor and give the cake a richer color. Finish with a drizzle of chocolate sauce for a decadent touch.
Nutty Crunch
Fold in a tablespoon of chopped walnuts or pecans before microwaving. The nuts add a satisfying crunch and a nutty aroma. They also pair beautifully with the cinnamon flavor.
Peanut Butter Delight
Swap the butter for peanut butter to create a nutty, protein‑rich version. Use a tablespoon of peanut butter and a splash of milk to keep the batter moist. The result is a creamy, indulgent cake with a peanut butter kick.
Citrus Zest
Add a teaspoon of lemon or orange zest for a bright, citrusy note. The zest will cut through the sweetness and add a fresh aroma. This variation is perfect for spring or summer cravings.
Spiced Pumpkin
For a fall twist, add a tablespoon of pumpkin puree and a pinch of pumpkin spice. The puree adds moisture and a subtle sweetness. The pumpkin spice blend gives the cake a cozy, autumnal flavor.
Almond Joy
Incorporate a tablespoon of almond extract and a handful of shredded coconut. The almond extract adds a nutty aroma, while the coconut provides texture. This variation feels like a dessert bar with a snickerdoodle base.
These variations allow you to tailor the cake to your mood, dietary needs, or the season. The base recipe is flexible enough to accommodate countless tweaks, making it a staple in any kitchen.
Storing and Bringing It Back to Life
Fridge Storage
Store the batter in a sealed container for up to 24 hours. The batter will keep its freshness, and the flavors will meld. When ready to use, microwave for an additional 15-20 seconds. The cake will taste almost as fresh as when first made.
Freezer Friendly
The batter freezes well for up to two weeks. Wrap it tightly in plastic wrap and place it in an airtight container. Thaw overnight in the fridge, then microwave for 20-25 seconds. The texture remains light and airy.
Best Reheating Method
Add a splash of water before microwaving to create steam and keep the cake moist. Cover the mug with a microwave‑safe lid or a paper towel to trap heat. Reheat for 10-15 seconds until warm. The cake will be soft and fluffy, just like new.
The key to a great reheated mug cake is to keep it moist. The water trick ensures the batter doesn’t dry out, maintaining the desirable texture. With these storage tips, you can enjoy a fresh, delicious cake anytime you crave it.