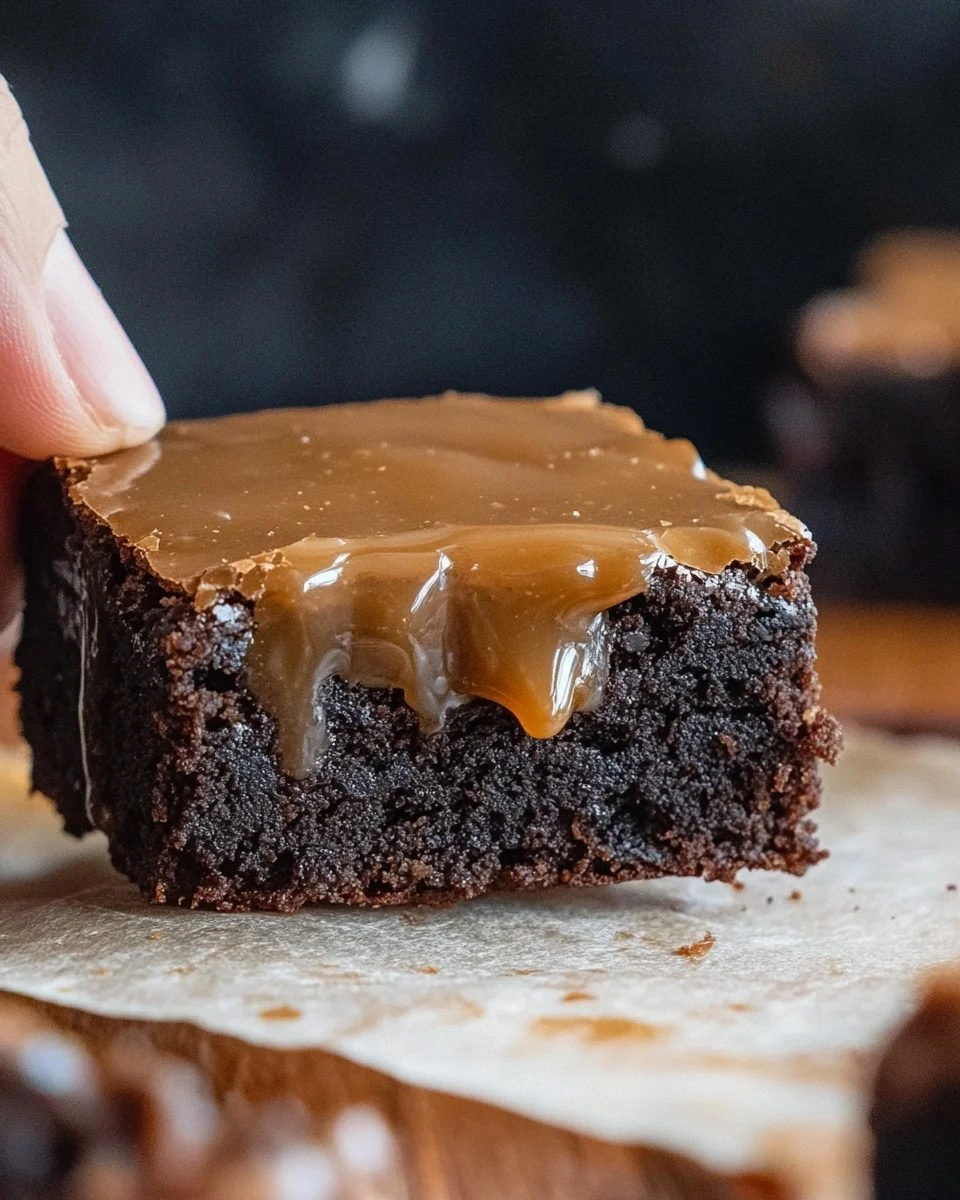
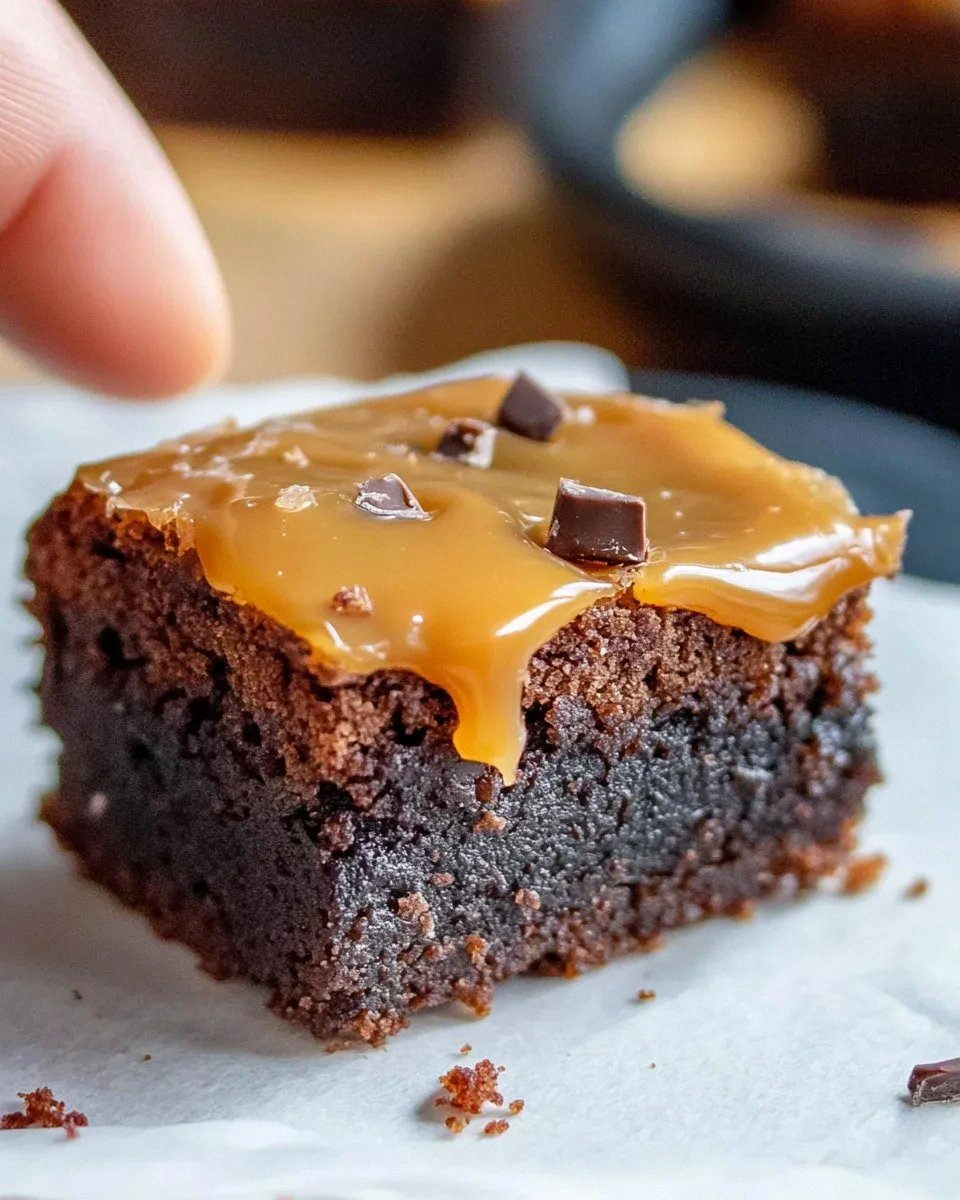
Picture this: you’re standing in a kitchen that smells like a bakery after a midnight bake‑off, the air thick with the sweet, buttery perfume of caramel that’s just begun to bubble. The oven hums, the timer clicks, and somewhere in the background a friend dares you, “I bet you can’t make a brownie that makes people cry with joy.” I accepted that challenge with a grin, a whisk, and a secret weapon that I’d been perfecting for months. The result? A brownie so fudgy it feels like stepping into a memory of childhood after‑school treats, layered with a caramel that drips like liquid gold and finishes with a whisper of flaky sea salt that sings on the tongue.
Now, let me take you on a sensory tour. The moment you open the pan, the first thing you’ll notice is the glossy caramel sheen, catching the light like a caramelized sunrise. The edges of the brownie have cracked just enough to reveal a crackling, crunchy crust that shatters like thin ice under a spoon, while the center remains soft, almost molten, a deep cocoa dream that clings to your fork. As you bite, the caramel swirls around the chocolate, a buttery river that coats each crumb like velvet, and the sea salt crystals pop, delivering a surprise that makes your taste buds do a little happy dance.
What makes this version truly stand out is the marriage of technique and ingredient quality. Most brownie recipes either skimp on the caramel or over‑sweeten it, ending up with a soggy mess that never quite reaches that perfect balance. I’ve cracked the code by caramelizing the sugar with a precise amount of butter, then enriching it with heavy cream and a splash of vanilla, creating a sauce that’s thick enough to hold its own but still fluid enough to swirl through the batter. The brownie itself is a harmonious blend of dark chocolate chips, unsweetened cocoa, and a touch of powdered sugar that lifts the flavor without overwhelming the caramel.
And here’s the kicker: I’m going to reveal a technique that most home bakers overlook—tempering the caramel with a dash of fine salt right at the end of cooking. This tiny addition amplifies the caramel’s depth, turning a simple sweet sauce into a complex, almost savory experience. Okay, ready for the game‑changer? Let me walk you through every single step — by the end, you’ll wonder how you ever made it any other way.
What Makes This Version Stand Out
- Flavor Explosion: The caramel is infused with vanilla and a pinch of fine salt, creating a sweet‑salty symphony that dances with the dark chocolate.
- Texture Contrast: Expect a crisp, caramelized edge, a fudgy, melt‑in‑your‑mouth center, and a buttery swirl that’s smooth as silk.
- Simplicity Meets Sophistication: Despite the impressive result, the ingredient list is short, and the steps are straightforward enough for a weekend warrior.
- Ingredient Quality: Using real unsalted butter, heavy cream, and high‑quality dark chocolate chips ensures every bite feels indulgent.
- Crowd‑Pleaser Factor: I dare you to taste this and not go back for seconds—guests will be begging for the recipe.
- Make‑Ahead Magic: These brownies keep beautifully for up to a week, and the caramel actually gets better after a night of rest.
- Versatile Base: The brownie batter is sturdy enough to handle mix‑ins, yet tender enough to let the caramel shine.
- Season‑Proof: Whether it’s a chilly winter night or a sunny summer afternoon, this dessert fits any occasion.
Inside the Ingredient List
The Flavor Base
1 cup granulated sugar – This is the backbone of your caramel. Granulated sugar melts into a clear, amber liquid that provides the sweet foundation. If you substitute brown sugar, you’ll introduce molasses notes that can muddy the caramel’s clean flavor.
6 Tbsp unsalted butter – Butter adds richness and a buttery mouthfeel that makes the caramel glossy. Using unsalted butter lets you control the salt level precisely later on.
1/2 cup heavy cream – The cream stops the caramel from hardening too quickly, giving it that luxurious, pour‑able consistency. Skim milk would make it watery; stick with at least 35% fat.
1 tsp vanilla extract or vanilla bean paste – Vanilla amplifies the caramel’s sweetness while adding a warm, aromatic depth. Vanilla beans would be even more intense, but the extract works wonders.
1/2 tsp fine salt – A pinch of fine salt at the end of the caramel cooking process elevates every flavor, turning simple sweetness into a nuanced experience.
The Texture Crew
1 1/2 cups granulated sugar – This larger amount sweetens the brownie batter without making it cloying. It also helps create that delicate crumb structure.
3/4 cup all‑purpose flour – Flour provides the framework for the fudgy interior. Using a light hand when folding prevents a cakey texture.
2/3 cup unsweetened cocoa powder – Cocoa gives the brownies their deep, chocolatey backbone. Opt for Dutch‑process cocoa for a smoother, less acidic flavor.
1/2 cup powdered sugar – Powdered sugar dissolves instantly, ensuring a silky batter that won’t leave gritty pockets.
1/2 cup dark chocolate chips – These melt into pockets of molten chocolate, adding bursts of richness that complement the caramel.
1/2 tsp fine salt – A second pinch of salt balances the chocolate’s bitterness and ties the whole dessert together.
The Unexpected Star
2 large eggs – Eggs bind the batter, trap air, and create that tender, slightly chewy crumb. Over‑beating can make the brownies tough, so mix just until combined.
1/4 cup vegetable or canola oil – Oil keeps the brownies moist and gives them that glossy finish. It also helps the batter spread evenly in the pan.
1/4 cup unsalted butter – Melted butter enriches the batter, providing a buttery flavor that mirrors the caramel’s richness.
2 Tbsp water – A splash of water helps the caramel achieve the perfect consistency and prevents it from seizing.
1 tsp vanilla extract or vanilla bean paste – Adding vanilla again in the batter creates a harmonious bridge between caramel and chocolate.
Flaky sea salt – Sprinkled on top just before serving, these crystals add a crunchy, briny contrast that makes each bite unforgettable.
Everything's prepped? Good. Let’s get into the real action…
The Method — Step by Step
-
Start by gathering a heavy‑bottomed saucepan, a whisk, and a heat‑proof spatula. Toss the 1 cup of granulated sugar into the dry pan over medium‑high heat. As the sugar begins to melt, it will clump—don’t stir yet; instead, gently swirl the pan to help the crystals melt evenly. When the sugar turns a deep amber, that’s your cue to add the 6 Tbsp of unsalted butter, letting it melt into the sugar like a sunrise over a caramel lake.
Kitchen Hack: Keep the heat steady—if the caramel starts to smoke, lower the flame immediately. Smoke means burnt sugar, and burnt sugar means bitter brownies. -
Once the butter is fully incorporated, slowly drizzle in the 1/2 cup heavy cream while whisking continuously. The mixture will bubble up vigorously—this is normal and signals that the caramel is reaching its perfect consistency. Add the 2 Tbsp of water to keep the caramel from hardening too fast, then stir in 1 tsp of vanilla extract and the 1/2 tsp fine salt. Let the sauce simmer for another 30 seconds, then remove from heat and set aside to cool slightly.
Watch Out: If the caramel hardens instantly when you add the cream, the pan is too hot. Remove it from the burner for a few seconds, then resume. -
While the caramel cools, preheat your oven to 350°F (175°C) and line a 9×13‑inch baking pan with parchment paper, allowing some overhang for easy removal. In a large mixing bowl, whisk together 1 1/2 cups granulated sugar, 1/2 cup powdered sugar, and the 2 large eggs until the mixture is pale and fluffy—this should take about 2 minutes of vigorous whisking.
-
In a separate bowl, sift together the 3/4 cup all‑purpose flour, 2/3 cup unsweetened cocoa powder, and the second 1/2 tsp fine salt. Sifting eliminates lumps and ensures the cocoa is evenly distributed, which is crucial for that smooth, velvety crumb.
-
Now, melt the 1/4 cup unsalted butter together with the 1/4 cup vegetable oil in a microwave‑safe bowl for about 45 seconds, or melt them in a tiny saucepan over low heat. Pour this melted fat into the egg‑sugar mixture, followed by the vanilla extract (another 1 tsp). Stir gently until just combined—over‑mixing will develop gluten and make the brownies cakey.
Kitchen Hack: Add the melted butter and oil in a slow, steady stream while whisking to create a glossy batter that traps air for a light texture. -
Fold the dry ingredients into the wet mixture in two additions, using a rubber spatula. Stop mixing as soon as you see no streaks of flour—this is the moment of truth for a fudgy brownie. Finally, fold in the 1/2 cup dark chocolate chips, ensuring they are evenly distributed.
-
Pour the brownie batter into the prepared pan, spreading it evenly. Then, dollop the slightly cooled caramel in generous spoonfuls over the surface. Using a butter‑slicked skewer or a thin knife, gently swirl the caramel through the batter, creating a marbled effect. The caramel should remain in distinct ribbons—don’t over‑mix, or you’ll lose that beautiful contrast.
-
Slide the pan into the oven and bake for 30‑35 minutes. You’ll know they’re done when the edges pull away from the pan, a thin crust forms, and a toothpick inserted into the center comes out with a few moist crumbs but no wet batter. The top should look set, with caramel ribbons still glossy.
Watch Out: Opening the oven door too early can cause the brownies to collapse. Trust the timer and the visual cues. -
Allow the brownies to cool completely in the pan—this is crucial for clean slicing. Once cool, lift the parchment overhang to release the slab, then cut into squares. Before serving, sprinkle a modest pinch of flaky sea salt over each piece; the crystals will sit atop the caramel, delivering that final pop of flavor.
That’s it — you did it. But hold on, I’ve got a few more tricks that’ll take this to another level…
Insider Tricks for Flawless Results
The Temperature Rule Nobody Follows
Never bake brownies straight from the refrigerator. Let the batter sit at room temperature for 10‑15 minutes before it hits the oven. This small pause allows the butter and chocolate to meld, preventing a dense, uneven crumb. I once tried skipping this step and ended up with a brownie that felt more like a dense cake—lesson learned.
Why Your Nose Knows Best
When the caramel reaches a deep amber hue, trust your nose more than the clock. The scent of toasted sugar is the true indicator that the caramel has hit the perfect stage. If you rely solely on timing, you risk either under‑cooked syrup or a burnt, bitter mess.
The 5‑Minute Rest That Changes Everything
After pulling the brownies from the oven, let them rest on a wire rack for exactly five minutes before cutting. This short rest lets the interior set just enough to hold its shape while keeping the center gooey. Cutting too early results in crumbly edges and a messy plate.
Salt Timing Is Everything
Adding fine salt to the caramel at the very end of cooking, and sprinkling flaky sea salt just before serving, creates a layered salty experience. The first pinch enhances the caramel’s depth; the second adds a crunchy pop that awakens the palate.
Pan Choice Matters
A light‑colored metal pan reflects heat more evenly than a dark glass dish, which can cause the edges to over‑brown while the center stays undercooked. If you only have a glass pan, lower the oven temperature by 25°F and add an extra 5 minutes to the bake time.
Creative Twists and Variations
This recipe is a playground. Here are some of my favorite ways to switch things up:
Salted Peanut Butter Swirl
Replace half of the caramel with a smooth peanut butter sauce, and sprinkle a pinch of sea salt on top. The nutty richness pairs beautifully with the chocolate, creating a flavor reminiscent of a classic candy bar.
Espresso Infused Caramel
Stir in 1 tsp of finely ground espresso into the caramel while it’s simmering. The coffee notes deepen the chocolate’s bitterness, delivering a sophisticated mocha‑caramel experience.
White Chocolate & Raspberry
Swap the dark chocolate chips for white chocolate chunks and fold in a handful of freeze‑dried raspberry pieces into the batter. The tart berries cut through the sweetness, while the white chocolate adds a buttery melt.
Spiced Chai Twist
Add ½ tsp of ground cinnamon, a pinch of ground cardamom, and a dash of ginger to the dry ingredients. The warm spices give the brownies a cozy, autumnal vibe that’s perfect for chilly evenings.
Nutty Crunch
Fold in ½ cup of toasted chopped pecans or walnuts just before baking. The nuts add a satisfying crunch that contrasts the soft caramel, and their buttery flavor complements the chocolate.
Vegan Adaptation
Replace the eggs with a “flax egg” (1 tbsp ground flaxseed + 3 tbsp water per egg) and swap butter for coconut oil. Use a plant‑based dark chocolate chip. The result is a slightly denser brownie, but still indulgent.
Storing and Bringing It Back to Life
Fridge Storage
Place the cooled brownies in an airtight container and store them in the refrigerator for up to 5 days. The caramel will firm up slightly, but a quick microwave zap (10‑15 seconds) will bring it back to a luscious pour‑able state.
Freezer Friendly
Wrap individual squares tightly in plastic wrap, then place them in a freezer‑safe bag. They’ll keep for up to 3 months. To reheat, let them thaw at room temperature for 20 minutes, then microwave for 15 seconds and drizzle a splash of heavy cream to revive the caramel sheen.
Best Reheating Method
When you’re ready to serve, preheat your oven to 300°F (150°C) and warm the whole slab for 8‑10 minutes. This gentle heat revives the fudgy interior without drying it out. For an extra touch, add a tiny splash of water to the pan before reheating; the steam will coax the caramel back to its glossy glory.